Create Database Table and Generate UI Service
- How to create an ABAP package
- How to create a database table
- How to create a data generator class
- How to generate transactional UI services
- How to preview the travel app


Prerequisites
- You need to have access to an SAP BTP, ABAP environment, or SAP S/4HANA Cloud, ABAP environment or SAP S/4HANA (release 2022 or higher) system.
For example, you can create free trial user on SAP BTP, ABAP environment. - You have downloaded and installed the latest ABAP Development Tools (ADT) on the latest Eclipse© platform.
- You have created an ABAP Cloud Project.
- Make sure, your system has the ABAP flight reference scenario. If your system hasn’t this scenario. You can download it here. The trial systems have the flight scenario included.
In this exercise, you will create an ABAP package and database table. In your database table you will define all important fields. To fill all your database table fields, you will create an ABAP class and run it. With the transactional UI services you will be able to define all your UI services in one step. This includes the data model, projection view, service definition and service binding. Afterwards you will check your Travel application with the SAP Fiori elements preview.
- Step 1
Create your exercise package. This ABAP package will contain all the artefacts you will be creating in the different exercises of this tutorial.
-
In ADT, go to the Project Explorer, right-click on the package
ZLOCAL, and select New > ABAP Package from the context menu. -
Maintain the required information (
###is your group ID):- Name:
ZRAP100_### - Description: RAP100 Package
###
Select the box Add to favorites package
Click Next >.
- Name:
-
Select a transport request, maintained a description (e.g.
RAP100 Package ###), and click Finish.
-
- Step 2
Create a database table
to store the Travel data.
A Travel entity defines general travel data, such as the agency ID or customer ID, overall status of the travel booking, and the price of travel.-
Right-click on your ABAP package
ZRAP100_###and select New > Other ABAP Repository Object from the context menu. -
Search for database table, select it, and click Next >.
-
Maintain the required information (
###is your group ID) and click Next >.- Name:
ZRAP100_ATRAV### - Description: Travel data

- Name:
-
Select a transport request, and click Finish to create the database table.
-
Replace the default code with the code snippet provided below and replace all occurrences of the placeholder
###with your group ID using the Replace All function (CTRL+F).ABAPCopy@EndUserText.label : 'Travel data' @AbapCatalog.enhancement.category : #NOT_EXTENSIBLE @AbapCatalog.tableCategory : #TRANSPARENT @AbapCatalog.deliveryClass : #A @AbapCatalog.dataMaintenance : #RESTRICTED define table zrap100_atrav### { key client : abap.clnt not null; key travel_id : /dmo/travel_id not null; agency_id : /dmo/agency_id; customer_id : /dmo/customer_id; begin_date : /dmo/begin_date; end_date : /dmo/end_date; @Semantics.amount.currencyCode : 'zrap100_atrav###.currency_code' booking_fee : /dmo/booking_fee; @Semantics.amount.currencyCode : 'zrap100_atrav###.currency_code' total_price : /dmo/total_price; currency_code : /dmo/currency_code; description : /dmo/description; overall_status : /dmo/overall_status; attachment : /dmo/attachment; mime_type : /dmo/mime_type; file_name : /dmo/filename; created_by : abp_creation_user; created_at : abp_creation_tstmpl; local_last_changed_by : abp_locinst_lastchange_user; local_last_changed_at : abp_locinst_lastchange_tstmpl; last_changed_at : abp_lastchange_tstmpl; } -
Save
and activate the changes.
-
- Step 3
Create an ABAP class
to generate demo travel data.
-
Right-click your ABAP package
ZRAP100_###and select New > ABAP Class from the context menu. -
Maintain the required information (
###is your group ID) and click Next >.- Name:
ZCL_RAP100_GEN_DATA_### - Description: Generate demo data

- Name:
-
Select a transport request and click Finish to create the class.
-
Replace the default code with the code snippet provided in the source code document
ZRAP100_GEN_DATA_###linked below and replace all occurrences of the placeholder###with your group ID using the Replace All function (CTRL+F).ABAPCopyCLASS zcl_rap100_gen_data_### DEFINITION PUBLIC FINAL CREATE PUBLIC . PUBLIC SECTION. INTERFACES if_oo_adt_classrun. PROTECTED SECTION. PRIVATE SECTION. ENDCLASS. CLASS zcl_rap100_gen_data_### IMPLEMENTATION. METHOD if_oo_adt_classrun~main. DATA: group_id TYPE string VALUE '###', attachment TYPE /dmo/attachment, file_name TYPE /dmo/filename, mime_type TYPE /dmo/mime_type. * clear data DELETE FROM zrap100_atrav###. * DELETE FROM zrap100_dtrav###. "insert travel demo data INSERT zrap100_atrav### FROM ( SELECT FROM /dmo/travel AS travel FIELDS travel~travel_id AS travel_id, travel~agency_id AS agency_id, travel~customer_id AS customer_id, travel~begin_date AS begin_date, travel~end_date AS end_date, travel~booking_fee AS booking_fee, travel~total_price AS total_price, travel~currency_code AS currency_code, travel~description AS description, CASE travel~status "[N(New) | P(Planned) | B(Booked) | X(Cancelled)] WHEN 'N' THEN 'O' WHEN 'P' THEN 'O' WHEN 'B' THEN 'A' ELSE 'X' END AS overall_status, @attachment AS attachment, @mime_type AS mime_type, @file_name AS file_name, travel~createdby AS created_by, travel~createdat AS created_at, travel~lastchangedby AS last_changed_by, travel~lastchangedat AS last_changed_at, travel~lastchangedat AS local_last_changed_at ORDER BY travel_id UP TO 10 ROWS ). COMMIT WORK. out->write( |[RAP100] Demo data generated for table ZRAP100_ATRAV{ group_id }. | ). ENDMETHOD. ENDCLASS. -
Save
and activatethe changes. -
Run your console application. For that, select your ABAP class
ZCL_RAP100_GEN_DATA_###, select the run button > Run As > ABAP Application (Console) F9 or press F9. A message will be displayed ABAP Console.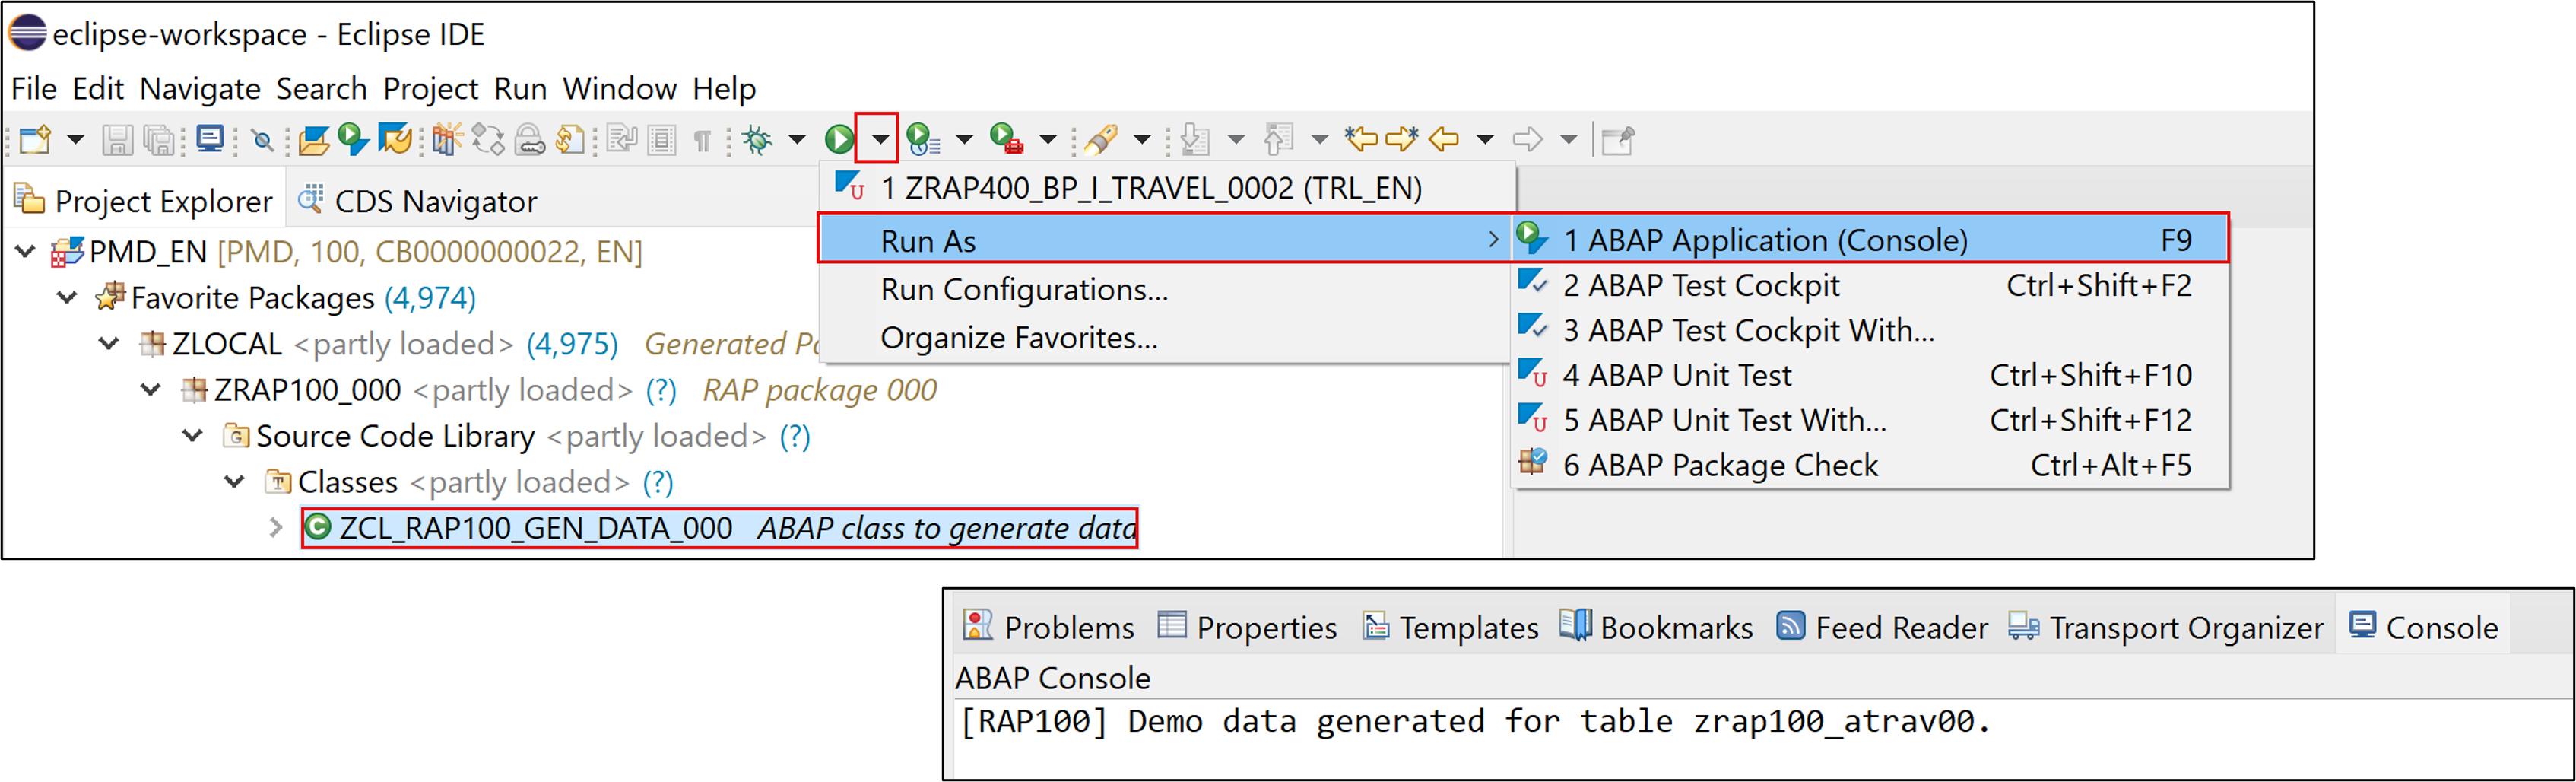
-
Open your database table
ZRAP100_ATRAV###and press F8 to start the data preview and display the filled database entries, i.e. travel data.
-
- Step 4
Create your OData v4 based UI services with the built-in ADT generator.
The generated business service will be transactional, draft-enabled, and enriched with UI semantics for the generation of the Fiori elements app.-
Right-click your database table
ZRAP100_ATRAV###and select Generate ABAP Repository Objects from the context menu. -
Maintain the required information (
###is your group ID) and click Next >:- Description:
Travel App ### - Generator:
ABAP RESTful Application Programming Model: UI Service

Generator: Cloud System Generator: On Premise System 1. Select OData UI Service and click Next >. 
1. Provide a description, select ABAP RESTful Application Programming Model: UI Service and click Next >. 
2. Click Next >. 
- Description:
-
Maintain the required information on the Configure Generator dialog to provide the name of your data model and generate them.
Maintain the required information on the Configure Generator dialog to provide the name of your data model and generate them.For that, navigate through the wizard tree (Business Objects, Data Model, etc…), maintain the artefact names provided in the table below,
and press Next >.Verify the maintained entries and press Next > to confirm. The needed artifacts will be generated.
About Naming Conventions
The main aspects of the naming conventions of SAP S/4HANA’s Virtual Data Model (VDM) are used in this exercise.
More information on VDM can be found on the SAP Help portal: Here.Attention
Please make sure to replace all the name proposals in the wizard with the names provided below.
Doing this is important to ensure the correctness of the code snippets provided in the following exercises.RAP Layer Artefacts Artefact Names Business Object Data Model CDS Entity Name: ZRAP100_R_TRAVELTP_###CDS Entity Name Alias: TravelBehavior Implementation Behavior Class: ZRAP100_BP_TRAVELTP_###Draft Table Name: ZRAP100_DTRAV###Service Projection Service Projection Entity CDS Entity Name: ZRAP100_C_TRAVELTP_###Service Projection Behavior Behavior Implementation Class: ZRAP100_BP_C_TRAVELTP_###Business Service Service Definition Service Definition Name: ZRAP100_UI_TRAVEL_###Service Binding Service Binding Name: ZRAP100_UI_TRAVEL_O4_###Binding Type: OData V4 - UI
-
Go to the Project Explorer, select your package

ZRAP100_###, refresh it by pressing F5, and check all generated ABAP repository objects
Below is a brief explanation of the generated artefacts for the different RAP layers: Base BO, BO Projection, and Business Service.
Base Business Object (BO)
ZRAP100_I_TRAVEL_###
BO Projection
ZRAP100_C_TRAVEL_###The BO projection represents the consumption specific view on the BO data model and behavior.

Business Service

-
- Step 5
-
Open your metadata extension
ZRAP100_C_TRAVELTP_###and adjust it.The field attachment is a raw string (data type
RAWSTRING) and cannot be used in the filter bar, so the annotation@UI.selectionFieldis not allowed for this field and should be removed. Therefore, remove following annotation block for the field attachment:ABAPCopy@UI.selectionField: [ { position: 10 } ]
-
Save and activate.
-
- Step 6
Hint: In SAP S/4HANA on premise or private cloud systems publishing the local service endpoint of your OData V4 service binding does not work from within ADT. Therefore you have to publish the service binding locally using transaction
/IWFND/V4_ADMINin these systems.Publish the local service endpoint of your service binding
and start the Fiori elements App Preview.
-
Open your service binding
ZRAP100_UI_TRAVEL_O4_###and click Publish. -
Double-click on the entity Travel in the Entity Set and Association section to open the Fiori elements App Preview.

-
Click the button on the Travel app Go to load the data.
-
Check your result.

-
- Step 7
Hint: In SAP S/4HANA on premise or private cloud systems publishing the local service endpoint of your OData V4 service binding does not work from within ADT. Therefore you have to publish the service binding locally using transaction
/IWFND/V4_ADMINin these systems.-
In the menu click on the button Run ABAP Development Object as ABAP Application in SAPGUI or press
Alt+F8.
-
Type
/iwfnd/v4_adminas a search string and double-click on the entry/IWFND/V4_ADMIN(Transaction).
-
Click the button Publish Service Groups to get a list of service groups that can be published.

-
Enter following values to search for the service group of your service and press the button Get Service Groups:
- System Alias: LOCAL
- Service Group ID:
Z*###*

-
Select the entry
ZRAP100_UI_TRAVELTP_O4_###from the list and press the button Publish Service Groups.
-
In the following popup enter a meaningful description such as
Travel App ###.
-
You are now asked to provide a customizing request. Choose an existing customizing request or create a new one and choose a meaningful description.

-
Confirm the success message and press Enter.

-
Navigate back to your service binding in the project explorer. Right click on it and choose Refresh.

-
Check that your service bindings is now publish and choose the entity Travel and press the button Preview.
-