Capture and Declare an Application to Trigger Technical Events
- How to capture and declare a Sales Orders application
- How to declare the elements


Prerequisites
- Step 1
The first step consists in creating a project.
-
In the Lobby of SAP Build, choose Create.

-
Select Build an Automated Process.

-
Select Task Automation.

-
In the Create a Task automation project window, name the project Get Order Details and choose Create.

-
You will be navigated to the Get Order Details project overview page.
-
You will be prompted to configure your agent version. Select the agent version that is registered on your machine.
-
Choose Confirm.

-
A pop-up window asking you to create an automation will appear, please choose Cancel.

What is going on?
As you will be using the capture feature, you do not need to create an automation but an application.
The next step would be to create your application within your project.
-
- Step 2
Now you can start capturing the application you wish to retrieve the order details from.
-
Open the Browse Orders application in a different window. You will capture the details of one order from the Browse Order page. To do so, select an order.
Make sure the Browse Order page is open in a separate window than SAP Build Process Automation.
-
Navigate back to the Overview tab.
-
In the Overview page, select Create and then Application.
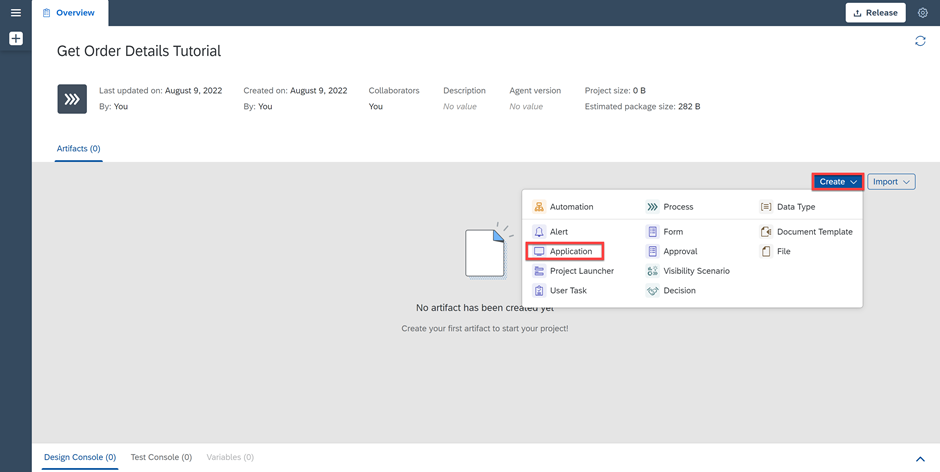
-
In the Create Application window, name your application: Browse Orders and choose Create.

-
Select the Browse Orders screen from the list, choose Next.

-
Choose Manual Capture as type ad select Capture.

The screen that you captured will appear in SAP Build Process Automation.
-
Choose Go to Application to view it.

-
In the Screen Details panel change the name to Order Details.
-
Remove the criteria Mainframe and add the criteria URL.
-
Select the URL criteria and change the Operator to contains and the Value to tab=shipping. Choose Apply.
-
Choose Save.

-
- Step 3
-
You will now declare an Order Reference on the Order Details screen.
-
You may choose Both to have a view of the screen and the tree.
-
Find the element that corresponds to an order. In this case, order 7991 is chosen.
-
In the Element Details panel, remove Text as criteria and add id as criteria.
-
Change the Name to Order Reference.
-
Choose Declare Element and hit Save.

-
- Step 4
-
You will now declare the customer name related to order 7991. Select the Order Details screen.
-
Choose Both to have a view of the screen and the tree.
-
Find the element that corresponds to the customer
Berglunds snabbköp. -
In the Element Details panel, remove Text as criteria and add id and class as criteria.
-
Change the Name to Customer Name.
-
Choose Declare Elements and hit Save.

-
- Step 5
-
You will now declare the order amount of this order. Select the Order Details screen.
-
Select the order amount on the screen.
-
In the Element Details panel, change the name to Order Amount.
-
Remove Text as criteria and add id and class.
-
Choose Declare Element and hit Save.

-
- Step 6
-
You will declare the shipping address name. Select the Order Details screen.
-
Choose Both to have a view of the screen and the tree.
-
Find the DIV that corresponds to the shipping address name on the screen.
-
In the Element Details panel, change the name to Shipping Address Name.
-
Remove Text as criteria and add class and nth-child-tag=1.
-
Choose Declare Element and hit Save.

-
You will move on to declare the next shipping detail: the street. Select the Order Details screen.
-
Choose Both to have a view of the screen and the tree.
-
Find the DIV that corresponds to the shipping address street on the screen.
-
In the Element Details panel, change the name to Shipping Address Street.
-
Remove Text as criteria and add Class and nth-child-tag=3.
-
Choose Declare Element and hit Save.

-
You will declare the next shipping detail: the zip code/city. Select the Order Details screen.
-
Choose Both to have a view of the screen and the tree.
-
Find the DIV that corresponds to the shipping address zip code/city on the screen.
-
In the Element Details panel, change the name to Shipping Address Zip Code City.
-
Remove Text as criteria and add class and nth-child-tag=5.
-
Choose Declare Element and hit Save.

-
You will declare the next shipping detail: the region. Select the Order Details screen.
-
Choose Both to have a view of the screen and the tree.
-
Find the DIV that corresponds to the shipping address region on the screen.
-
In the Element Details panel, change the name to Shipping Address Region.
-
Remove Text as criteria and add class and nth-child-tag=7.
-
Choose Declare Element and hit Save.

-
Lastly, you will declare the last shipping detail: the country. Select the Order Details screen.
-
Choose Both to have a view of the screen and the tree.
-
Find the DIV that corresponds to the shipping address country on the screen.
-
In the Element Details panel, change the name to Shipping Address Country.
-
Remove Text as criteria and add class and nth-child-tag=9.
-
Choose Declare Element and hit Save.

-
- Step 7
Now you will declare the Line Items on the Order Details screen.
-
First, you will declare the Table Header (TH) element:
- Select the Order Details screen.
- Choose Both to have a view of the screen and the tree.
- Find the TH that corresponds to the Product header on the screen.
- In the Element Details panel, change the name to Table Header.
- Remove Text as criteria.
- Choose Declare Element.

- Now choose the three dots next to the TH element and select Set as collection.
The Table Header consists of several items hence it needs to be set as a collection.
- Choose Save.

-
Next, you will declare the Table Row (TR) element:
- Select the Order Details screen.
- Choose Both to have a view of the screen and the tree.
- Find the TR that corresponds to the first row’s table on the screen.
- In the Element Details panel, change the name to Table Row.
- Remove Text as criteria.

-
Now choose the three dots next to the TR element and select set as collection.
-
Choose Declare Element and hit Save.

-
Then, you will declare each of the columns of the table. You will do so by creating collections for each column.
-
Start by declaring the Table Data (TD) element for the Product column. On the Order Details screen:
- Choose Both to have a view of the screen and the tree.
- Find the TD that corresponds to the data found in the first row’s table of the Product column on the screen.
- In the Element Details panel, change the name to Table Product.
- Remove Text as criteria and add aria-colindex.
- Choose Declare Element.

- Now choose the three dots next to the TD element and select Set as collection.
- Click on Save.

-
Secondly, you will declare the Table Data (TD) element for the Unit Price column. On the Order Details screen:
- Choose Both to have a view of the screen and the tree.
- Find the TD that corresponds to the data found in the first row’s table of the Unit Price on the screen.
- In the Element Details panel, change the name to Table Unit Price.
- Remove Text as criteria and add aria-colindex.
- Choose Declare Element.

- Now choose the three dots next to the TD element and select Set as collection.

- In the tree, find the SPAN that corresponds to the data found in the first row’s table of the Unit Price column.
- Right click on the SPAN and select Add to criteria.

- Remove id as criteria and add class.
- Select the three dots next to SPAN criteria and select Set as target element.

- Now, select the three dots again and select Set as single element.
- Click on Save.

What is going on?
As the text criteria for the collection of TD does not render the value displayed on the table (i.e. 9.31 EUR Emphasized Object Number), you need to work through the tree to find the criteria that displays the value needed. (i.e. 9.31 EUR). In this use case, the SPAN needs to be added as criteria and set as target and single element to your collection of TD.

-
Thirdly, you will declare the Table Data (TD) element for the Quantity column. Select the Order Details screen:
- Choose Both to have a view of the screen and the tree.
- Find the TD that corresponds to the data found in the first row’s table of the Quantity column on the screen.
- In the Element Details panel, change the name to Table Quantity.
- Remove Text as criteria and add aria-colindex.
- Choose Declare Element.

- Now choose the three dots next to the TD element and select Set as collection.
- Click on Save.

-
Finally, you will declare the Table Data (TD) element for the Total column. Select the Order Details screen.
As for the Unit Price, you will need to declare the SPAN as criteria and set it as target and single element to your collection of TD.
Let’s do this but in a different way yielding the same result:
- Choose Both to have a view of the screen and the tree.
- Find the SPAN that corresponds to the data found in the first row’s table of the Total on the screen.
- In the Element Details panel, change the name to Table Total.
- Remove Text as criteria and add class.
- Choose Declare Element.

- Now right click on the TD in the tree corresponding to the data found in the first row’s table of the Total on the screen, and select Add to criteria.

- Remove id and add aria-colindex.
- Choose Set as collection by clicking on the icon this time.

- Choose Save.

Now that the application is fully captured and declared, you may start designing your automation.
In what case do you set as collection an element?
-