Capture Orders Management SAP UI5 Application Using Recorder
- How to use the recorder for SAPUI5 applications to prepare screens for automation
- How to use Multi Dimensional Collection in an automation

Prerequisites
- Install and Setup the Desktop Agent
- You have enabled SAP Build Process Automation browser extension
In this tutorial, you will record SAPUI5 application screens using SAP Build Process Automation Recorder and declare multiple screens and elements which can be used later in an automation. You will capture Orders Management application screens and search for an order using supplier name. Later, you will extend this use case to read an excel file with supplier names and search for orders.
- Step 1
Navigate to SAP Build Process Automation tenant to create a new project for this specific automation.
-
In the SAP Build Lobby, select Create.

-
Select Build an Automated Process.

-
Select Task Automation.

-
Enter the Project Name as Order Management Using Recorder and select Create.

-
Once the project opens in a new tab, select your agent version in the Configure agent version dialog box and select Confirm.

-
In the Create Automation dialog box, select Cancel.

-
- Step 3
-
Make sure the SAPUI5 application is opened in a separate window, not just in a new tab. The Desktop Agent must be running and connected to the right tenant.
-
In the project window, click the Create button and then select the Application artifact from the artifact menu.

-
In the Create Application dialog box, enter the Application Name as Orders Management and select Create.

-
Select the screen named Browse Orders. This is your SAPUI5 application.

-
Choose Next.

-
Make sure the Type is set to Recorder and select Record.

-
The Browse Orders application opens and the recording controls appear.

CAUTION: If the window with recording controls is not fully visible, click and hold on the drag section (refer to the following screenshot) and move the window. Release the left mouse button to finish.

-
- Step 4
Now, you will record your first step.
-
Click the Record button. Recording starts and your first screen is captured as shown in the following screenshot.

-
Click on the search box in the SAPUI5 application window, type Bottom- and click the Search button. Order 2686 appears and the new step is displayed in the recorder window as shown in the following screenshot.

-
Now, click the Capture button.

You will see a second line is added to the recording steps.

-
Choose Order 2686.

After the click, your screen must look like the following screenshot:

-
Click again the Capture button.
Your screen must look like the following screenshot:

-
Click the Stop button.

-
Click the Export button in the recorder window to finish the capturing activity.

Wait until the recording is saved. The SAP Build Process Automation project opens with new automation steps that have been recorded using Recorder.

-
- Step 5
Now, you can test the automation. This step is optional, however it is highly recommended to check whether the automation runs smoothly.
-
Close the SAPUI5 application (in a separate window) and click the Test button.

-
Click the Test button.

-
Wait until the package is generated and all SDKs are downloaded. You will see that the SAPUI5 application opens in a separate window, all steps are executed and the window gets closed. Test results are shown on the screen.

-
- Step 6
By using the recorder, you already captured three screens that you will use in your automation. Now, you will define various elements on those screens. You will use these screens and elements in the automation later.
You do not have anything to declare for your first screen because the screen recording has already captured and defined everything. You only need to rename the screen to make it more meaningful.
-
Open the Orders Management application tab.
-
Select Capture 1 screen and change the name to Order List Screen then press enter.

-
- Step 7
You will rename the second screen from Capture 2 to Search Result Screen.

Next, you will rename elements on the second screen.
-
Make sure the second screen you just renamed to Search Result Screen is selected.
-
Choose Order 2686.
-
Rename the element to Order Found.
-
Change the Element Class to SAPUI5 Recorder.
-
Remove the text equals identifier from Recognition Criteria.
-
Select Declare Element.

-
- Step 8
Rename the last screen from Capture 3 to Order Details Screen.

Now, you need to define some new elements of the third screen that you will use in your automation to get the data from the screen.
- Step 9
Select the third screen you just renamed to Order Details Screen.
-
Choose the order number in the preview.
-
Rename the element to Order Number.
Don’t choose Declare Element yet.

As you previously did, you are going to adjust the criteria.
-
Choose the Text criteria.
-
A popup opens. Change the Operator to contains.
-
Change Value to Order with a space at the end.
-
Click Apply.

-
Click Declare Element.

-
- Step 10
-
Make sure that the third screen, Order Details Screen is selected.
-
Choose Price in the preview.
-
Remove the Text criteria.

-
Add the ID of the element as criteria instead. This will uniquely identify the price.

-
Rename the element to Price.
-
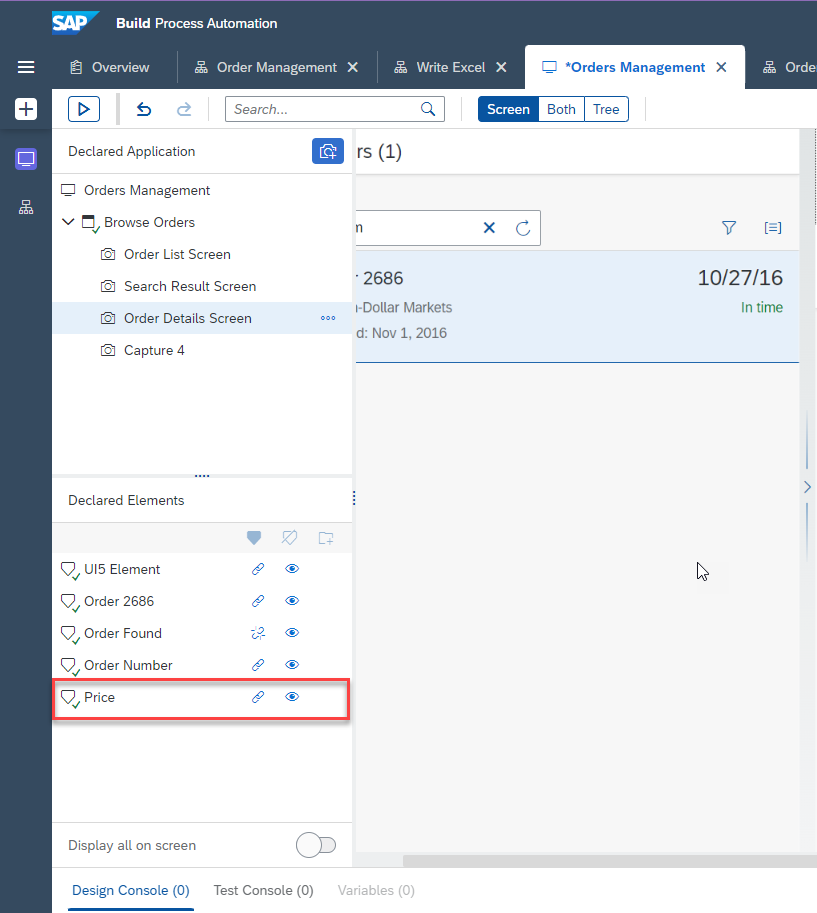
Make sure the correct id criterion is selected and click Declare Element.

Now, you have successfully declared the element Price and it is visible in the Declared Elements.
-
- Step 11
Now, you will define the Shipping Address in a different way, as a collection of multiple elements.
-
Choose the Name under shipping address in the preview.

-
Remove the Text criteria.

-
Select class as element.

With SAP Build Process Automation, you can also see the underlying technical document structure of the page. You use this to select more precisely the element you would like to define.
-
Click the Both tab on the top to show both the preview, as well as the technical DOM structure.
-
Adjust the zoom (for example, to 50%) to be able to see the HTML elements and the screen.
-
Choose the Name element of the Shipping Address.
-
Select the DIV (the container), instead of the SPAN. This way, you will be able to connect it to the other elements of the address.

-
DIV is selected. Now, remove the Text criteria as it is too specific.

-
Add the class criteria instead.

-
Class is selected. Set the name to Shipping Address.
-
Click Declare Element.

The element cannot be uniquely identified because multiple elements fulfill the same criteria. SAP Build Process Automation shows this in the warning status message in the Declared Elements section.
-
Create a collection of these multiple elements, by clicking the Is a collection button under Recognition Criteria, while Shipping Address is selected.

As a result, a collection is defined and the element is uniquely identified. The technical page structure shows that multiple elements are part of this collection (0, 1, 2, 3, 4).

-
Don’t forget to save the progress by choosing the Save button on the top right.
-
- Step 12
The automation displays product details, that is product name, unit price, quantity, and total amount of purchase order. You will use multiple collection feature and retrieve the data.
-
Navigate to the Order Details Screen.
-
Select the Line Item Uncle Bob’s Organic Dried, declare TR as an element.
-
Rename the declared element to Table Row.
-
Make sure you only have class as a recognition criterion.

-
Since TR is a collection, make it as a collection by clicking on the three dots.
-
Select Set as collection.
-
Click Declare Element.

-
Now, you see the Table Row element is added to the list of declared elements and it is represented with the collection symbol since you have set it as a collection.

You need to retrieve that table data now, which is a cell.
-
Select TD.
-
Remove Text and add class as a recognition criterion.

Since TD is also a collection, it must be set as a collection.
-
Rename the TD to Table Data.
-
Click on the three dots and select Set as collection.
-
Click Declare Element.

You can see the one-dimension array added as of now. Since it is a collection, the Table Data is also a collection.

-
Click on the three dots on Table Row, to recognize the Table Data as two-dimensional.
-
Click Add to criteria.

In the Element Information section, you can see that everything is added in the Table Row, and the TD is also marked as a two-dimensional array.

-
Click Save to save your application.
Nice! You have completed the capturing of the application and can build the automation by following the next tutorial Automate the extraction of Order Details in Order Management Application
Which of the following is true about defining multi dimensional collections?
-