Create and Configure Forms
- How to add interactive forms to the process
- How to design the form with layout and input fields using drag-and-drop approach
- How to configure the forms as the process steps


 Arthur Fortin
Prerequisites
- Complete Create a Business Process tutorial
Tasks are a part of any business process. SAP Build Process Automation helps you to create forms that are made available to the business users in their inboxes to take relevant action.
These interactive forms can be created by dragging and dropping the text elements and input fields into the canvas. Once a form has been created, it can then be used as a process trigger to start the process or added as an approval step in the business process.
Let us now explore how these different forms are created. In the steps below, you will create three forms that will be used to:
- Start the approval process.
- Send a task to the inbox of the business user for approval.
- Notify the requester for approval or rejection.
- Step 1
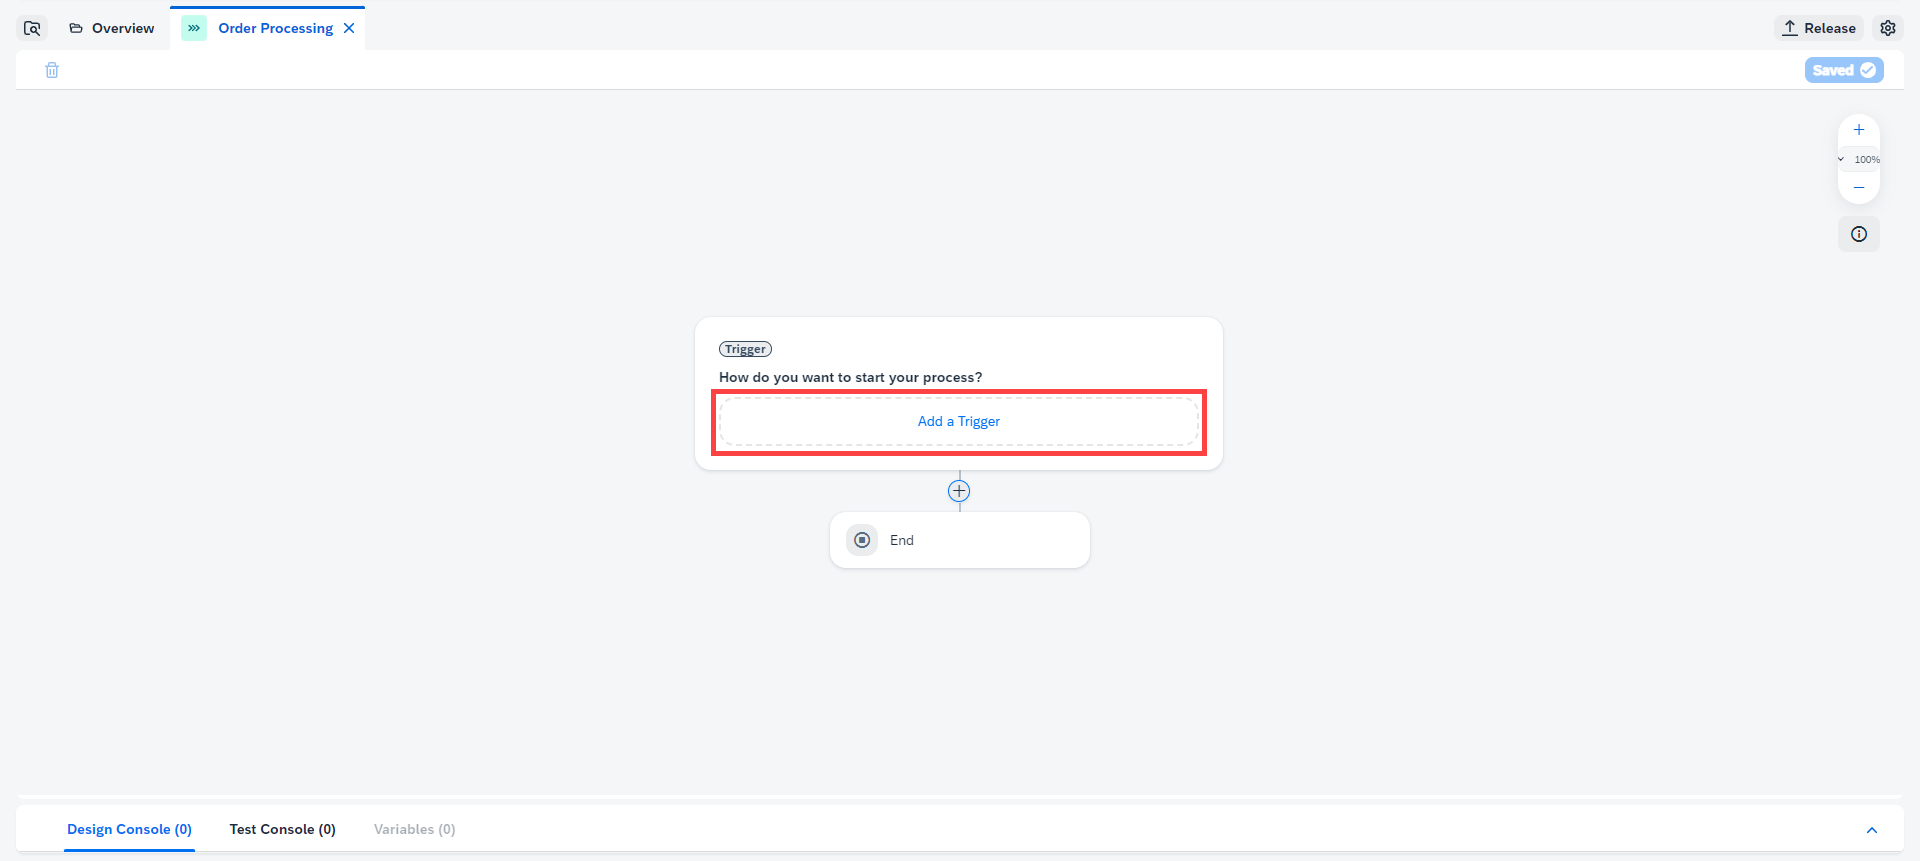
First, you will create a trigger form that will start the business process. For that, you have to open your process in the process builder and add a new form.
-
Choose Add a Trigger in the Trigger settings.
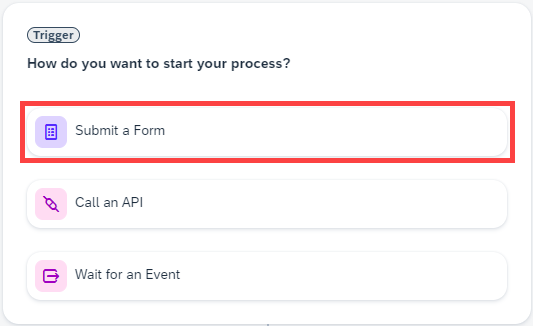
-
Choose Submit a Form.
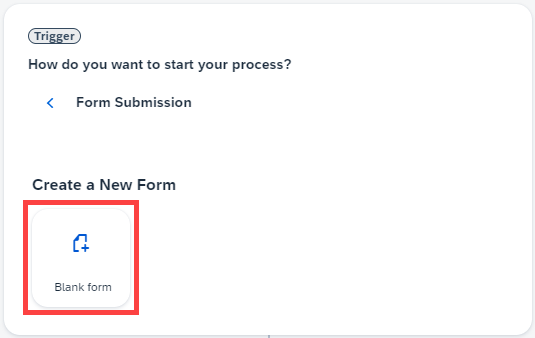
-
Choose Blank form.
-
In the pop-up window for new form:
- Enter the Name: Order Processing Form
- Enter a Description: Form to collect order details
- Choose Create.

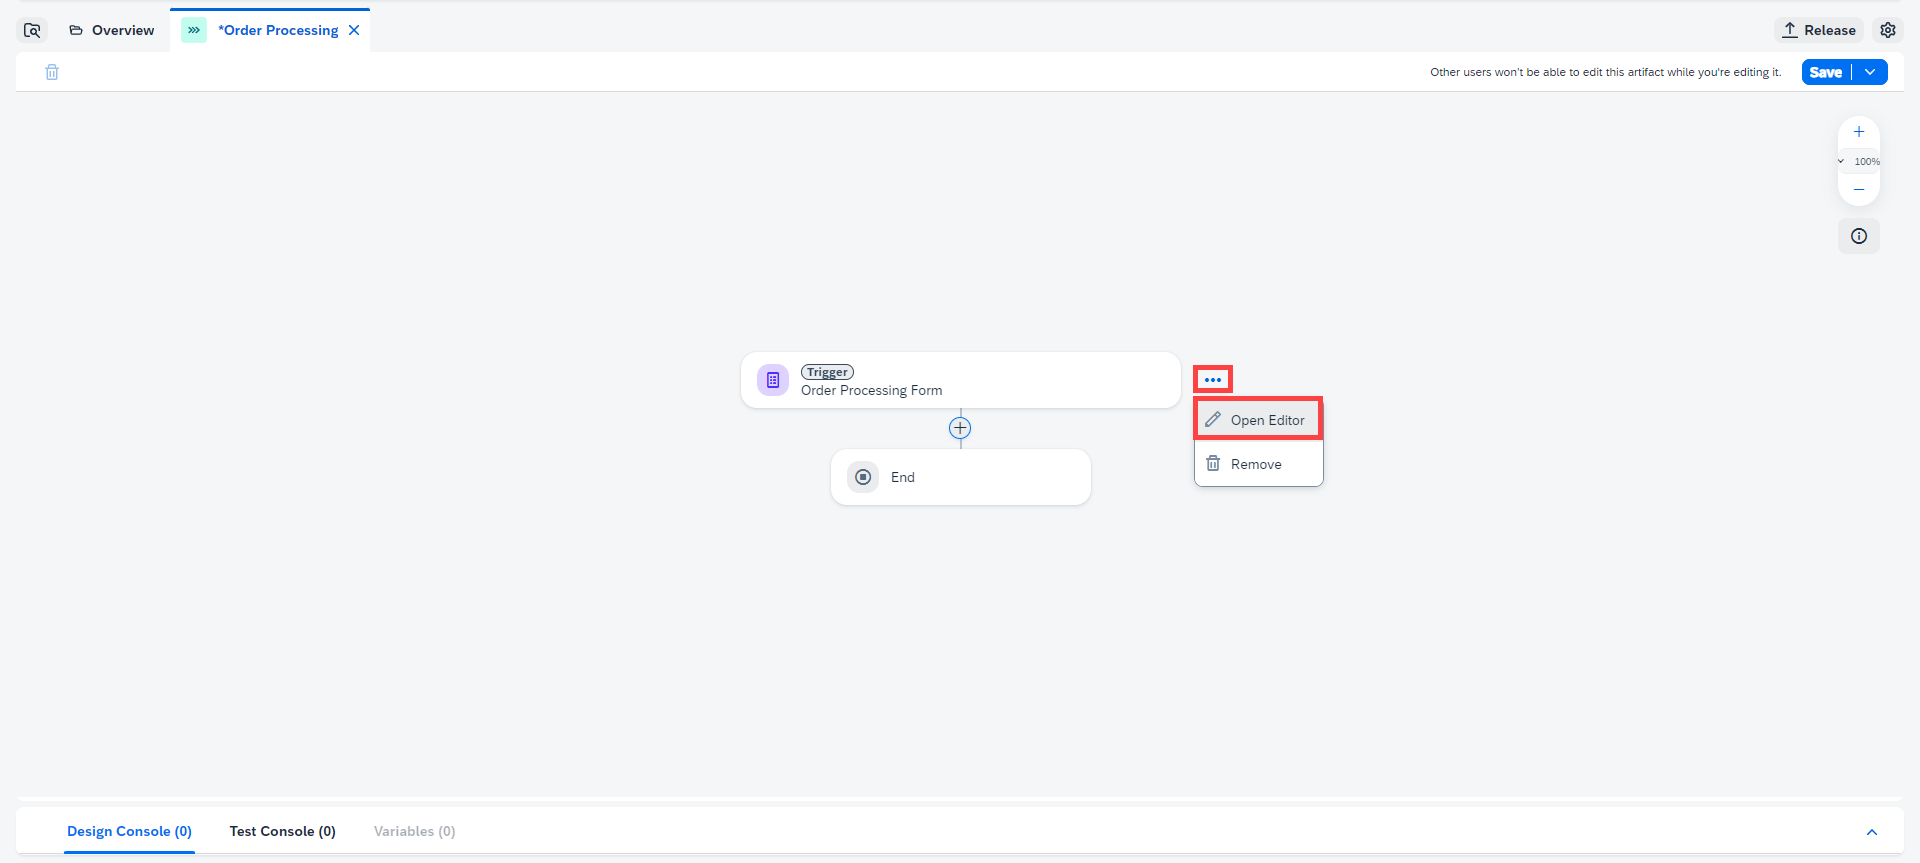
The form will be added as the Start Trigger.
-
To design the form, choose the three dots and select Open Editor.
-
You will now design the Form with available layout and input fields options. First, drag-and-drop the form layout fields and enter the given names and field settings as below:
Form Fields Field Settings with Label Headline 1 Order Approval Request Form Paragraph Please provide the necessary information of your order and submit for approvals. 
-
Now, add Input Fields, enter the labels and select the Required checkbox.
Form Fields Field Settings with Label Text Customer Name Text Order Number Number Order Amount Date Order Date Text Shipping Country Date Expected Delivery Date -
The trigger form is ready. Save the form using the Save button on the top-right corner of the screen.

Now, you will design the process with more activities related to approval of the sales order.
What are some of the available Layout and/or Input fields?
-
- Step 2
The approval form will be used to get faster and easier approvals from the business users, to take informed decisions, and get rid of sending emails. These approval forms could be about approving or rejecting sales orders, invoices, onboarding, IT requests, etc. The forms are then converted into tasks in an automated workflow which will appear in the My Inbox of the user.
You can create these different forms using the Form Builder embedded in the process builder using different form field options. You can design and modify them without any coding.
-
Go to the Order Processing process and choose + below the Trigger.

-
Choose Approval.

-
Choose Blank Approval.

-
In the Create Approval dialog box, do the following:
- In the Name field enter: Approval Form
- In the Description field enter: Form to approve or reject the sales order
- Choose Create

-
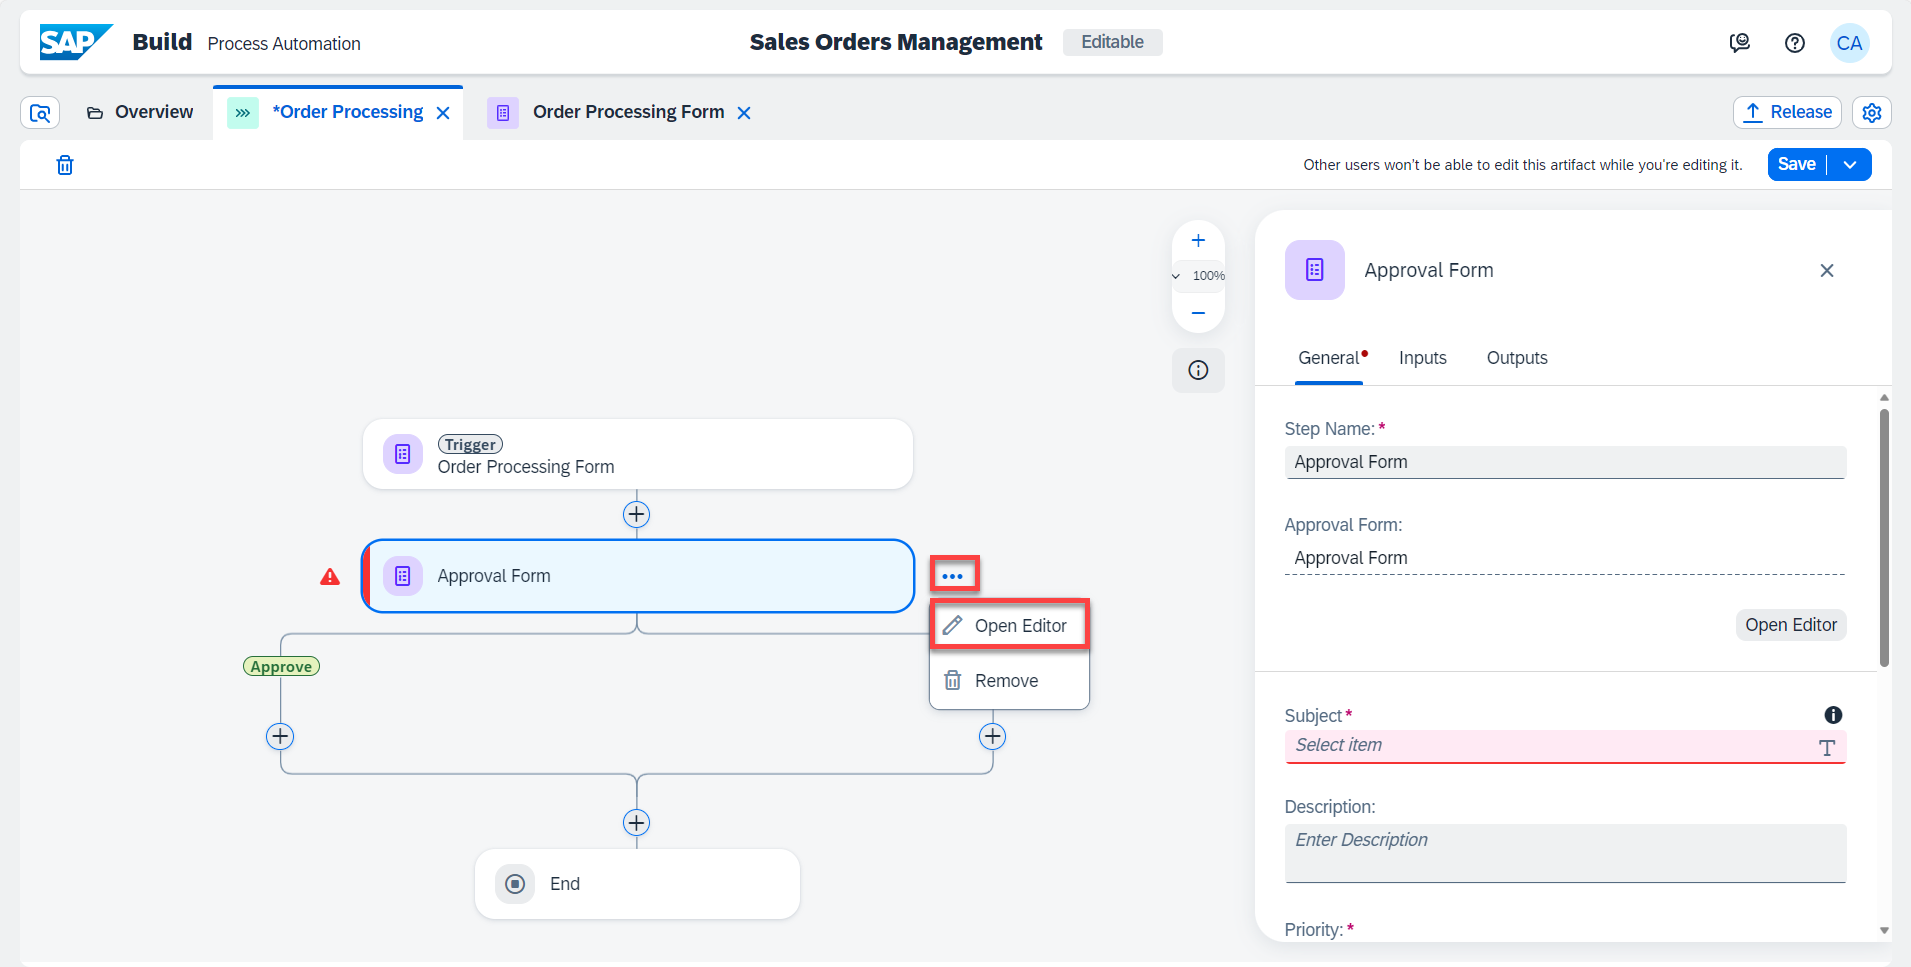
Choose Open Editor of the Approval Form.
-
Design the Approval Form in the form builder by dragging-and-dropping fields into the form editor and configuring respective field settings.
Form Fields Field Settings with Label Headline 1 Approve Sales Order Paragraph A new order has been received. Please review and confirm whether the requirements can be met or not. Paragraph Sales Order Details: 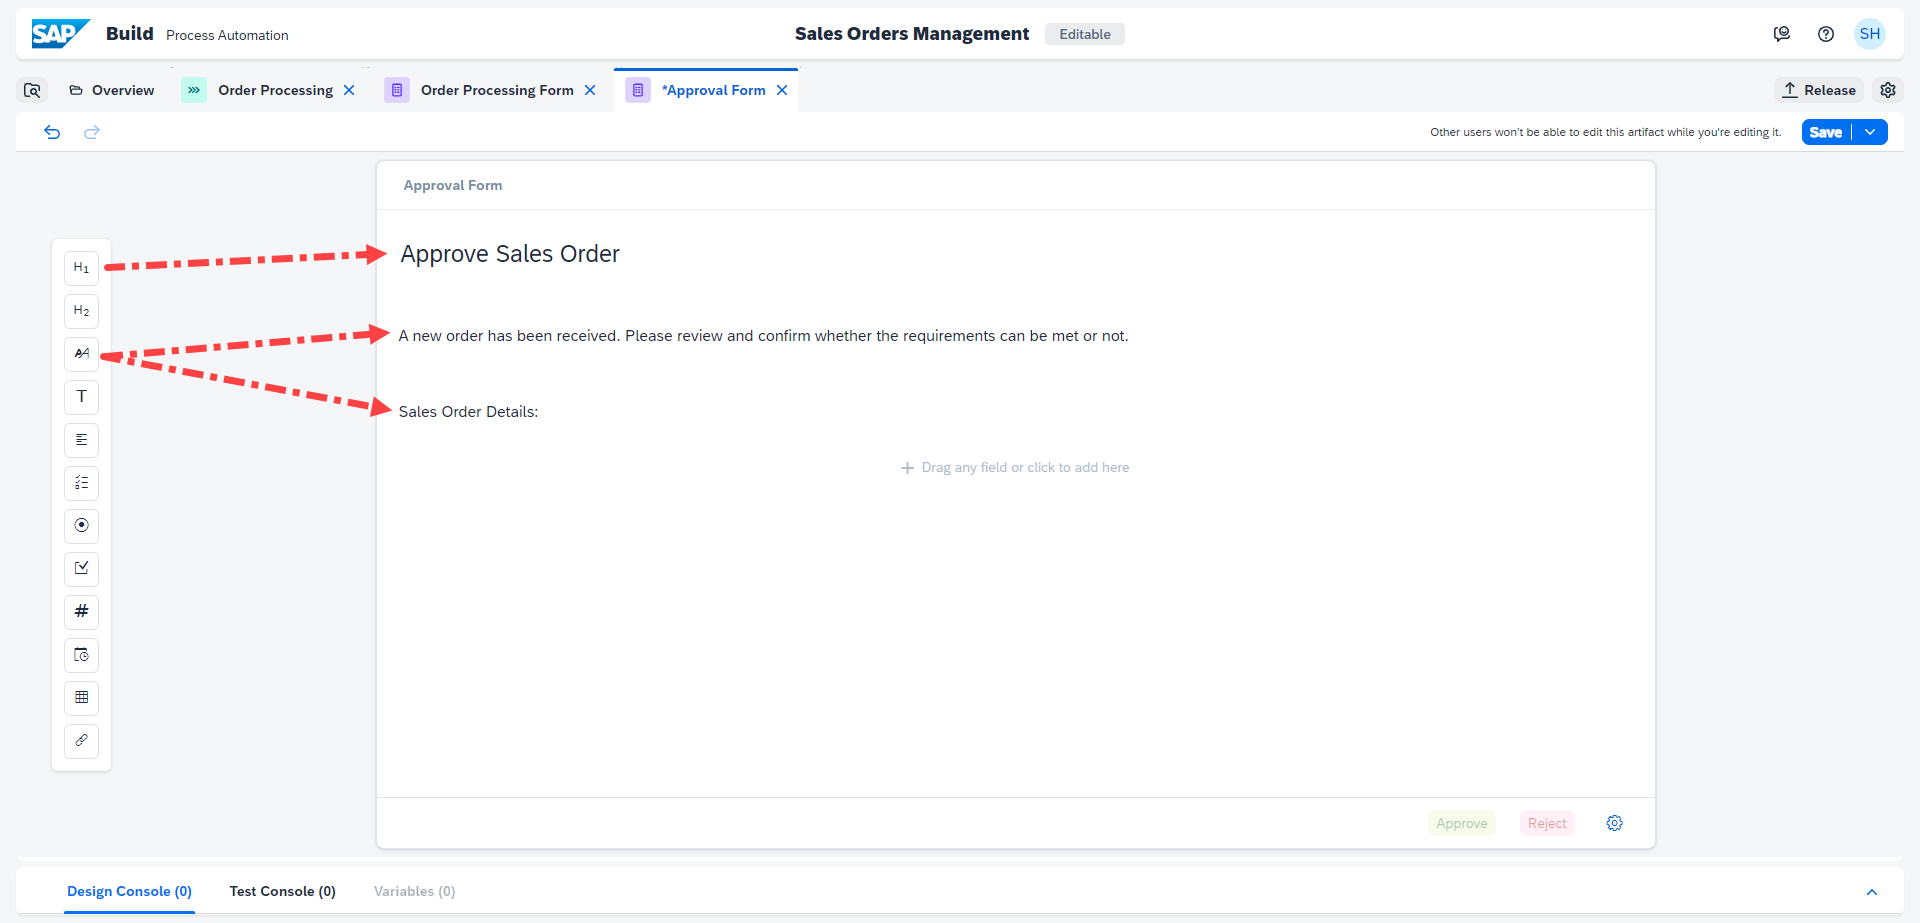
-
Add Input Fields, enter the labels and select the Read Only checkbox.
Form Fields Field Settings with Label Text Customer Name Text Order Number Number Order Amount Date Order Delivery Date 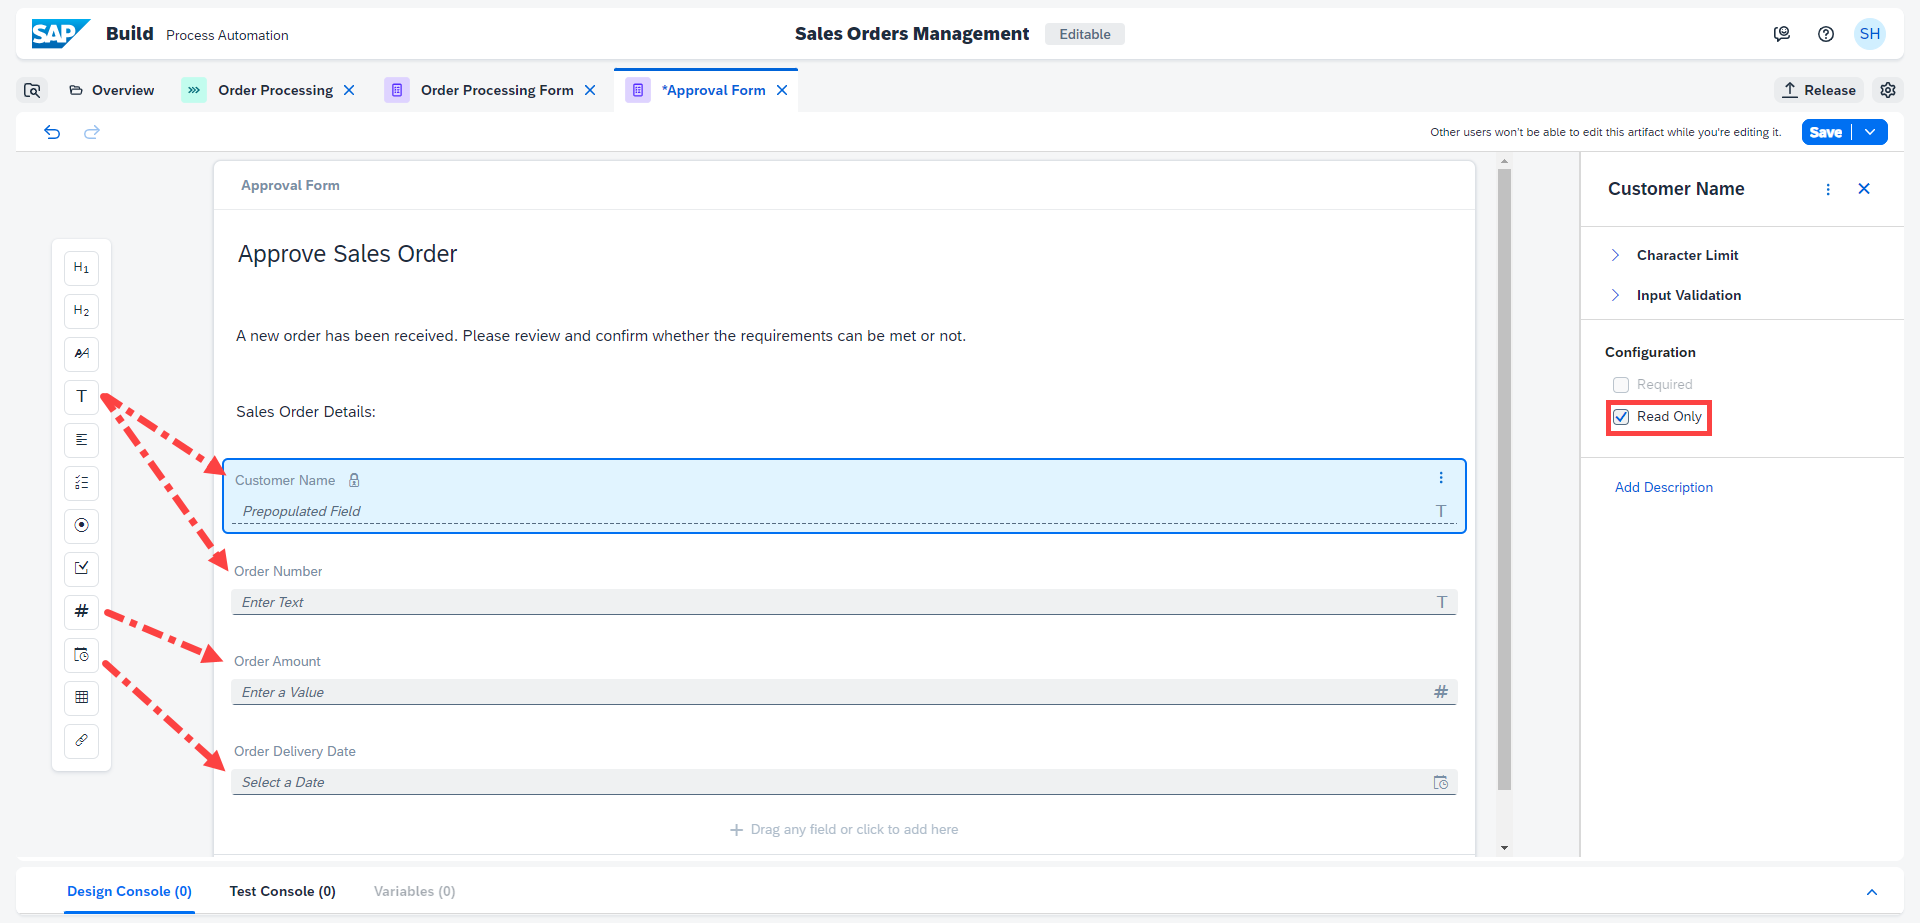
-
Add Input Fields and enter only the labels.
Form Fields Field Settings with Label Paragraph Supplier Acknowledgment Checkbox I acknowledge that we have received your order and will process it based on the availability Text Area Message to buyer: -
Save the form.

SAP Build Process Automation helps you to easily and quickly create forms using:
-
- Step 3
-
Go back to the process builder to map the process content with the form input fields.
-
Select the Approval Form to configure the General information section.

-
In the Subject field, do the following:
- Enter Review and approve order
- Select Order Number from Order Processing Form (Trigger)
- Enter from
- Select Customer Name from Order Processing Form (Trigger)
- Enter company

The Subject configuration of the form will be shown when this task appears in the
MyInbox. -
In the Recipients section, under Users select Process Started By from Process Metadata.

This form will appear as the task in the
MyInboxof the given Recipients to take action. -
In the Due Date section:
- Select Static Duration as type of due date
- Enter 2 Days as the duration
What is going on?
This means that the due date to approve or reject the form will be set to 2 days.
As the task appears in the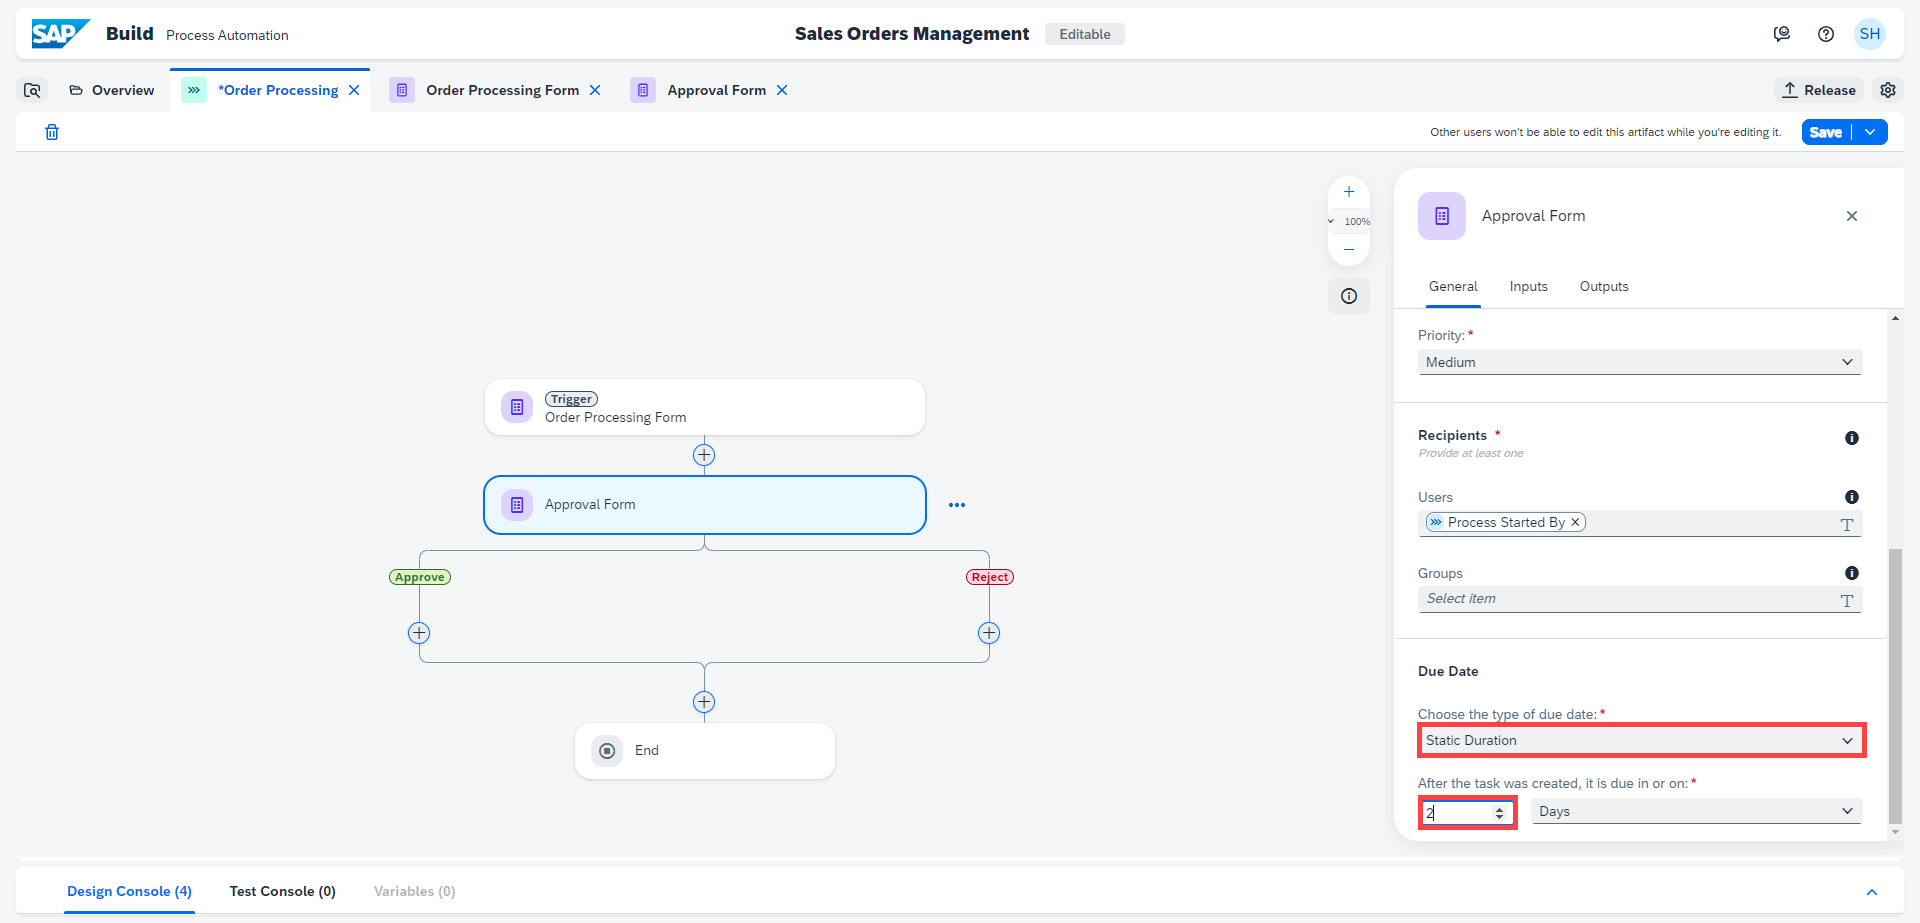
MyInbox, there will be duration information shown to the recipients like Overdue if the task was not completed in 2 days, or within 1 day if the task is supposed to be completed in 1 day etc. -
Similarly, go to the Inputs section and map the different input fields, which were marked as read-only in the approval form, by selecting the respective Process Content entry.
Form Input Fields Process Content Entry Customer Name Customer Name Order Delivery Date Expected Delivery Date Order Amount Order Amount Order Number Order Number The process content will highlight the entries with the same data type of the input field. For example: if the input field is of Number type then Process Content will show only number-type entries.
-
Save the process.

The process should look like the following:

In SAP Build Process Automation, forms can be used:
-
- Step 4
After the user approves or rejects the request, the next step is to create notifications. These notifications will inform the requester whether their sales order is approved or rejected, and will be sent either via an email or through the form. They will appear in the inbox of the requester as a task.
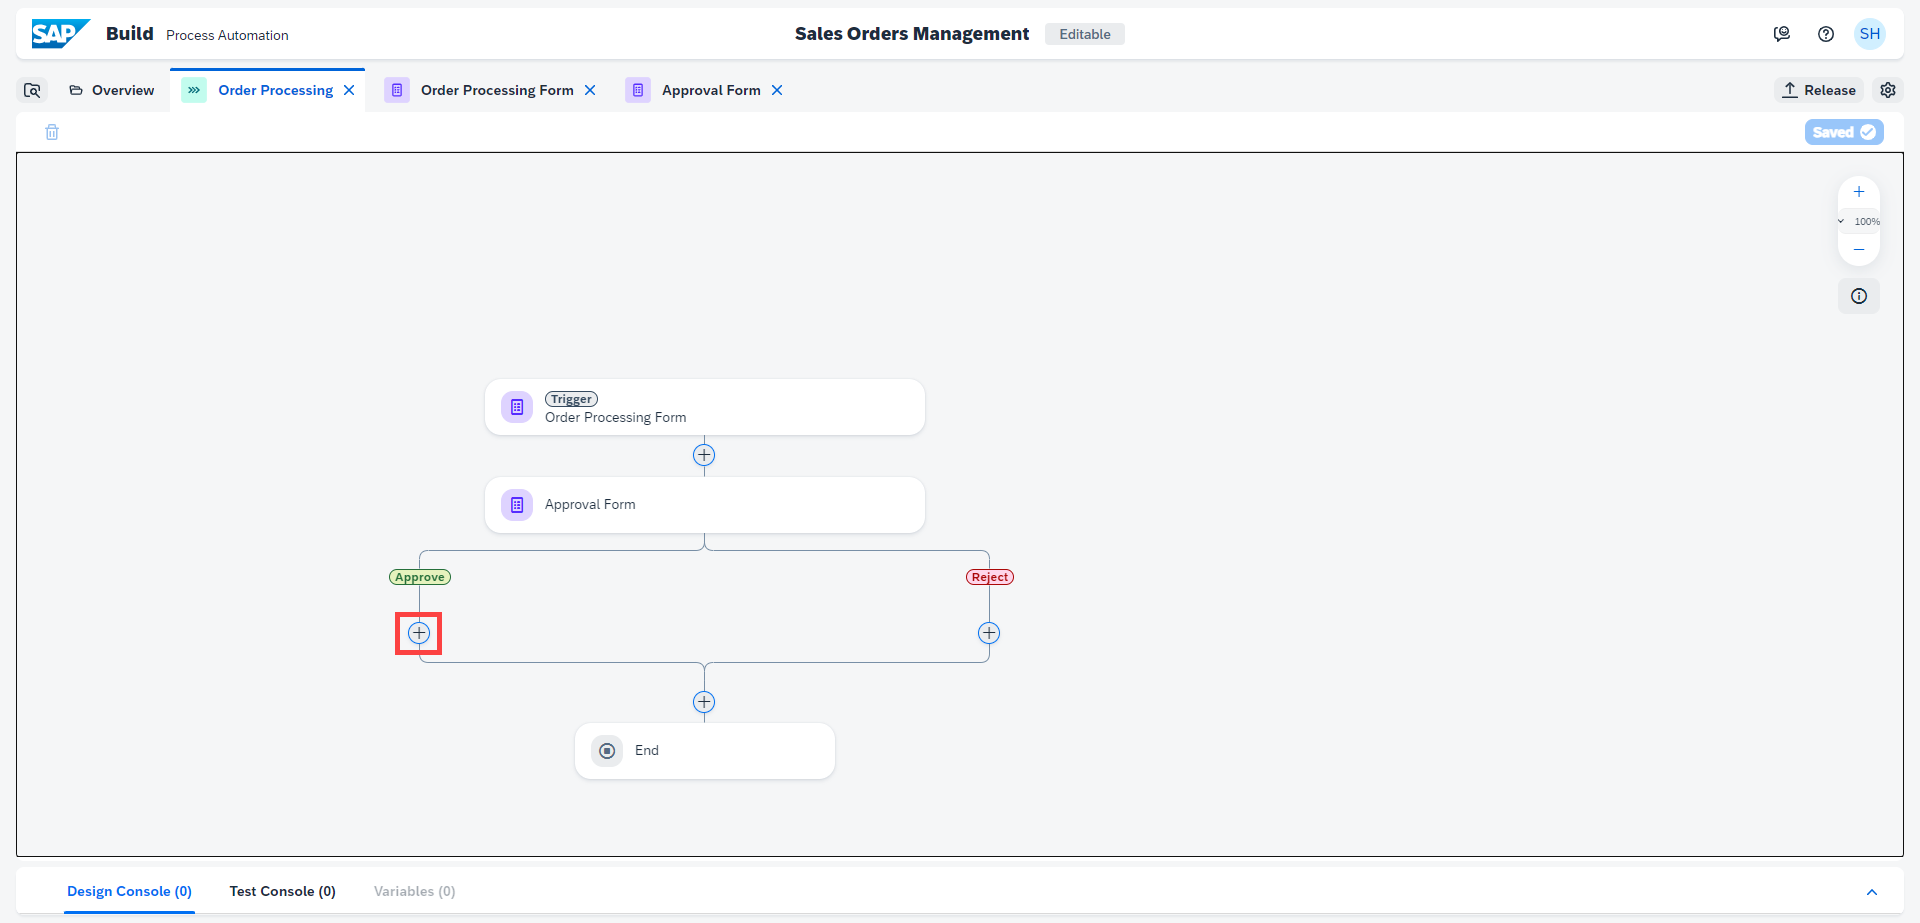
-
To add a confirmation to the process, select + below the Approve option.
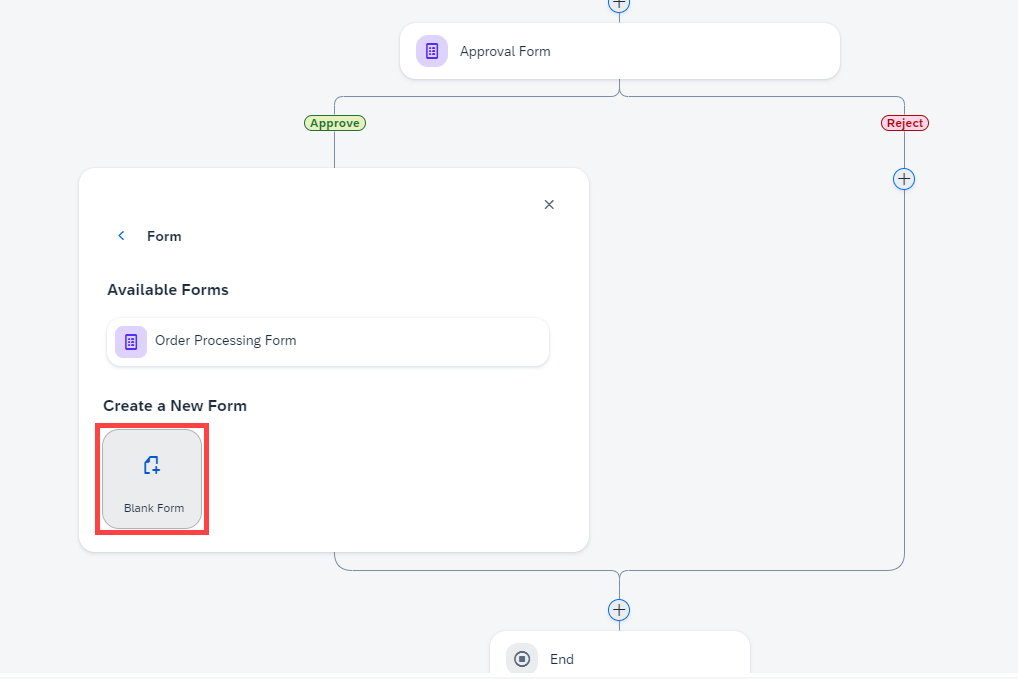
-
Choose Form.

-
Choose Blank Form.
-
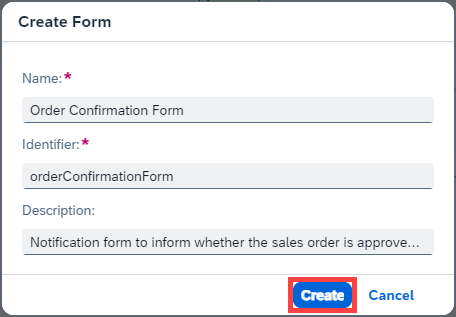
In the Create Form dialog box, do the following:
- In the Name field, enter Order Confirmation Form
- In the Description field, enter Notification form to inform whether the sales order is approved by the supplier
- Choose Create
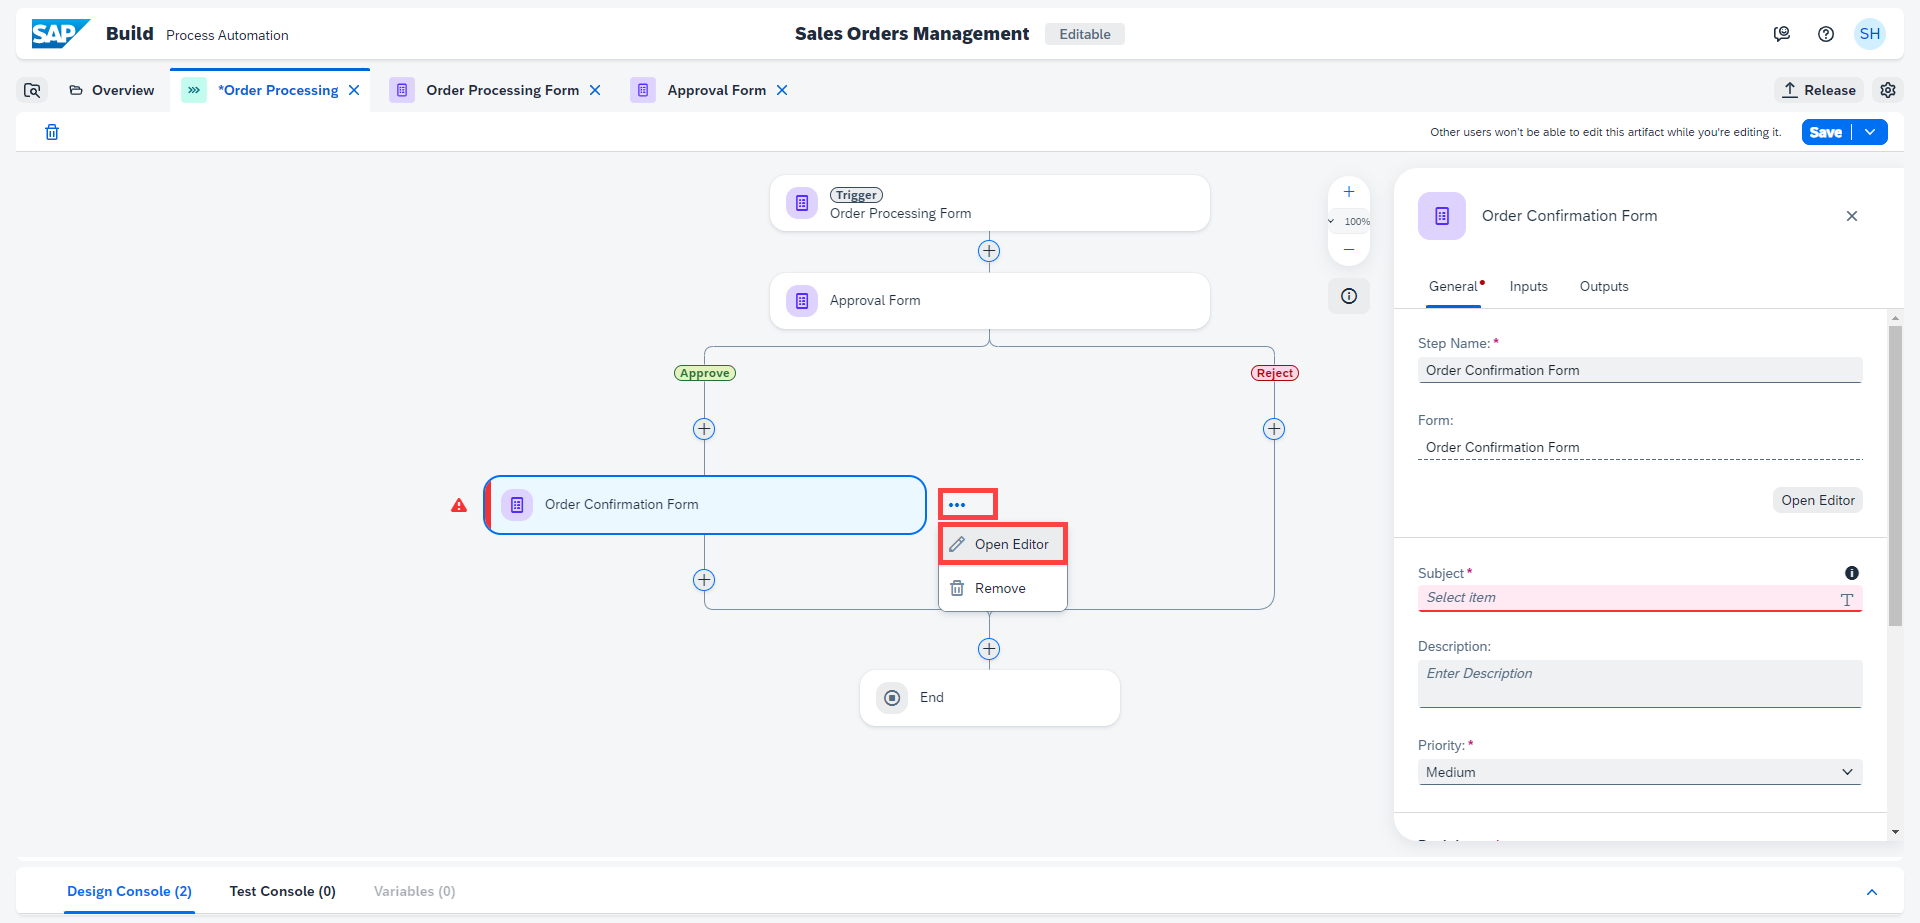
-
Choose Open Editor of the form.
-
In the form builder, design the form to notify the requester of the order confirmation. Add the following Layout Fields:
Form Fields Field Settings with Label Headline 1 Order Confirmation Paragraph Your order has been received and accepted for delivery. We will send you the details as soon as the order is shipped. You can find the details of your order below, please review and verify your request: Text Area Message from the supplier: Paragraph Your Sales Order Details: 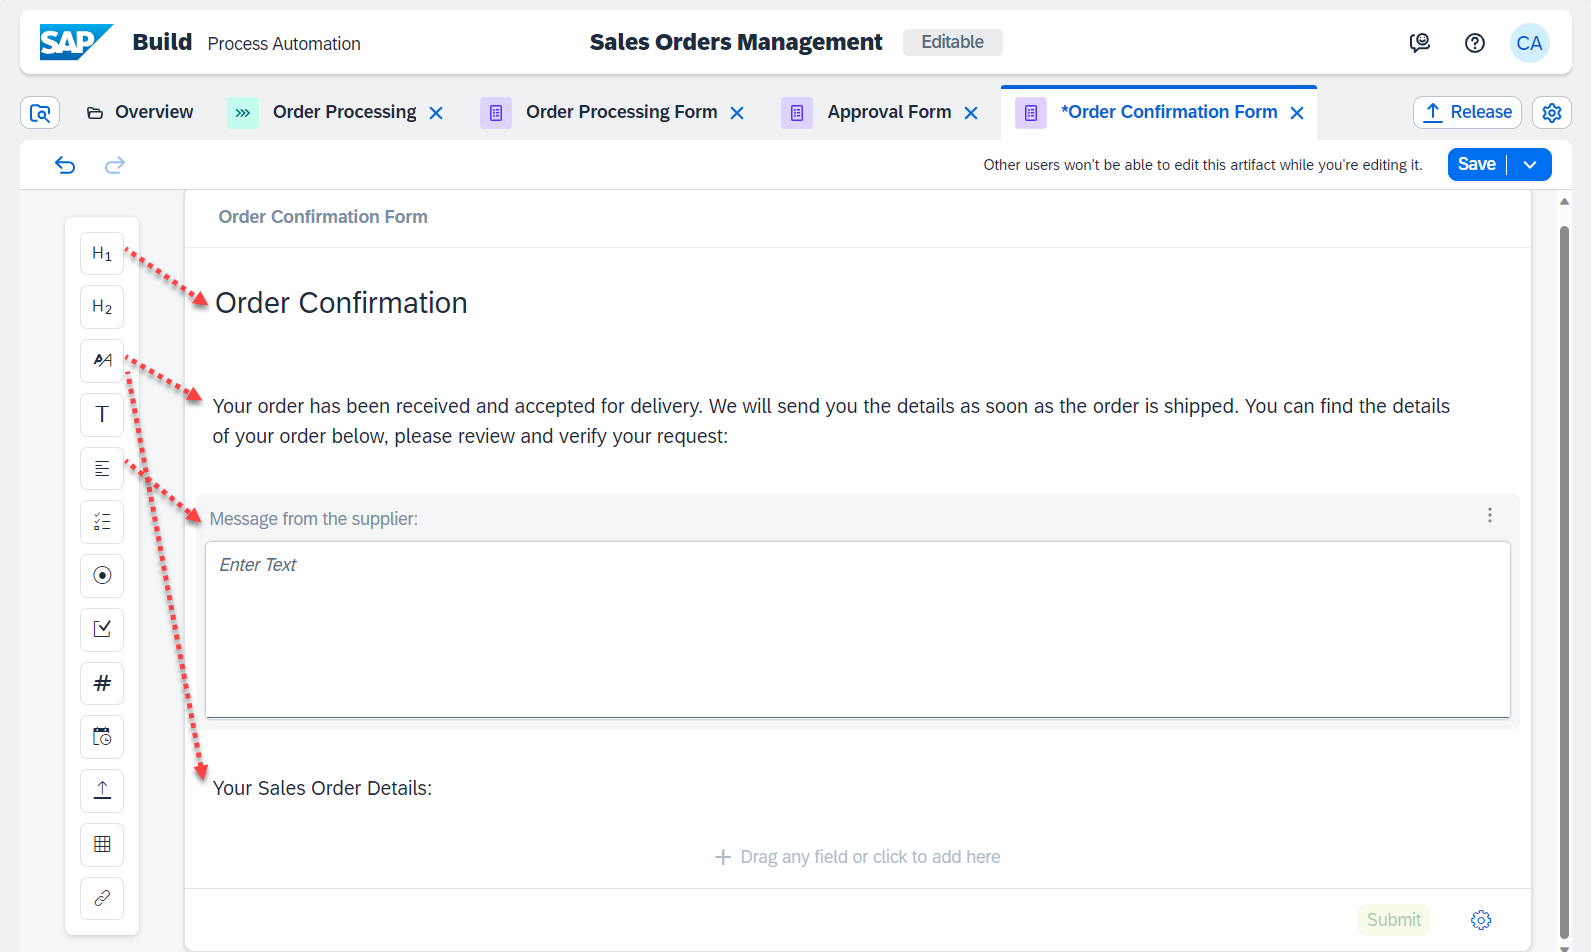
-
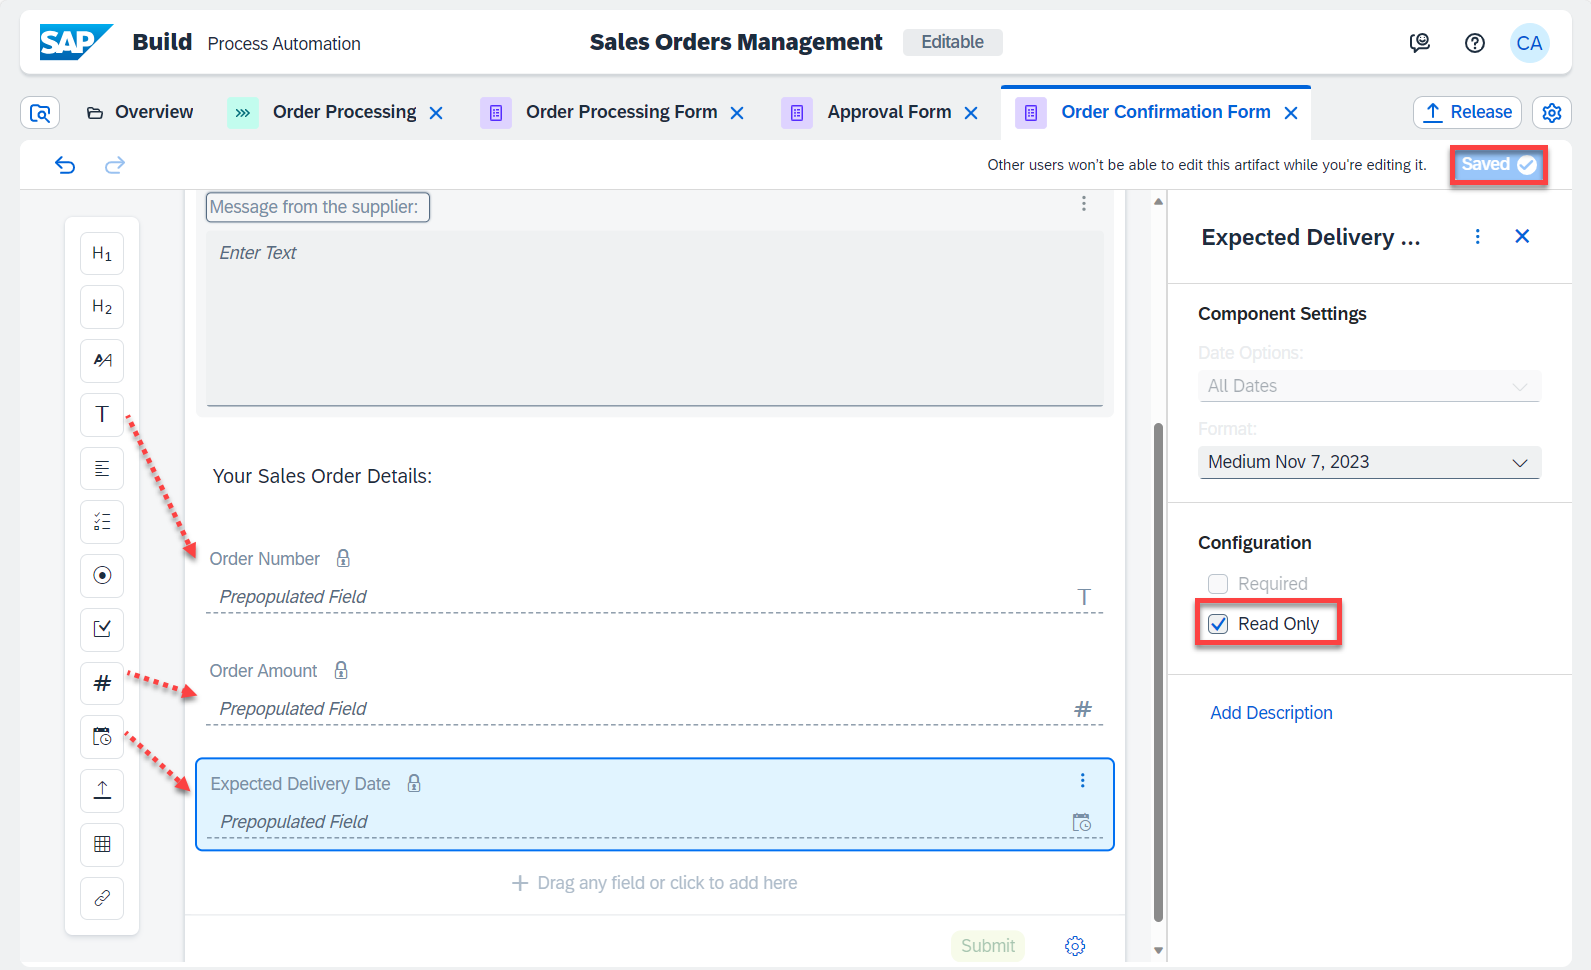
Add below Input Fields, enter the labels and select the Read Only checkbox.
Form Fields Field Settings with Label Text Order Number Number Order Amount Date Expected Delivery Date -
Save the form.
-
Go back to the process builder to map the process content with the form input fields.
-
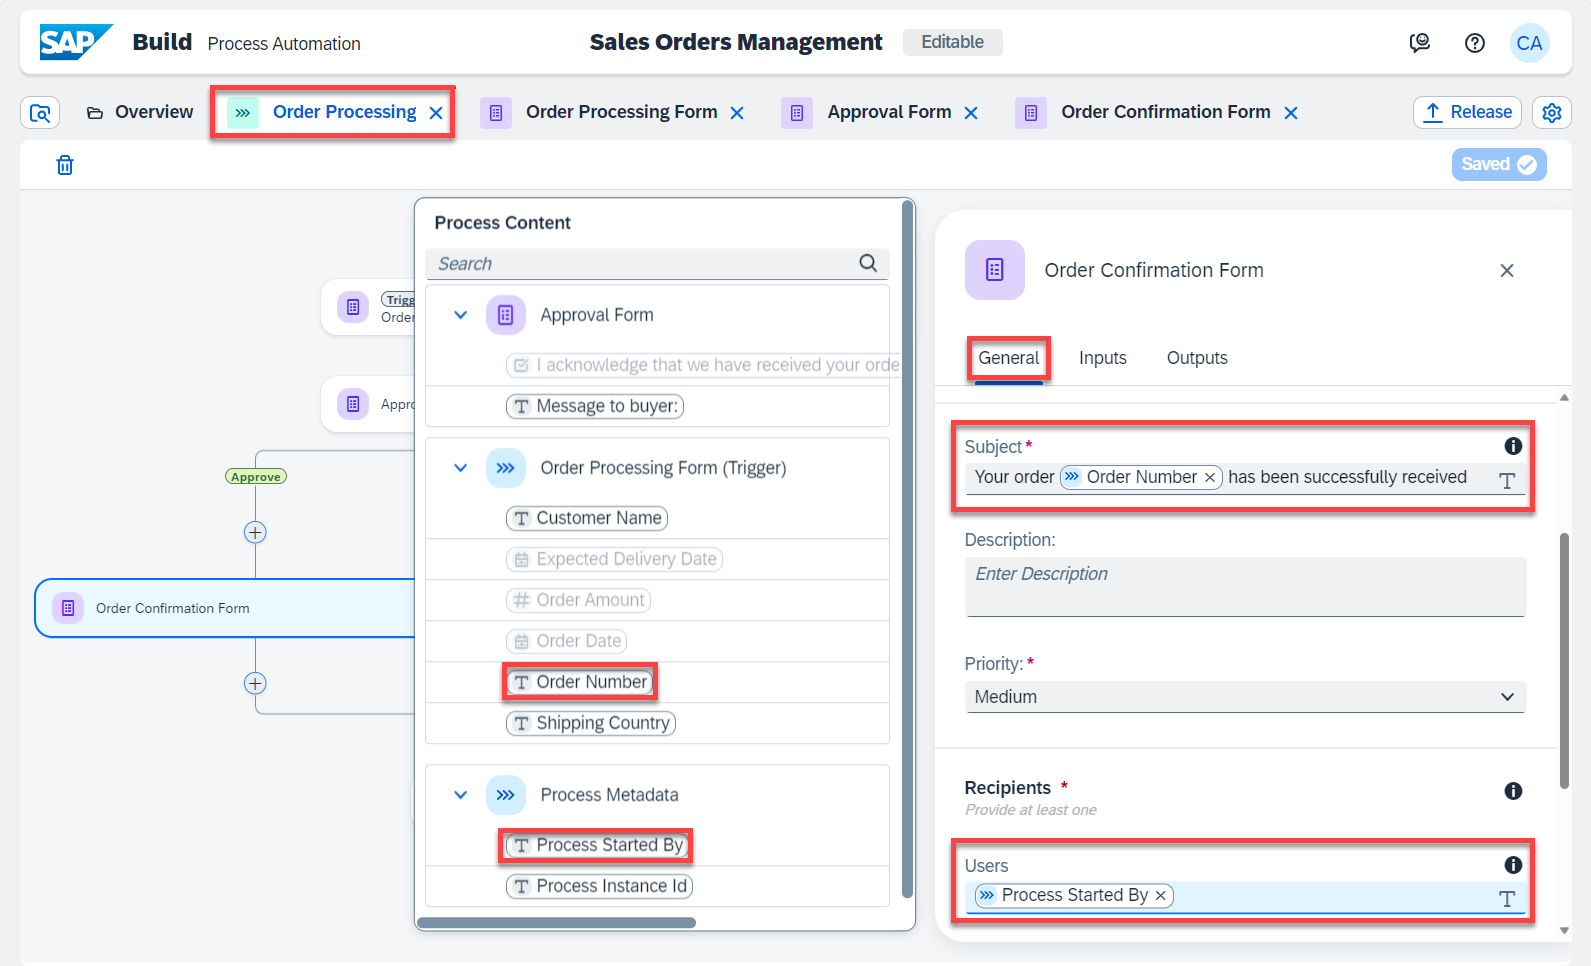
Select the Order Confirmation Form to configure the General information section.
-
In the Subject field, do the following:
- Enter Your order
- Select Order Number from Order Processing Form
- Enter has been successfully received
-
In the Users section, under Recipients, select Process Started By from Process Metadata.
-
Go to the Inputs section and map the different input fields, which were marked as read-only, with the respective process content entries.
Form Input Fields Process Content Entry Order Number Order Number Message from the supplier Message to buyer Expected Delivery Date Expected Delivery Date Order Amount Order Amount The process content will highlight the entries with same data type of the input field. For example: if the input field is of Number type then Process Content will show only number-type entries.
-
Save the process.

With this you completed designing and configuring the confirmation notification form.
You can copy the same form to create another form to send a rejection notification to the requester. If copy is not available then create the form in the same way and modify the texts wherever relevant as shown below.
-
To add the new rejection form, you will use the Duplicate feature. Select the Overview.
Duplicate feature is used to copy artifacts within the Business Process whereas Copy feature is used to copy artifacts across the Business Processes.

-
In the Overview screen:
- Find Order Confirmation Form under the Artifacts section and select …
- Choose Duplicate

-
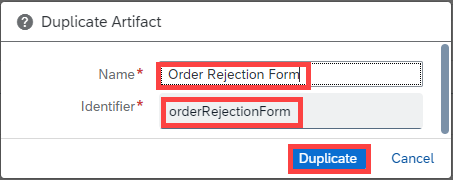
In the Duplicate Artifact pop-up window, change the name to Order Rejection Form and select Duplicate.
-
The form is automatically opened in the form builder. Change the order rejection form in the form builder to reflect the data for rejection case.
Form Fields Field Settings with Label Headline 1 Order Rejection Paragraph We are sorry to inform you that your order cannot be accepted. Any inconvenience caused due to the refusal of the order is regretted. You can find the reason of the rejection and the details of your order below, please confirm the request: -
For the below Input Field enter the label and position it after Expected Delivery Date.
Form Fields Field Settings with Label Paragraph Please press the SUBMIT button to acknowledge the order status. -
Save the form.

-
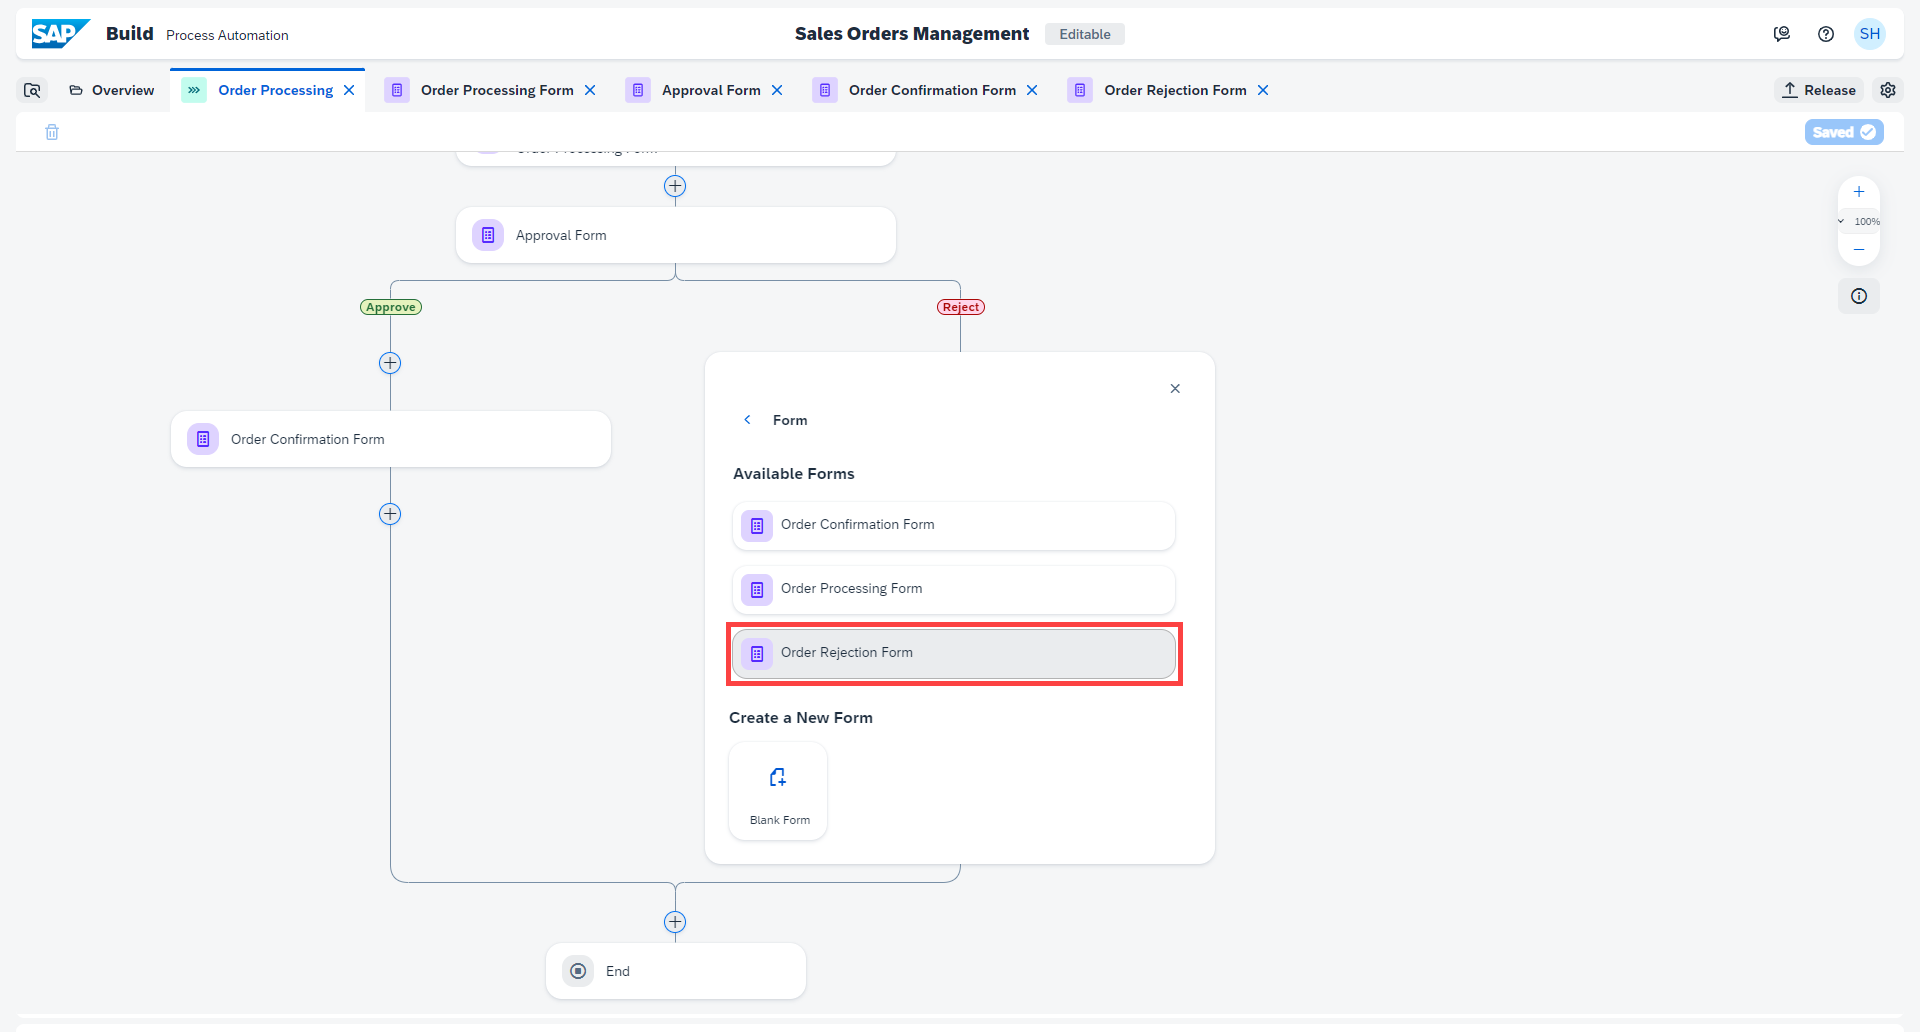
Go back to the process builder and add the order rejection notification form to the process. Select + below the Reject option.

-
Choose Form.

-
Choose Order Rejection Form.
-
Configure the Order Rejection Form. In the General section configure in the Subject box:
- Enter Your order
- Select Order Number from the Order Processing Form
- Enter is rejected by the supplier
-
Under Priority, select High.
-
Under Recipients, for Users, select Process Started By.
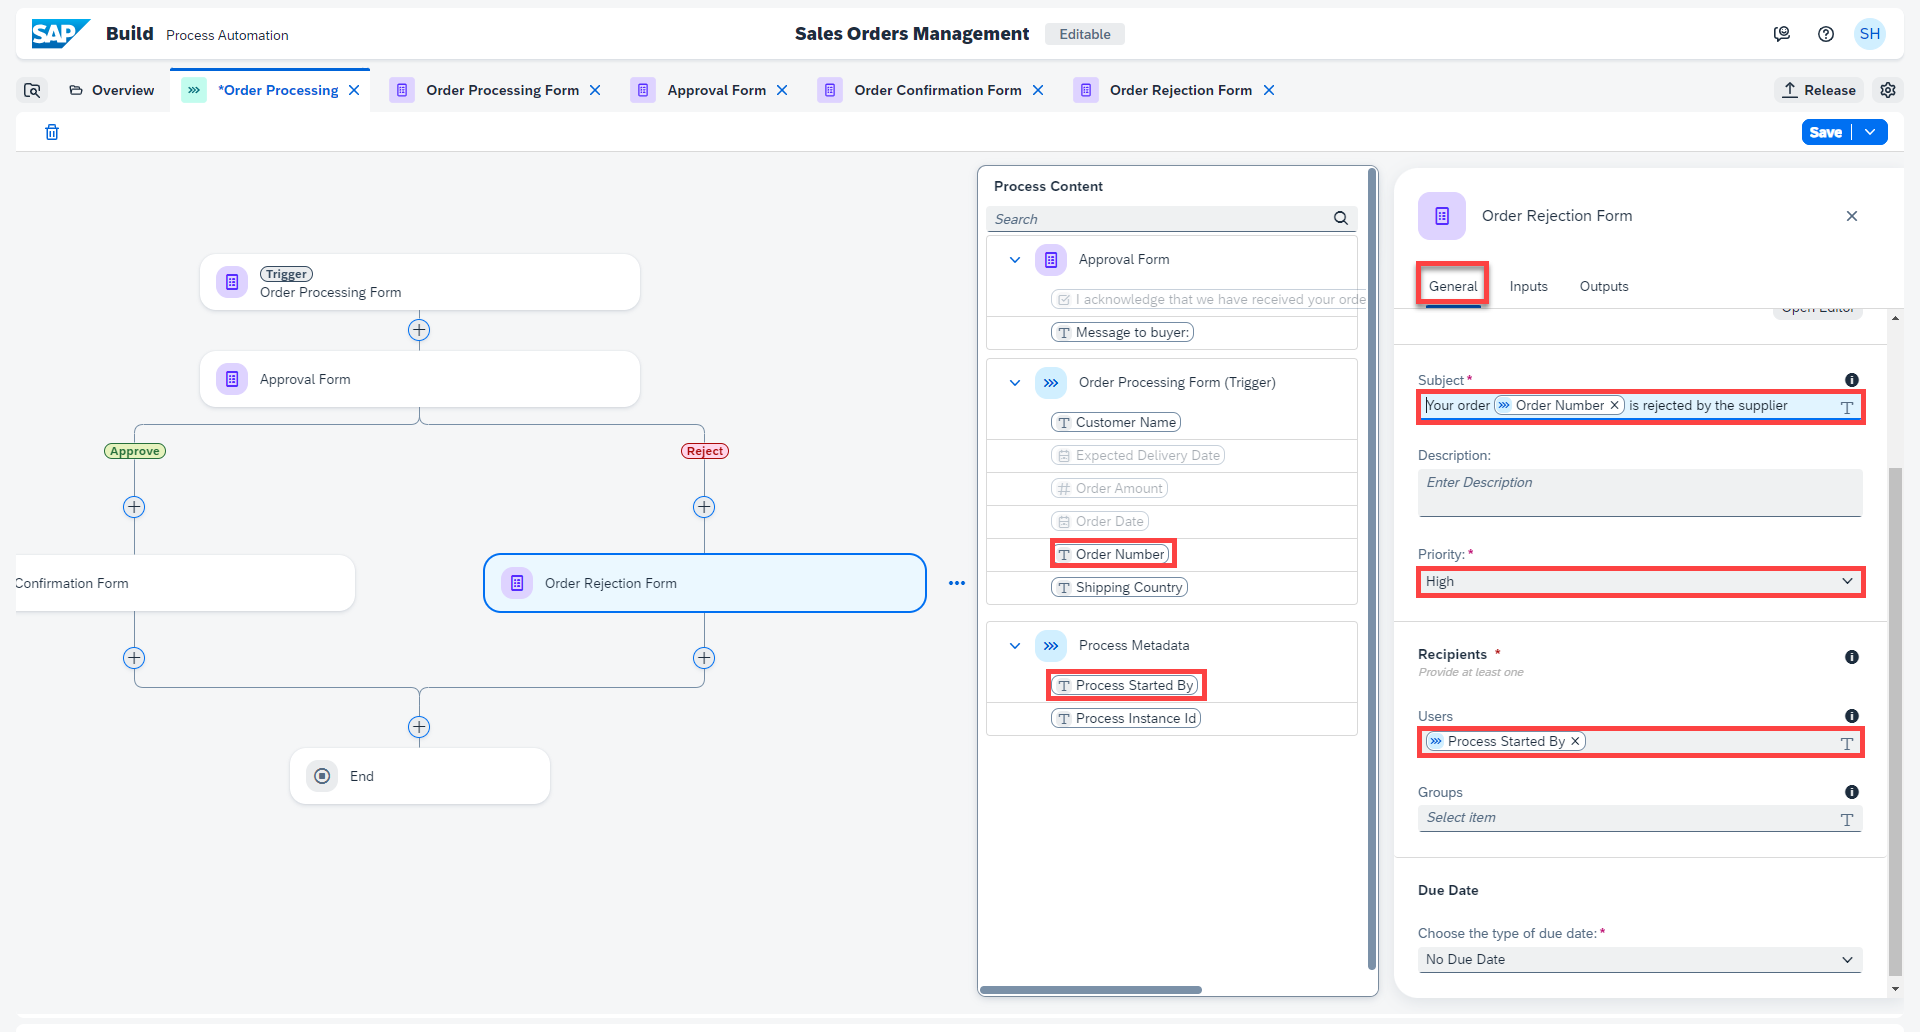
-
Configure the Inputs section.
Form Input Fields Process Content Entry Expected Delivery Date Expected Delivery Date Message from the supplier Message to buyer Order Amount Order Amount Order Number Order Number 
-
Save your work.
With this you have completed the process design of your business process. You have experienced building a process in a completely no-code environment and with no technical know-how. You used the process builder to create a one-step approval process with trigger form, approval form and notification forms.

-