Skip to Content

Sample Project

For this beginner tutorial, you will load data onto your SAP HANA 2.0, express edition installation and preview that data. You will learn how to create a new user, create a schema, upload .csv data to your SAP HANA 2.0, express edition installation, create a new package, load and connect the .csv data to that package, and then edit and preview that data.
You will learn
  • How to use SAP HANA Studio to load data onto your SAP HANA 2.0, express edition installation and create the proper user and schema, create a package, load data to that package, and preview that data
aplata-sapAdrian PlataOctober 28, 2020
Created by
aplata-sap
March 1, 2017
Contributors
aplata-sap

Prerequisites

In SAP HANA Studio, do the following:

Additional Information

  • Step 1
    1. Under your SYSTEM user login, expand the Security folder.

    2. Right-click on Users and select New User.

      Create User

      The security editor opens.

    3. Create the new user and give it the proper permissions.

      1. Give your new user a name.

      2. Give your user a strong password. You may wish to force a password change upon first login.

      3. Under Granted Roles, click

        insert
        .

      4. Select MODELING.

      5. Click OK.

      6. Repeat steps 3, 4, and 5 while selecting CONTENT_ADMIN.

      7. Click Deploy

        Deploy
        to create your new user.

      Create User
  • Step 2
    1. Under the Systems panel, right-click on your SYSTEM login and select Open SQL console.

    2. Create your new schema.

      bash
      Copy
      CREATE SCHEMA <schema_name>
      

      Click Execute

      execute
      .

    3. Grant rights and permissions for your new user to work on your new schema.

      bash
      Copy
      GRANT SELECT on SCHEMA <schema_name> to <new_user>
      

      Example:

      GRANT SELECT on SCHEMA TEST to PREVIEW
      
      bash
      Copy
      GRANT SELECT, CREATE ANY on SCHEMA <schema_name> to <new_user>
      

      Example:

      GRANT SELECT, CREATE ANY on SCHEMA TEST to PREVIEW
      
      bash
      Copy
      GRANT SELECT, INSERT, UPDATE, DELETE, EXECUTE ON SCHEMA <schema_name> to _SYS_REPO WITH GRANT OPTION
      

      Example:

      GRANT SELECT, INSERT, UPDATE, DELETE, EXECUTE ON SCHEMA TEST to _SYS_REPO WITH GRANT OPTION
      

      Click Execute

      execute
      for each line.

  • Step 3
    1. Import the STS_FCTCUSTOMERORDER.csv file.

      1. On the SAP HANA Studio window, click File then Import….

        import

      2. Select SAP HANA Content then Data from local file.

      3. Select your SYSTEM repository and click Next.

      4. Browse for and select the STS_FCTCUSTOMERORDER.csv file. Click Open.

      5. Select Header row exists.

      6. Select New Schema and choose the schema you created earlier in this series.

        Note:
        Be sure to select your new schema and not the user you create to ensure that the data is in the proper location.

      7. Give your table a name and click Next.

    2. Choose the Data Types for the table. Select Key for ORDERID, PRODUCTID, CUSTOMERID, EMPLOYEEID, and ORDERPERIODID. Click Next to see a preview of your table, otherwise click Finish to complete the upload.

      Load file
    3. Repeat steps 1 and 2 to import the remaining two .csv files.

      For STS_DIMPRODUCT.csv, select Key for PRODUCTID. For STS_DIMCUSTOMER.csv, select Key for CUSTOMERID.

    4. Refresh your schema.

      Successful Upload

    You should see your new tables under the Tables folder under your schema.

  • Step 4
    1. Log into SAP HANA Studio as your new user.

      1. Right-click on your current system.

      2. Select Add System with Different User….

      3. Enter your new user name and the appropriate password.

      Note:
      If prompted, change your new user’s password.

    2. Under the Systems tab, right-click on Content.

    3. Select New then Package….

    4. Enter a name for the package. Click OK.

    The new package will appear under your Content folder under your new user login.

    Create Package
  • Step 5
    1. Right click on the package you created earlier and select New then Analytic View….

    2. Give your new Information View a name.

      A new viewing window opens and a folder is added under your package.

    3. Select Data Foundation and click Add Objects

      insert
      .

    4. Under Type the object name to search for, add the FCTCUSTORDERS, DIMPRODUCT, and DIMCUSTOMER tables you created in the previous tutorial.

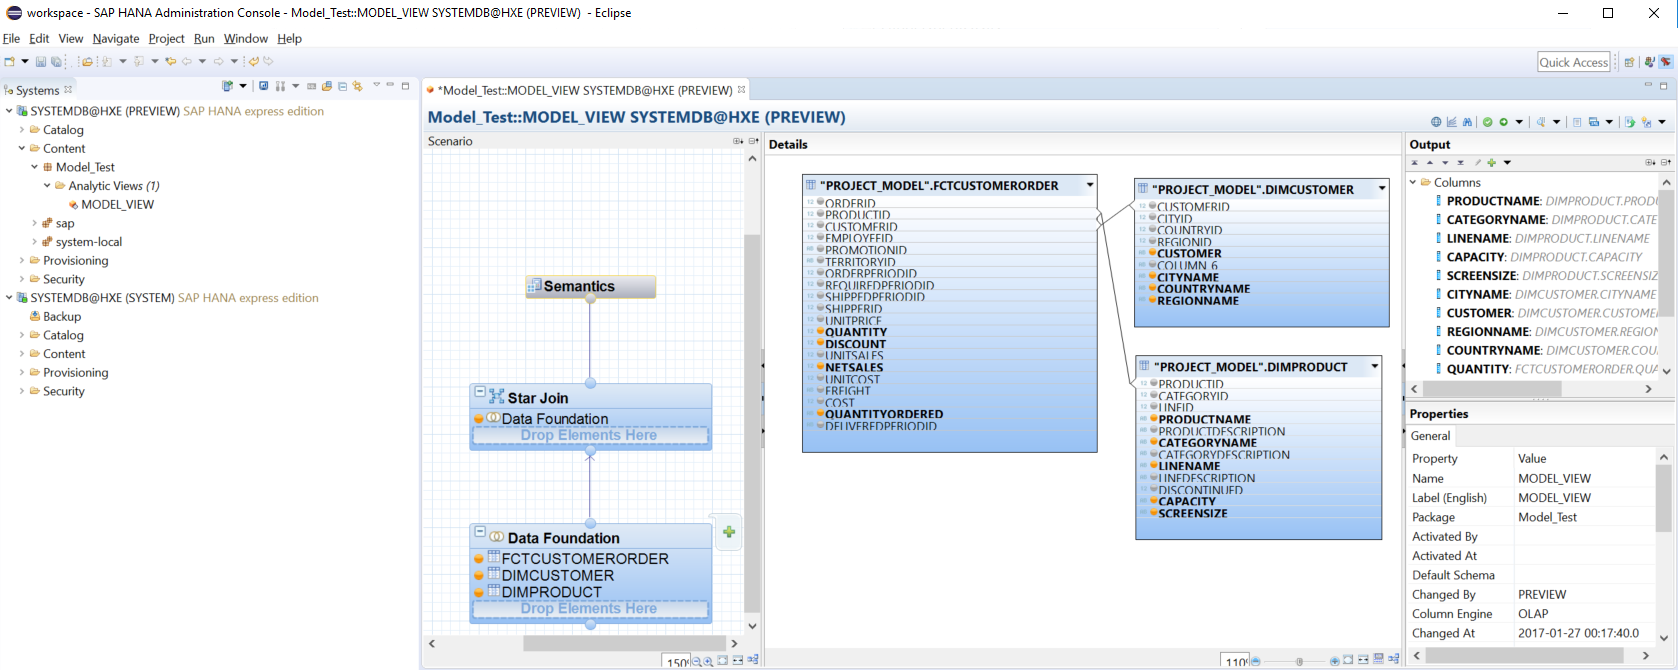
    5. Under the Details window panel, link the related information between the tables.

      Connect PRODUCTID under "<schema_name>".DIMPRODUCT to PRODUCTID under "<schema_name>".FCTCUSTOMORDERS by clicking the phrase, holding, and dragging your mouse. Repeat this and connect CUSTOMERID under "<schema_name>".DIMCUSTOMER to CUSTOMERID under "<schema_name>".FCTCUSTOMORDERS.

      Note:
      You can move the individual tables to better view your information.

    6. Add output columns.

      1. Under "<schema_name>".DIMPRODUCT, hold the Ctrl button and select PRODUCTNAME, CATEGORYNAME, LINENAME, CAPACITY, and SCREENSIZE.

      2. Right-click on one of the selected elements and click Add To Output.

      3. Repeat previous steps for "<schema_name>".DIMCUSTOMER and select CUSTOMER, CITYNAME, COUNTRYNAME, and REGIONNAME.

      4. Repeat previous steps for "<schema_name>".FCTCUSTOMORDERS and select QUANTITY, DISCOUNT, NETSALES, and QUANITYORDERED.

    Here is an example:

    Connect Data

  • Step 6
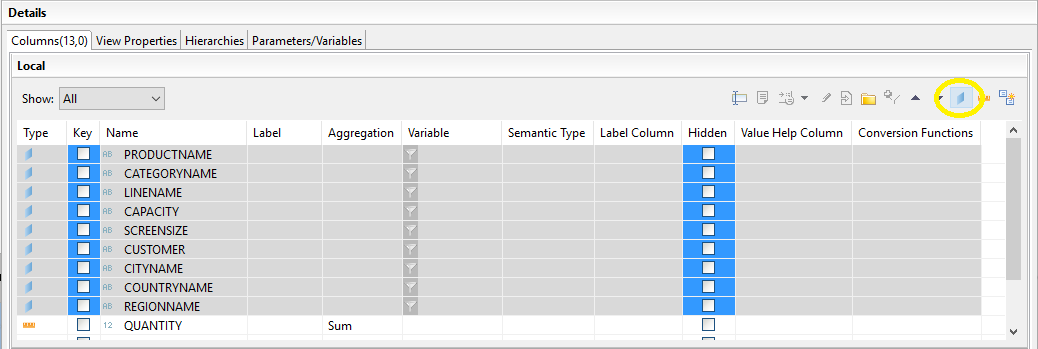
    1. Select Semantics under the Scenario panel.

      Note:
      Make sure the Show menu pulldown is set to All otherwise you may not see your information.

    2. Label Attributes columns.

      1. Highlight the following columns: PRODUCTNAME, CATEGORYNAME, LINENAME, CAPACITY, SCREENSIZE, CUSTOMER, CITYNAME, COUNTRYNAME, and REGIONNAME.

      2. Click Mark as Attribute

        attribute
        .

      Mark as Attribute
    3. Label Measure columns.

      1. Highlight the following columns: QUANTITY, DISCOUNT, NETSALES, and QUANTITYORDERED.

      2. Click Mark as Measure

        measure
        .

      Mark as Measure
    4. Adjust your data as necessary.

      • Under the Label column, you can provide new names for your columns.

      • You may hide any columns by selecting its Hidden column box.

    5. Click Save and Validate

      check
      to save and check your changes.

      An entry will be added to the Job Log window panel.

      Note:
      The system may return the status Completed with warnings. This is expected and the system should still run successfully.

    6. Click Save and Activate

      activate
      to deploy the scenario.

      An entry will be added to the Job Log window panel.

  • Step 7
    1. Refresh your package’s Analytic View folder.

    2. Double-click the Analytic View file you created earlier.

    3. Preview your data. Right-click on your Analytic View file and select Data Preview.

    You can now preview your data by dragging Attributes to the Label axis panel and Measures to the Values axis window panel.

    Here is an example:

    Data Preview

Back to top