Expose Integration Flow Endpoint as API and Test the Flow
- How to define and expose an integration flow endpoint as an API
- How to assign a policy to your API


Prerequisites
- You have created and deployed an integration flow that reads product details using an OData connection. For more information, see Design and Deploy Your First Integration Flow.
Context
In this tutorial, you will define the endpoint of the integration flow developed in the last tutorial as an application programming interface (API).
In addition, you will assign a policy template to the API to define how the API is called. A policy defines, for example, how an API can be called. In this tutorial, you assign a policy that defines an authentication of the API according to OAuth 2.0 client credentials grant. It is a secure way to control access to an API.
After you have performed these steps, finally, you will call the API to fetch the product details.
- Step 1
In this step, you copy the endpoint address of the integration flow.
-
Open your integration flow.
-
In the Deployment Status tab of the property sheet, choose the navigation link.

-
In the Endpoints tab, choose Copy icon.

-
- Step 2
In this step, you define and expose an integration flow endpoint as an application programming interface (API).
-
Choose Settings > APIs to provision the API Management capability. This provisioning might take a few seconds to complete. After the provisioning is complete, refresh your webpage.
The page is available only if you’re provisioning the capability as a first-time user.
-
Choose Configure > APIs > Create to create an API proxy.
-
On the Create API dialog, next to Select: choose URL and specify the following parameters:
IMPORTANT : Paste only the endpoint URL till
/http/productsOtherwise, the scenario will not run appropriately.Parameter Settings URL Paste the integration flow endpoint address you have copied in step 1. It ends with /http/products/details. Paste the endpoint URL only till/http/productsinstead of/http/products/details.Name RequestProductDetailsTitle Product Details APIAPI Base Path /products
Select Create.
-
On the landing page, choose Resources tab and then Add.

-
In field Tag enter
Product Details, and in the field Path Prefix enter/details.
-
Under Operations, delete all tabs except the POST tab and choose OK.

The API Resource is displayed.
-
Choose Deploy to create and activate the API Proxy for your integration flow.

-
Choose the POST operation to display more details on the API. A default API definition in Open API specification format is also generated.
-
To update the generated API definition in Open API format, choose Edit > Edit in API Designer.

The API designer is opened.
-
In the editable section on the right part of the screen, make the following changes.
Change Payload to
productIdentifierand add a row as shown in the following screenshot.TIP: Instead of copying the example, type it manually.


Choose Save.
-
Choose
RequestProductDetailsand then the Resources tab. Then, choose Edit > Edit in API Designer.Now choose the POST request. You notice the API changes, in particular, the request body contains now one element with a product identifier.

-
When you choose Try Out and then Execute, since no authentication details have been configured, you get an error message with error code 401 (not authorized).

With this step, you have successfully created an API Proxy for your integration flow and generated an API documentation for your REST API in
OpenAPIformat.
-
- Step 3
In this step, you’ll copy the client ID, client secret, and token URL from the service key that you automatically generated in your SAP BTP account. See: Set Up Integration Suite Trial.
-
In your SAP BTP subaccount, navigate to your service instance page. Choose Services > Instances and Subscriptions.
-
Under the Instances section, look out for the service instance that was created. Choose the key under the Credentials column to open the service key.

TIP: In trial accounts, the default name that the booster provides for the service instance is default-it-rt-integration-flow. In free tier accounts, the instance name is user-defined.
- Copy the values of
clientid,clientsecretandtokenurlparameters. These are the credentials that you use to make a request to your integration flow.
-
- Step 4
In this step, you assign a policy template to your API to specify authentication details for the API call. In particular, you use a policy template that defines that the caller of the API authenticates itself using OAuth 2.0 client credentials grant.
This grant type works in the following way: In a first call, the API client provides the values of
clientidandclientsecret(from the service key generated in Step 1) to a token service (the URL of the token service is also contained in the service key definition). The token service provides an access token to the API client. In a subsequent call, the API client calls the integration flow endpoint providing the access token. If the access token is valid, the API client is authorized to call the integration flow.-
Choose Discover > APIs.
-
Search for the package Connect to SAP Business Technology Platform Services and select it.

-
Navigate to Artifacts tab.
-
Under Actions, choose Copy.

-
After the success message is displayed, navigate to the Configure > APIs.
-
Choose the API that you created in the previous step.

-
Choose Edit.

-
Select Policies.

The Policy Editor opens.
-
Choose Policy Template –> Apply.

-
Select the template
Cloud_Platform_Connectivityand choose Apply.
-
Open the node Target Endpoint.

-
Choose
PreFlow.
-
In the editor, the OAuth workflow defined by the policy is visualized as a graphical model.
Now, you need the values copied from the service key:
clientid,clientsecretandtokenurl. -
In the graphical model of the Policy Editor, choose the
getcredentialshape.
-
Paste the value of
clientidandclientsecretas shown in the following image.
-
In the Policy Editor, choose the
getoauthtokenshape.
-
Paste the value of
tokenurlas shown in the following screenshot.Note: Make sure that you append
?grant_type=client_credentialsto the token URL that you pasted.
-
Select Update.

-
Select Save.

-
Select Click to Deploy.

-
Confirm the deployment.
You have assigned a policy template now.
Which of the following values are mandatory to authorize the API client and to call an integration flow as an HTTP endpoint?
-
- Step 5
In this step you try out the API to get product details as a response from the web shop.
-
Go to the Resources tab.

-
Choose Try Out.

-
Choose Execute.

-
As result, you see the response from the
WebShopwith the product details for the given product identifier.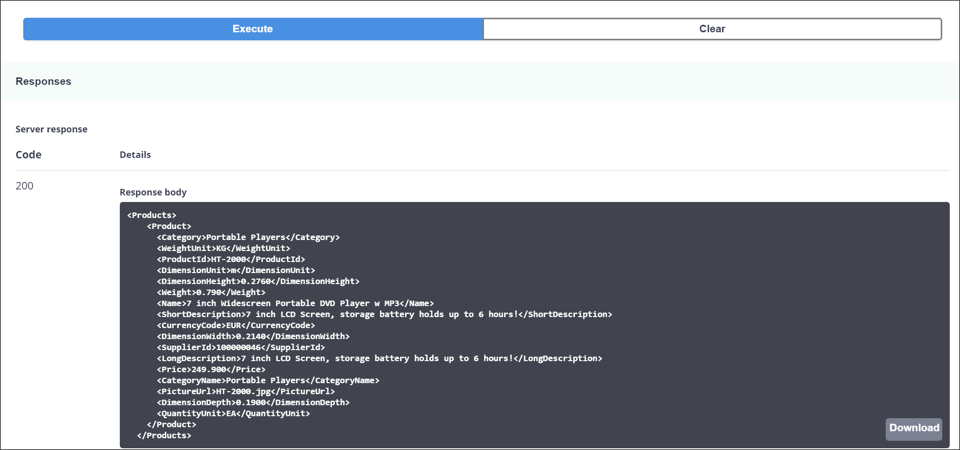
-