Set Up SAP Business Application Studio for CAP Java
- What is SAP Business Application Studio
- How to create a project skeleton for a CAP Java project
- How to expose ports of the application in SAP Business Application Studio to the internet.


Prerequisites
- If you don’t have a Cloud Foundry Trial Subaccount on SAP Business Technology Platform (SAP BTP) yet, create your Cloud Foundry Trial Account.
- Basic knowledge of Spring Boot and Java (optional)
First things first: You need to set up your development environment and check that everything is running smoothly.
For this tutorial, we use the SAP Business Application Studio as the development tool of choice. SAP Business Application Studio provides a web-based Visual Studio Code-like experience. So, it’s like VS Code, but for your browser.
What’s great about using SAP Business Application Studio?
You get an editor, useful extensions and all the tools required to develop CAP applications and full access to the terminal.
To make sure that everything is set up correctly, this tutorial also includes how to build and run a simple Hello World application. The SAP Cloud Application Programming Model (CAP) supports both Java and Node.js development. But for this tutorial, we’re using Java. The CAP Java SDK is able to tightly integrate with Spring Boot, which provides numerous features out of the box. This means, Spring Boot will be your runtime container.
For a general overview about CAP, you might also want to have a look at the official CAP documentation and the CAP Community.
- Step 1
Before you can start using SAP Business Application Studio, you need to create your developer space, where your project will run. Depending on the application you want to develop, you can create different types of dev spaces.
For this tutorial, you will create a dev space personalized for building services and applications with CAP.
Before you begin, check the settings of your browser. You need to add domains
ondemand.comandcloud.sap.comto the list of the exceptions to enable pop-ups and new tabs and disable the ad blocker extension if you use one.-
Go to the SAP BTP Cockpit on Trial.
-
Choose SAP Business Application Studio under Quick Tool Access.

-
On the welcome page choose Create Dev Space.
-
Type
CAPTutorialas the name for your dev space and select Full Stack Cloud Application as the application type. Continue with Create Dev Space.
By selecting Full Stack Cloud Application, your space comes with several extensions out of the box that you will need to develop CAP applications. For example, CDS tools are built in. This saves unnecessary setup time. The creation of the dev space takes a few seconds.
-
When it’s ready, open your dev space by clicking on the name.

Please note that you’re using the trial version of SAP Business Application Studio. See section Restrictions in the SAP Business Application Studio documentation for more details on how your development environment can be affected.
-
- Step 2
-
Change the color theme to your preferences.
Go to File → Preferences → Color Theme and choose an item from the list. We used Dark (Visual Studio).
-
From the main menu, choose Terminal → New Terminal.

-
A terminal window should now have been opened on the bottom of the window. From the terminal, run
cd projectsto go to the projects directory.
-
Now, run:
Shell/BashCopycds init products-service --add javaThis will initialize the application using the maven archetype
cds-services-archetypeand create your project as follows:- The project is named
products-service. - The
dbfolder stores database-related artifacts. - The
srvfolder stores your Java application.

- The project is named
-
From the main menu, choose File → Open Folder.
-
Choose projects → products-service and then OK.

If you see a notification asking if you want to synchronize the
Java classpath/configuration, choose Always.If you have any problem indication for any of the
pom.xmlfiles yet, don’t worry; ignore them for now.
-
- Step 3
CAP applications use Core Data Services (CDS) to describe:
- Data structures by using entity definitions
- How data structures are consumed by using service definitions
In this step, you will define a simple service, which also defines its own entity. In more complex applications, services usually expose projections on entities defined in the data model.
-
Right-click on the
srvfolder and choose New File.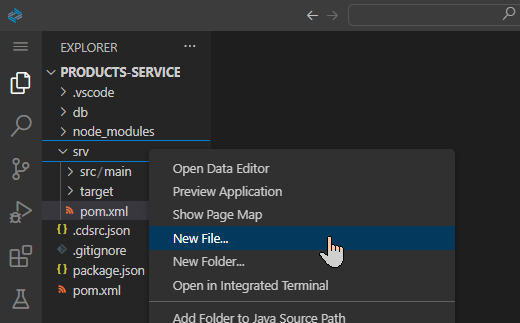
-
Call it
admin-service.cdsand choose OK to create the file. -
Add the following service definition to the file and make sure you Save the file (keyboard shortcut CTRL+S):
CDSCopyservice AdminService { entity Products { key ID : Integer; title : String(111); descr : String(1111); } }
- Step 4
-
From the main menu, open a terminal with Terminal → New Terminal.
You should be in the products-service project but in order to be sure runpwd.Shell/BashCopypwd
-
Run the following command in the terminal to trigger the maven build process:
Shell/BashCopymvn clean install
Running this for the first time in a fresh dev space might take a while, depending on the network. Please wait until you see the BUILD SUCCESS message before continuing with the tutorial.
After running this command, some files are generated and added to the
srv/src/main/resources/edmxfolder. This is the default path, where CAP Java runtime looks for the model definitions.
-
- Step 5
While creating the project skeleton, the application
Application.javafile was created, which contains amainmethod. TheApplication.javais the startup class for the Spring Boot container.-
Look at the
Application.javain thecustomer.products_servicepackage (file path:srv/src/main/java/customer/products_service).
If you use CTRL+P in SAP Business Application Studio, you open a search bar. Start typing
Application.javato find and open the file.As you can see, the file doesn’t contain CAP-specific startup instructions. It’s the typical boilerplate code found in every Spring Boot application. The initialization of the CAP Java runtime is done by Spring automatically, based on the dependencies defined in the
pom.xml. -
Go to the root of your project by running the following command in the terminal:
Shell/BashCopycd ~/projects/products-service -
Start the application by running the following command in the terminal:
Shell/BashCopymvn clean spring-boot:runA notification message saying “A service is listening to port 8080” will appear in the bottom right.

-
Choose Open New Tab.
-
The application start page will be opened in a new tab.

-
- Step 6
-
Make sure that your application is running. From the main menu, go to View → Find Command to open the command palette.

-
Type Port: Preview and select or enter
8080. There will be one application visible and you can open new tab for it.
What are valid keyboard shortcuts to open the command palette?
-
- Step 7
- Choose
$metadatafrom the welcome page to inspect the OData metadata that is automatically served by the CAP Java runtime.

Alternatively add
/odata/v4/AdminService/$metadatato your app URL. Your URL should be the same either way.In the next tutorial, you will learn how to add custom logic. Specifically, so that your application can read and create Products.
- Choose
- Step 8
Sometimes it happens that your CAP Project can’t be started. Does your log output look similar to this one?

This means that your application is still running in another terminal. Check if you have multiple terminals opened or use Ports: Preview to check if you have another application running on same port.

-
Stop the application in the other terminal by using
CTRL+Cor … -
Choose the x icon next to the terminal to close the terminal window and implicitly stop all inherited processes.

Great Job! You have built your CAP Java application skeleton and are good to serve some data.
-