Consume SOAP Web Services in SAP Cloud Application Programming Model (CAP)
- Understand the business problem
- Understand the application architecture
- How to get prepared for development
- How to get the web service definition (WSDL)
- How to create the web service reference
- How to use the destination and XSUAA services to point to the service host
- How to use additional node modules to create the SOAP client and perform the web service calls
- How to develop a reusable module to create SOAP clients
- How to develop the CAP service code to achieve the application’s objective

Prerequisites
- Get an SAP Business Technology Platform trial account following this tutorial
- Setup SAP Business Application Studio in your trial account following this tutorial
- Have access to an SAP S/4HANA Cloud tenant with a communication user with access to communication scenario
SAP_COM_0193orSAP_COM_0093, via some communication arrangement (unfortunately S/4HANA Cloud trial tenants do not provide it, so make sure you’re granted such access by other means)
IMPORTANT NOTE: this tutorial is intended for developers who have previous experience in developing CAP applications which consume either OData or REST APIs using SAP Business Application Studio and SAP BTP destinations, as well as handling communication scenarios and communication arrangements in S/4HANA Cloud.
- Step 2
You are going to build a simple CAP application that reads Business Users from S/4HANA Cloud (which are exposed exclusively via a SOAP web service).
You can view the application architecture bellow:

- Step 4
The first thing you need to do is to get the web service definition which is described in WSDL (Web Services Description Language).
WSDL is an XML notation for describing a web service. A WSDL definition tells a client how to compose a web service request and describes the interface that is provided by the web service provider.
You can get such definition from SAP API Business Hub, so access
https://api.sap.com.In the home page, first make sure to (1) login to API Business Hub.
NOTE: you must login for the download process to work properly.
Then, after login, (2) click on the S/4HANA Cloud tile.

In the next page, (1) click on the APIs tab, then, (2) in the find box, type “business user read” and press enter. Finally, (3) click on the Business User – Read tile.

In the next page, click on API Specification.
NOTE: make sure your communication user (set up in your destination) has access to communication scenario
SAP_COM_0193orSAP_COM_0093, via some communication arrangement, as indicated below:
Click on the down arrow next to WSDL and save the
QUERYBUSINESSUSERIN.wsdlfile in your local computer.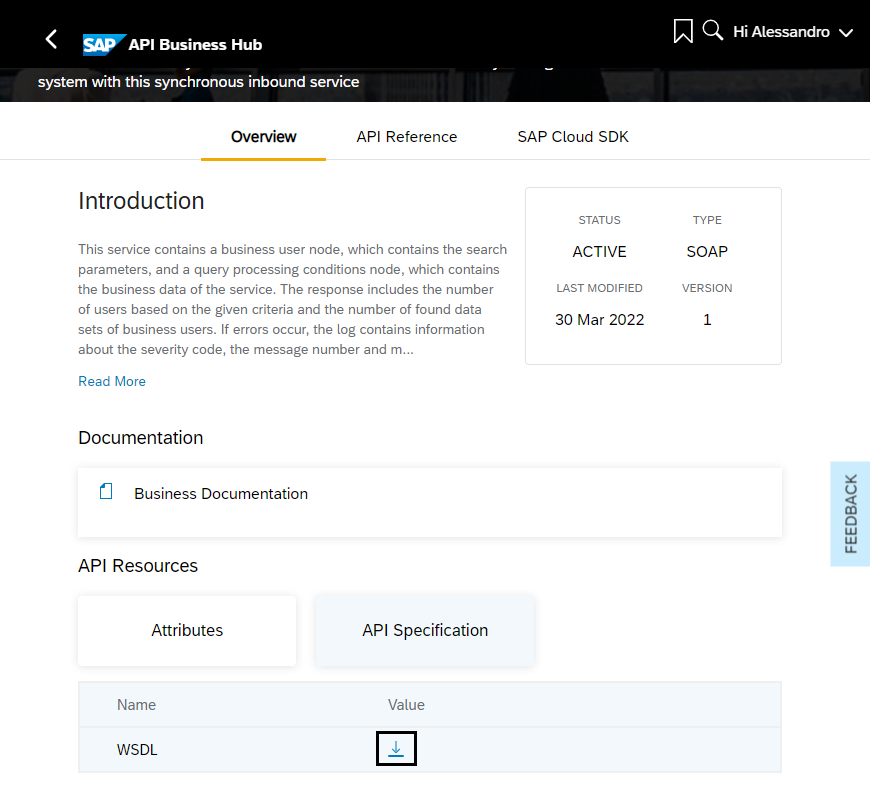
Now, go to your CAP project in Business Application Studio and create a folder named “external” under the
srvfolder, then drag & drop the recently downloadedQUERYBUSINESSUSERIN.wsdlfile into it like demonstrated below:
This definition will be used later upon creation of the web service client.
- Step 5
The next step is to reference the web service in the project’s
package,jsonfile. So, open it up and insert the following code snippet right before the last curly bracket:JSONCopy, "cds": { "requires": { "UserRead": { "kind": "SOAP", "credentials": { "destination": "S4HC", "path": "/sap/bc/srt/scs_ext/sap/querybusinessuserin" } } } }After the insertion, your
package.jsonfile should look like the screenshot below:
Notice that the reference is pointing to the destination that has been previously created in BTP with the path to the actual service location.
Although the destination already points to the S/HANA Cloud host, as the WSDL file has been downloaded from SAP API Business Hub (not directly from a communication arrangement in the actual S4/HANA Cloud tenant), the service location within it is “generic”, meaning it’s just a “placeholder” in the format of
https://host:port/<service path>.Therefore, you still need to replace such placeholder with the actual S/4HANA Cloud tenant host, but the code snippets in this tutorial have been developed to dynamically set the service endpoint at runtime using the
setEndpointmethod from the soap node package. So, it’s not necessary to do such replacement directly in the WSDL file, although it can be done if you desire, like in the screenshot below:
Now, the project is fully set up to communicate with the web service via the application code.
- Step 6
Before moving on to binding the services to your project, make sure to login to Cloud Foundry either via the BAS command palette (View > Find Command) or command line interface (CLI) in the terminal.
After login, create the destination and XSUAA service instances using the command lines below:
cf create-service destination lite busers-destcf create-service xsuaa application busers-xsuaa
Upon successful creation of the service instances, on the left-hand pane of BAS (1) click on the Cloud Foundry icon (small light bulb), then (2) on the refresh button at the top right of the pane.
The newly created instances should be displayed (3) at end of the list, like demonstrated below:

Right click on the
busers-destservice instance and select “Bind service to a locally run project” and, then, in the dialog, make sure thebusiness-usersfolder is selected and click on the “Select folder for.envfile” button.
Now, repeat the same procedure for the
busers-xsuaaservice instance.Click again on the Explorer icon in the left-hand pane and, then, (1) on the refresh button at the right of the project name. (2) You should see the
.envfile that has been created like demonstrated below:
Now, you need to (1) rename that file to
default-env.jsonand (2) transform its contents into JSON format (as it’s just defining a regular environment variable calledVCAP_SERVICESwhich is not in the expected JSON format), like demonstrated below:
- Step 8
In a productive scenario, you usually would have more than one web service being manipulated throughout the application code, so it’s convenient to create a module with a function that facilitates the creation and handling of SOAP clients and can be largely reused.
Under the
srvfolder create a folder namedliband, in that folder, create a file namedsoap-service.jslike demonstrated below:
Open-up that file and paste the following code snippet into it:
JavaScriptCopyconst soap = require('soap'); const client = require('@sap-cloud-sdk/http-client'); const connectivity = require('@sap-cloud-sdk/connectivity'); // Helper to create a soap service through the BTP destination service async function getSoapService(service, wsdl, endpoint) { // Get the service reference var definition = cds.env.requires[service]; // Get the destination data from BTP const dest = await connectivity.getDestination({ destinationName: definition.credentials.destination }); // Get service endpoint const url = (dest.url.substr(dest.url.length-1,1) === '/') ? dest.url.substr(0,dest.url.length-1) : dest.url; endpoint.url = url + definition.credentials.path; // Create an httpClient which connects over the BTP destination var httpClient = { request: async function (url, data, callback, exheaders, exoptions) { client.executeHttpRequest(dest, { method: 'POST', url: url, data: data, headers: exheaders }, {...exoptions, fetchCsrfToken: false}).then((result) => { callback(null, result, result.data); }).catch((e) => { callback(e); }); } } // Instantiate the service using that http client return soap.createClientAsync(wsdl, { httpClient: httpClient }); } module.exports = { getSoapService }The code is quite simple: the
getSoapServicefunction receives the service name (defined inpackage.json) and the WSDL file location with the service description, then fetches the destination data from BTP and uses it to get the service endpoint and create an HTTP client, which is then passed to thecreateClientAsyncfunction from the soap package, that returns a promise to get the actual SOAP client later in the application code. - Step 9
Now, you must create a handler function which will invoke the web service method that returns the business users from S/4HANA Cloud as response.
In the
libfolder, create a file namedhandlers.jslike demonstrated below:
Open-up that file and paste the following code snippet into it:
JavaScriptCopyconst { getSoapService } = require('./soap-service'); let userReadServicePromise = null; let userReadServiceEndpoint = { url: null }; (async function () { // Connect to external S/4HC SOAP service userReadServicePromise = getSoapService('UserRead', './srv/external/QUERYBUSINESSUSERIN.wsdl', userReadServiceEndpoint); })(); /*** HANDLERS ***/ async function readBusinessUser(req) { try { // Get the SOAP client for the UserRead service const userReadService = await userReadServicePromise; userReadService.setEndpoint(userReadServiceEndpoint.url); // Set the parameters for the QueryBusinessUserIn method of the sevice const param = { BusinessUser: { PersonIDInterval: { IntervalBoundaryTypeCode: 9, LowerBoundaryPersonID: "0000000000" }, BusinessPartnerRoleCodeInterval: { IntervalBoundaryTypeCode: 9, LowerBoundaryBusinessPartnerRoleCode: "000000" } }, QueryProcessingConditions: { QueryHitsUnlimitedIndicator: true } }; // Invoke QueryBusinessUserIn method asynchronously and wait for the response const resp = await userReadService.QueryBusinessUserInAsync(param); // Prepare the actual service response const busUsers = []; if (resp && resp[0] && resp[0].BusinessUser) { resp[0].BusinessUser.forEach(busUser => { busUsers.push({ ID: ((busUser.User) ? busUser.User.UserID : busUser.PersonID), FirstName: busUser.PersonalInformation.FirstName, LastName: busUser.PersonalInformation.LastName, PersonFullName: busUser.PersonalInformation.PersonFullName, BusinessPartnerRoleCode: busUser.BusinessPartnerRoleCode, HasUser: ((busUser.User) ? true : false) }); }); } return busUsers; } catch (err) { req.error(err.code, err.message); } } module.exports = { readBusinessUser }Upon module loading, a promise to the service is created by the
getSoapServicefunction, which is, then, used in thereadBusinessUserhandler to get the actual SOAP client for theUserReadservice referenced inpackage.json. TheQueryBusinessUserInmethod of the service is invoked asynchronously, passing a few required parameters (basically filters and query processing definitions), and the response is finally formatted into the expected CAP service response. - Step 10
Now that you have the complete business logic of the application, you can create the CAP service definition to expose the data fetched from S4/HANA Cloud via a service entity and attach the handler function to its READ event.
In the
srvfolder, create a file namedbusers-service.cdslike demonstrated below:
Open-up that file and paste the following code snippet into it:
CDS Service Definition LanguageCopynamespace sap.extensions.soap.busers; service BusinessUsers @(path : '/bussiness-users') { entity BusinessUser { ID : String(12); FirstName : String(128); LastName : String(128); PersonFullName : String(258); BusinessPartnerRoleCode : String(6); HasUser : Boolean; } }Here you are just exposing a non-persistent entity named
BusinessUsercontaining only some relevant fields to be fetched from S/4HANA Cloud. - Step 11
The last step is to attach the handler function to the READ event of the
BusinessUserentity, so the CAP service can be called to retrieve the business users data from S/4HANA Cloud and return it to the client as an OData v4 response.In the
srvfolder, create a file namedbusers-service.jslike demonstrated below:
Open-up that file and paste the following code snippet into it
JavaScriptCopyconst cds = require('@sap/cds'); const { readBusinessUser } = require('./lib/handlers'); module.exports = cds.service.impl(async function () { /*** SERVICE ENTITIES ***/ const { BusinessUser } = this.entities; /*** HANDLERS REGISTRATION ***/ // ON events this.on('READ', BusinessUser, readBusinessUser); });As you can see, the
readBusinessUserhandler is attached to the ON READ event of theBusinessUserentity. - Step 12
Finally, you are all set! So, test the application by running
cds watchand, then,CTRL+Clickon thehttp://localhost:4004link to open-up the CAP service home page in a new tab:
Now, click on the
BusinessUserentity link and, after some seconds, you should get the JSON containing the Business Users from your S/4HANA Cloud tenant, like demonstrated below:
And that’s it! A fully working CAP service consuming a SOAP web service from S/4HANA Cloud.