Check Status of Process from SAP Build App
- How to retrieve the instances for a process
- How to check the status for a specific instance

Prerequisites
- You created the Sales Order Trigger application, as described in Create SAP Build App to Trigger Workflow.
In addition to triggering a workflow, you can get the status of a workflow, the tasks within a workflow, and a whole lot more.
In this tutorial, we will create a new page to display the processes we have triggered (including its ID, status and time it was triggered), and let the user click a button for each to check if its status was updated.
We will use the process flow functions that come with SAP Build Apps, making this task quite easy. You can also use a wide range of APIs to interact with processes, and these are described in the SAP Business Accelerator Hub. Select the API you are interested in, and then click View the API Reference.
- Step 1
You will create a separate page to display the process instances, including each one’s ID, time it was triggered, and its status.
-
In the top-left of your project, open the page dropdown and click Add New Page.

For Name, enter
Process Status.Click OK.

-
Add a container into the page.

Right-click the container, and select Copy.

Right-click the container, and select Paste.

This will create nested containers.

-
Copy the following text:
Container CodeCopyH4sIAAAAAAAACt1ZbW/bOBL+Kwb3DtgAolcSKYkUsB+8TnJrbJrkNukVRV0YfBnZQmVJkOg0uaL//UDLSpzEybKtvR/O+WDJEjkzzzzPcMh8QeauBpQiVS3rqoTSTMrWiFIB8lBuYInSLw/P7E2uUYooEzQQWmMWqhhTSWLM4oxgBSJiPBacCoo8pPO2LsTdrBRLa2NclUbkJTQDgjy0+fEGGpMrUcxkdTsrxF21MshDopm31tpN3uayAJSaZgUekkJ9mjfVqtSTpZjb4eirh1pzZ1/5guaiHmUGGnvdVqtG2TfMApY2mhtRrOz9P9paqLycz+7Dmp3ZWeaiPimFLEB31vqJZ6oQbYtSdO+cWuSFbqBE6YcNHsRnEAYywVQkgGkEAsuIExwA5TyKfa2j+Dke17kpYBA8YKFWramWOCEkAJkQDDThmNKAYcligXXAIKGx9qXPtzBSVWnWyUHvquZTVlSfB1dGmFVrg97G7++DauPSZZMvRXP3GLKPX70eNR0mUocR1lGUYMqTGDNGNWZBwDPCmYaMvMai4P+MRSojcaAVwZwFAlOdMcwYCTDEgdQBi6TP9Wt4hIfBQxT5vJwYWK4zC6WFxkNZAbfHeQPK5FWJUtRUn5F3YOzqjk9j0VgcGqhBmEeWajEHfCOa3M6CPPQJ7tbDKgVt21e2dthAW1dlC6OmEXfW8vNcBFHIqKYaRyGJMY0yhgWRHMswjgKaSJ+z8HkuflsZU5U7JB0CREpBiHloJR35AktFYxwqHygJQyoh2EpQISQUKEW7dbw2u8EpE0X7SNg6X0LZ5lXZ/gYLcZNXDUpRlpvrarypE39Tll5SPSSBhFglmFIIMeWgscx8jinogIgwoMpXO2ol3JoduAodKBb4AodaWlwFwyILKY4zqQMeZjqJyK5SuRV3RyPQ93RRq6aB0gxzbcN9gvxS3J5BOTcLlEa+73uohQKUWfOtS4aHytVSQnORneUltCj1/zI9XTD7ToyHFpDPF+ZlHnzOtQ0EEf+f/d3Wyy2Y/6xNvpThS9GIeSPqxUupZoopKoMEB0lGMSVJjKWOqC1oEZMh89W6z9iV6vAQqYbbuoHWot8n+wvKqma5KgRK0enFn29G17Pj0fXJ9eTNyezsYjw6+7mnx7CnRWtEY0CPjDeYouPjX968+eX9+/fvB7//ni6XadtO0dGg+yAPtarJa/Pi5GcXF3+8vey/elPetOfgFB15U3RvsbvdbdPiCDWUGkqVW9p9+LBN7c2E1qV+NvTxo4eyVbmu4HbAbieRhzr/0Mev+9eDqorqMd3bpWgM3qQPd88fyH81upwt8vmisMy2zHSpd1lVmndrLaAUJb6/f6UZuDUju04+LJHfrRotNGc8JFjxzLZFGcM8yigmIREx1xGju9qirpl8LpvvbSZdKmTbLU9PWfF6fh+JcIP0tgwnpzs1Z1bt4NdfB1P059vz88n5v6bIm6KfaBDzk2CKvL8adfX26vLk/PjkuBs3Ho/Hvu8wbjw6H5+c9cNOT31/PWyKfvL97vro6Ghb6JPTnydXs5N/v/0WeZtV213fB3f0NLofmHQr9qOnwf/AtA/QHL2OjXNdsmR6VpQmp8hDvZtPitFO8cNtLUr9br22PdE+P7T2m74sfct+qPuzLXX1uV23oLcoDQLfQ3copb6H/rtpbVOS3nuTOu451yXFh5DrmAx5EkZMRcjrt/1w03cCTZcbC3+urx8/XX9fbTfZ3+xJakRtsyGKwm43zvu9y2aOQfc4b8dVmeXzVSO2qokbHo7NRtfdZ1rxyB+GgvlUhnvGw8WTw+Ph2Gd3O/Ew0kJFQ0oSnnC2ZzxcPDk8Ho6nDWs8BMtIErBhmCQcCNm3Xhw8OTwejjvcNR4yCllE5DDmQZZQtWc8XDw5PB6Opy/dSQ0BEWfxUAlOJdk3Hi6e/BgeG2+NkH1E30uP/qTi3nI6uD8EcbTkuJDtsNQfoLoacqsAOwxtnzk6GnNcjnZF1e1/He040vbVoJyNOa4pLwXlDJ7jFuhFSnQBuaje0dLazTiSoHQ2lOCTQMd7Vr2LJwdXveM/dl5lE3EG39FaV3IDlcVcDyGKwSewZ/BdPPkB8G133+00RnW98Wy5KkxeF8LYrS/6+j8jA/omihsAAA==Right-click Container 2 – either on the canvas (it should still be selected) or in the tree view – and select Paste.

You should now see the skeleton layout.

-
- Step 2
After retrieving the process instances, you will need a place to store the information.
-
Click Variables.
-
Click Page Variables, and then click Add Page Variable.
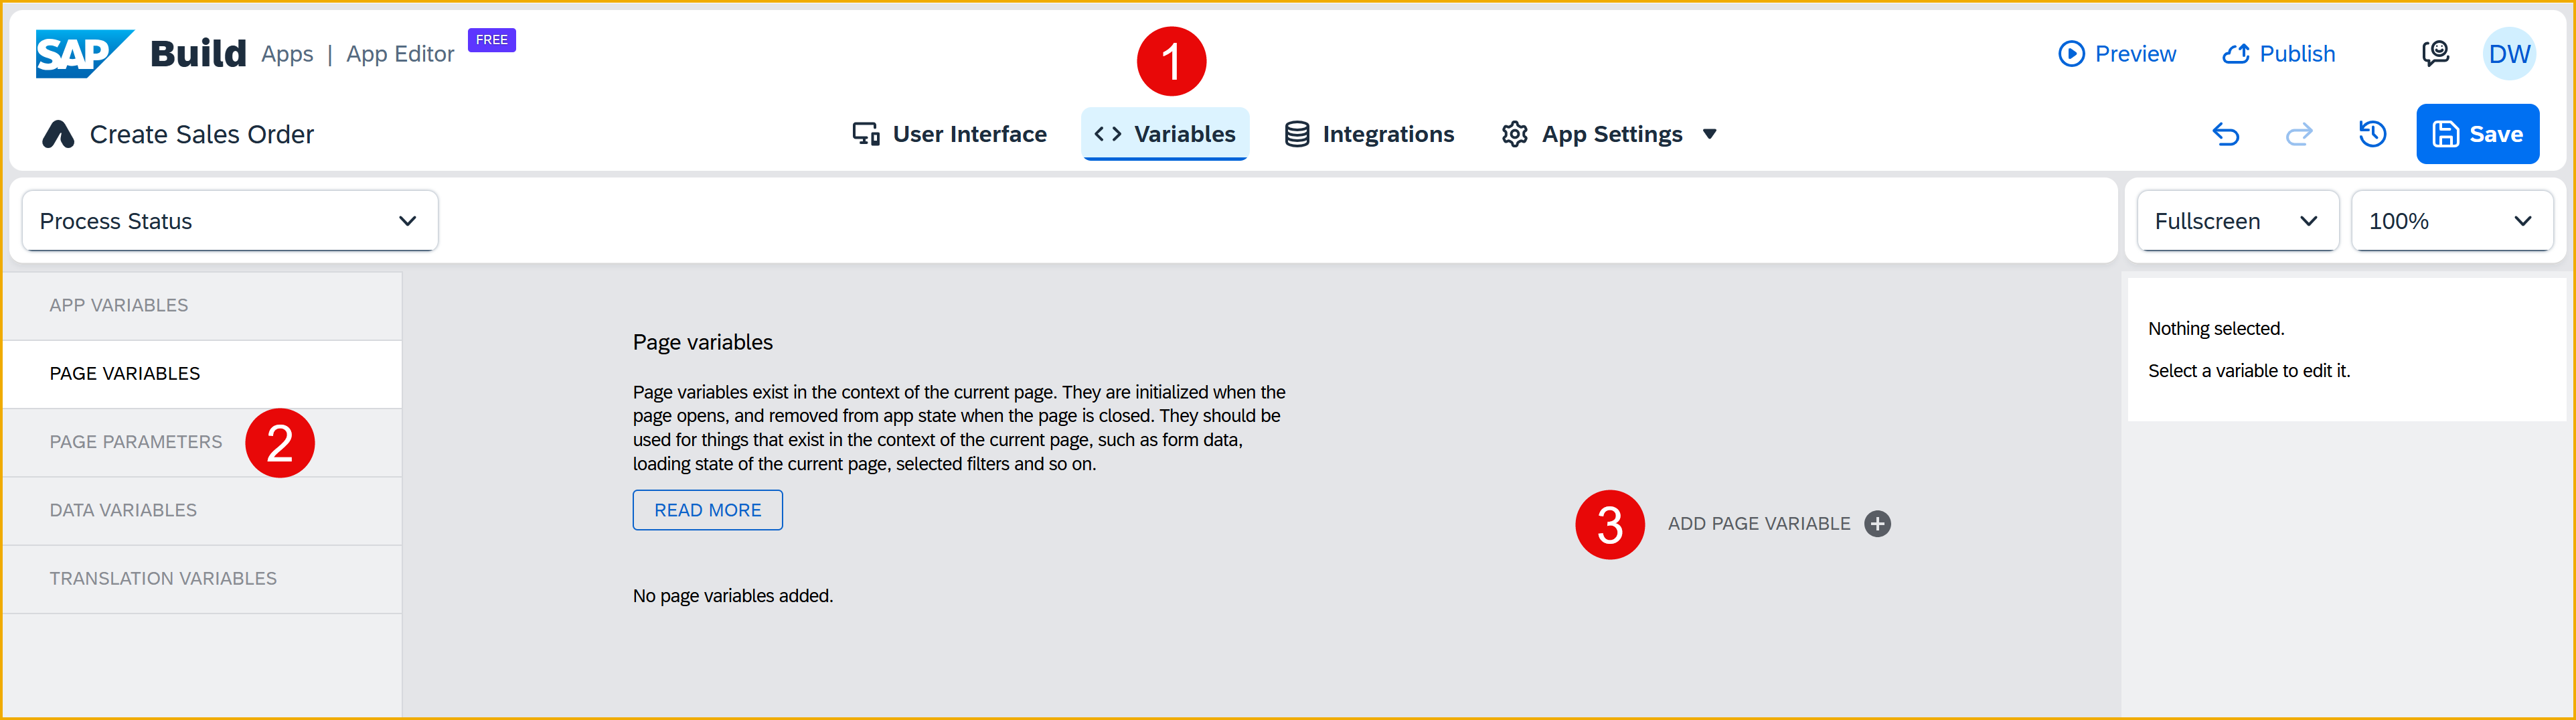
Choose From existing schema.

-
Select Process, then navigate to Order Processing > Retireve process instances > Output Schema.
Click Create.

-
Change the name of the variable to processInstances.

-
Click Save (upper right).
-
- Step 3
-
Click the User Interface tab.
Open the logic pane by clicking Add logic to Process Status.

-
Under Processes, drag in a Retrieve Instances flow function and connect it to the Page Mounted event.

With the flow function selected, set Process to Order Processing.

With the flow function selected, set the startedBy property to Data and Variables > System Variables > Currently logged in user > email.
You can filter it to whichever user you want, or perhaps not filter the list at all.

With the flow function selected, set the orderBy binding type to Static text. Then, select startedAt desc.

-
Drag a Set page variable flow function and connect it to the top output of the Retrieve instances flow function.

Set Variable Name to processInstances (this should already be set).
Set Assigned Value to Output Value of Another Node > Retrieve Instances > Success.

To store the information about all the process instances, you created what type of page variable?
-
- Step 4
You will create navigation so the user can open up the process status page from the home page.
-
Open the App Settings > Navigation tab.

-
Click Add Item. This will add a row to the navigation.

-
Select the new navigation menu item, and set the following in the Properties pane on the right:
Field Value Icon play-circle Tab Name Process Status Page Process Status 
-
Select the Empty Page menu item, and change its Tab name to Home.

-
Click Save (upper right).
-
- Step 5
Run the app, and click the new Process Status navigation menu item.

You should now see the process instances that you started. The exact data will depend on how many you created and their statuses.
- Step 6
To get any status that changed, you can just refresh the page. But now you will create logic for the status button to retrieve the latest status for a specific process instance.
-
Click the User Interface tab.
Make sure you are on the Process Status page.
Click the first Status button, and make sure the logic canvas is open. If it’s not open, click Show logic for Button 1.

-
Under Processes, drag in a Retrieve Instances flow function and connect it to the Component Tap event.

Set the Process to Order Processing.
Set id to the following formula:
JavaScriptCopyrepeated.current.id
-
Drag a Set page variable flow function and connect it to the top output of the Retrieve instances flow function.

Set Variable Name to processInstances.responseArray.
Set Assigned Value to the following formula:
JavaScriptCopySET_ITEM_AT(pageVars.processInstances.responseArray,repeatedInfo.current.index,SET_KEY(pageVars.processInstances.responseArray[repeatedInfo.current.index],"status",outputs["Retrieve instances"].workflowInstances.responseArray[0].status))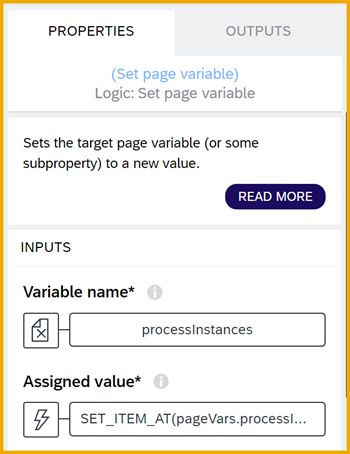
In the formula for updating the status of the current process instance (after the user clicks the "Status" button), which 2 functions did you use?
-
- Step 7
Run the app again (it should refresh on its own), and click the navigation to go to Process Status. You should see something like this.

Go to SAP Build Process Automation, and suspend the process.

Go back to your app and click Status for the process. The status should change to Suspended.
