Get Started with SAP Cloud Transport Management Service
- How to create a subaccount in an SAP BTP global account
- How to configure entitlements to SAP Cloud Transport Management service
- How to subscribe to SAP Cloud Transport Management service
- How to set up role collections required for SAP Cloud Transport Management service
- How to create a service instance of SAP Cloud Transport Management service and a service key

Prerequisites
- If you are new to SAP BTP, follow the tutorial View the SAP BTP from 10,000 Meters.
- If you do not have an SAP BTP account, follow the tutorial Get an Account on SAP BTP Trial.
Please note that it involves a significant amount of manual work to migrate an SAP Cloud Transport Management landscape from a trial account to a standard instance (for productive use). In contrast, it is very easy to switch a free instance of SAP Cloud Transport Management to a standard instance, keeping all your configuration intact. We therefore recommend to use a subaccount in a CPEA-enabled global account if available to you. To do this, follow the steps under Enterprise Account.
For more information about SAP Cloud Transport Management service, see the SAP Help Portal at SAP Cloud Transport Management Service.
- Step 4
After successful subscription, you need to configure user access to the SAP Cloud Transport Management application. You create different role collections for the different SAP Cloud Transport Management roles, and assign roles to the role collections based on the application templates. Afterwards, you assign the role collections to users or user groups.
Although the screenshots show the steps in the trial account, they are identical and therefore also valid for an enterprise account.
-
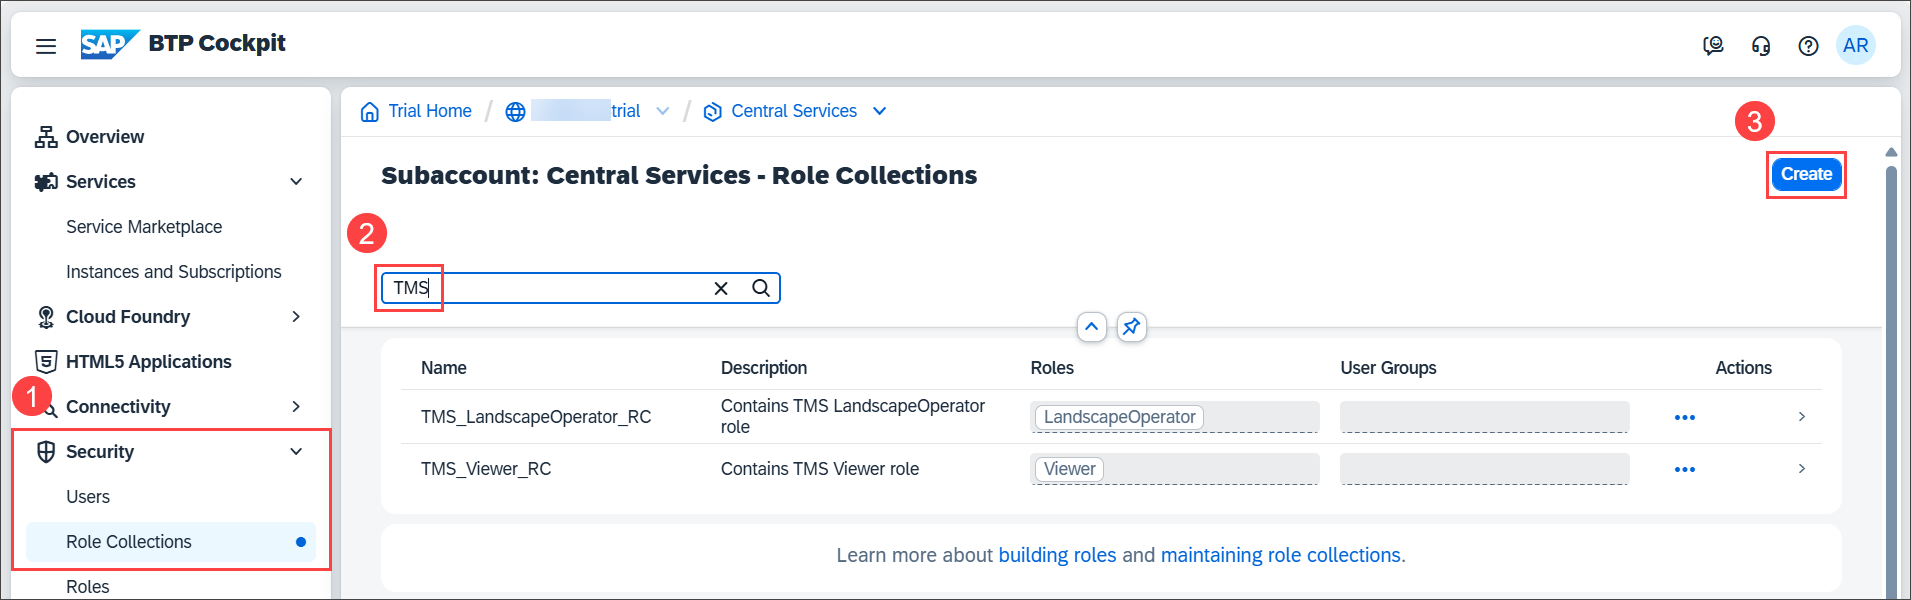
Before you can use the user interface of SAP Cloud Transport Management, you’ll need to set up role collections and assign roles and permissions to your user, which you will do in this step. To create role collections for the roles that you want to use for the service, choose Security > Role Collections from the navigation on the left (1). Filter for role collections called TMS (2). The delivered role collections are displayed. To create a new role collection, choose Create (3).
-
To create a role collection for administrative tasks, enter a name, here
TMS Admin(1), a description (optional), and choose Create (2).
-
The role collection was created.

-
To assign the SAP Cloud Transport Management Administrator role to the new role collection, go to the Roles tab of the subscription details. To do this, choose Services > Instances and Subscriptions from the navigation on the left (1), and select the arrow at the end of the Cloud Transport Management row (2).

-
Select the Roles tab.

-
On the Roles tab, the default role templates for SAP Cloud Transport Management are displayed. In the row of the Administrator role template, choose the + button.

-
On the Add to Role Collection dialog box, select the TMS Admin role collection (1), and choose Add (2).

-
The role collection was added to the Administrator role template.

-
You can now add users to the new role collection. To do this, choose Security > Role Collections from the navigation on the left (1). Filter for the TMS role collections (2). Select the arrow at the end of the TMS Admin row (3).

-
In the details of the TMS Admin role collection, choose Edit.

-
You can add individual users or user groups to the role collection. In the tutorial, add an individual user. To do this, select the identity provider (here: Default identity provider). In the ID field, enter an existing e-mail address and choose
Enter(1). The E-Mail field is automatically filled with the selected e-mail address. Save your changes (2).
-
The role collection was added to the selected user. You see that 1 user is displayed.

If you want to create other role collections for other tasks, such as the Import Operator for import tasks, you can repeat the steps. However, this is not required for the tutorial.
See also on SAP Help Portal: Setting Up Role Collections
-
- Step 5
A service instance is required to enable the usage of SAP Cloud Transport Management service using programmatic access (using API Remote Call), for example if you want to use the service to export content directly in your application. To create a destination to SAP Cloud Transport Management service, you need to provide a service key.
Although the screenshots show the steps in the trial account, they are identical and therefore also valid for an enterprise account.
-
In your subaccount, choose Services > Instances and Subscriptions (1). Choose Create (2).

-
From the Services dropdown menu, select Cloud Transport Management (1). From the Plan dropdown menu, select the standard plan of the Instances type (2).

-
Enter an Instance Name (1), and choose Create (2).
You don’t have to choose Next, because the next step isn’t necessary for SAP Cloud Transport Management. It’s a default step when creating service instances, allowing you to enter JSON parameters, but SAP Cloud Transport Management doesn’t support JSON parameters.

-
The service instance is being created.

-
When the instance is created, you can create the service key. Select the three dots (…) at the end of the row and choose Create Service Key.

-
On the New Service Key dialog, enter a name for the service key (1), here
cTMS1-key, and choose Create (2).
-
The service key is created. To display it, select the three dots (…) at the end of the row and choose View.

-
The service key looks as follows. For the destination to SAP Cloud Transport Management service, you need, for example, the values of
clientid,clientsecret, andurlin theuaasection.
See also on SAP Help Portal: Creating a Service Instance and a Service Key
Why do you need a service instance?
-
- Step 6
You should now be able to access the user interface of SAP Cloud Transport Management service.
-
To check this, in your subaccount, choose Services > Instances and Subscriptions (1). In the Subscriptions section, choose the Cloud Transport Management link or the Go to Application icon to the right of it (2).

-
In a new tab, you should now see the Overview page of your SAP Cloud Transport Management service instance. Currently, it looks quite empty which is expected from a new instance.

This concludes the tutorial. Congratulations!
For more information, see the SAP Cloud Transport Management documentation on SAP Help Portal.
What do you need to do to get started with SAP Cloud Transport Management service?
-