Skip to Content

Modify Error Handling with Custom Objects

Requires Customer/Partner License
Maintain custom objects to customize the error handling in the message monitor of SAP Application Interface Framework.
You will learn
  • How to create a custom hint to provide additional information about how to solve a particular error
  • How to create a custom data link that links a particular error code to a field in the data structure
  • How to create a custom message text to replace the default log message text with a user-specific text
  • How to create a custom function to navigate to a transaction
peasantsbootAlexander BundschuhDecember 8, 2022
Created by
peasantsboot
December 8, 2022
Contributors
peasantsboot

Prerequisites

  • You’ve set up SAP Application Interface Framework
  • SAP S/4HANA 1709 or later, AIF 4.0
  • You’ve completed the tutorial Create a Simple IDoc Interface

In this tutorial, you will learn how to use custom objects to simplify the error resolution of an interface in SAP Application Interface Framework.

You can link custom objects, such as hints, data links, message texts, and functions, to a log message and an interface to modify the error handling process to your preference.

This tutorial focuses on creating custom objects for an IDoc interface. Note that custom objects are also supported for any other technology that SAP Application Interface Framework supports, such as Proxies or Web Services.

  • Step 1

    As custom objects are defined directly in the Message Monitor based on an existing log message, let’s first create a couple of sample messages to use later.

    Send in new test IDocs, for example using the Test Tool for IDoc Processing (transaction code WE19).

    1. Send in a new test message with a new customer. The message should be processed successfully.

    2. Send in a new test message with a wrong customer type (for example, change CUSTTYPE to X). This message should run into an error.

    3. In SAP GUI, check the results of your test in the Interface Monitor (transaction code /n/AIF/IFMON).

      When you select the summary line for your interface, you’re forwarded to Monitoring and Error Handling, where you can see your selected test messages. Choose either the Success or the Error icon to display the respective message. One message should be in status Successful with the message text confirming that the flight customer has been created. The other message should be in status Error with the message text Customer type can be only B or P.

    Monitoring and Error Handling
  • Step 2

    Once the new flight customer has been created, you want to navigate to the customer record to display its details. Let’s configure this navigation using a custom function.

    1. In Monitoring and Error Handling, select the successful message.

    2. In the Log Messages section, select the message text stating that the flight customer has been created.

    3. In the menu, choose Customize > Custom Functions.

      Menu Custom Functions
    4. In the Custom Function Action section, enter transaction BC_GLOBAL_SCUST_DISP.

    5. In the Parameter table, maintain a new entry with the following details:

      Parameter ID Fill Method Value from Message Variable
      CSM Message Variable [MsgVar2]
      Create Custom Function
    6. Maintain the following details in section Custom Function Attributes:

      Parameter Value
      Text Display customer
      Tooltip Display customer
      Icon @A0@
      Skip First Screen check the box
    7. Save your changes

      Selecting the Display customer icon in the Log Messages section now forwards you to the customer record display screen.

  • Step 3

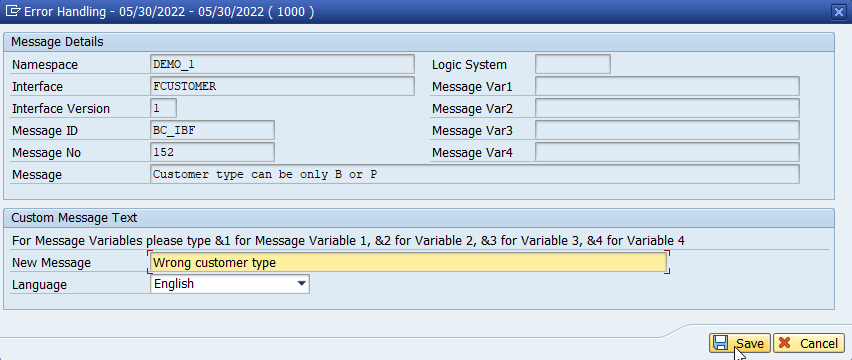
    For the erroneous message, you’d prefer an own custom text instead of the default log message.

    1. Select the erroneous message.

    2. In the Log Messages section, select the message text stating that the customer type can only be B or P.

    3. In the menu, choose Customize > Custom Message Text.

      Menu Custom Message Text
    4. In the upcoming dialog, enter the New Message Wrong customer type.

      Create Custom Message Text
    5. Save your changes.

      The customized message text is now displayed in the message log.

  • Step 4

    For the erroneous message, you also want to maintain a hint that describes how to fix the error.

    1. Select the erroneous message.

    2. In the Log Messages section, select the new customized message text.

    3. In the menu, choose Customize > Custom Hints.

      Menu Custom Hints
    4. In the upcoming dialog, enter the Tooltip Wrong customer type.

    5. Maintain the Text by copying and pasting the following hint:

        You have entered a wrong customer type.
        To be able to proceed with the customer creation, navigate to the Customer Type field in your message, and enter a valid type, i.e., either B or P, then save and restart the message.
      
      Create Custom Hint
    6. Save your changes.

      Selecting the icon in the Hints column in the Log Messages section now displays your custom hint text.

  • Step 5

    To facilitate the error resolution, you’d like to directly navigate to the field in the data structure that causes the error.

    1. Select the erroneous message.

    2. In the Log Messages section, select your customized message text.

    3. In the Data Structure section, double-click the data structure E1BPSCUNEW.

    4. In the Data Content section, scroll to the very right, and select the field in column CUSTTYPE.

    5. In the Log Messages menu, choose Customize > Custom Data Link.

      Menu Custom Data Link
    6. In the upcoming dialog, choose Create to confirm the creation of the new data link.

      Create Custom Data Link

      The value of the field CUSTTYPE is highlighted in red.

      Double-clicking the log message now navigates you to the problematic field in the Data Content section.

  • Step 6

    Before testing the custom objects, let’s change the customer type field so we can fix the error.

    1. Go to Customizing for SAP Application Interface Framework (transaction code /n/AIF/CUST) and navigate to Error Handling > Define Interface-Specific Features.

    2. In the upcoming dialog, enter namespace DEMO_1, interface FCUSTOMER, and version 1, then press Enter.

    3. Double-click Define Changeable Fields in the menu on the left. Add a new entry with Index number 10 and Field Path E1SCU_CRE-E1BPSCUNEW-CUSTTYPE.

      Define Changeable Fields
    4. Save your changes.

      Back in the Monitoring and Error Handling screen, the field Customer Type is now editable in the Data Content section.

      If you opened Customizing in a new screen, you might have to restart Monitoring and Error Handling for the changes to be visible.

  • Step 7

    Now finally, let’s test that the custom objects we configured are working as planned.

    1. As in step 1, send in a new test message with a wrong customer type to force an error.

    2. In Monitoring and Error Handling, refresh the list of messages. The new message should be in status Error.

      Your custom message text Wrong customer type should be displayed.

      Monitoring and Error Handling
    3. Choose the icon in the Hints column to display the custom hint you maintained.

      Show Hint

      Choose Close.

    4. Use your custom data link to find the source of the erroneous message and double-click the message log text. You’re navigated to the field CUSTTYPE.

    5. Maintain a valid value for the field CUSTTYPE - either B or P - and choose Confirm.

      Edit Field
    6. Save the changes.

      Save Field Change
    7. Restart the data message. It should now process without errors.

    8. To test your custom function, click the Display customer icon that has appeared for your log message in column Function.

      Navigate To Transaction

      The customer record details are displayed.

      Display customer record

    Congratulations! You’ve successfully configured a custom hint, custom function, custom message text, and custom data link for a log message.

  • Step 8

    Which custom object allows you to navigate to a transaction?

Back to top