Use Pre-Trained Tensorflow Models with a GPU in SAP AI Core
- How to sync pre-trained model to SAP AI Core
- How to write a pipeline and necessary docker code to enable GPU deployment.
- How to deploy an AI model and use it for online inferencing.


 gsalomone
 Helen Vernon
Prerequisites
- A BTP global account
If you are an SAP Developer or SAP employee, please refer to the following links ( for internal SAP stakeholders only ) -
How to create a BTP Account (internal)
SAP AI Core
If you are an external developer or a customer or a partner kindly refer to this tutorial - You have set up an Enterprise SAP BTP Account for Tutorials. Follow the instructions to get an account, and set up entitlements and service instances for SAP AI Core.
- You have set up your Git Repository with SAP AI Core.
- You have created docker registry secret in SAP AI Core
Pre-read
All the required files are available for download in the specified step, so that you can easily complete the tutorial.
This tutorial demonstrates a use-case in which you have trained an ML model on your local computer and would like to deploy this model to production with SAP AI Core.
The model used in this example uses a pre-trained embedding layer of GloVe followed by custom stack of neural network layers for fine tuning. Please find the following tutorials used as reference for the same.
By the end of this tutorial you will have a movie review classification model deployed in SAP AI Core, using which you can make predictions in real-time.
You may complete each step of this tutorial using any of the following tools to control operations in your SAP AI Core:
- Postman
- SAP AI Core SDK (demonstrated below)
- AI API client SDK
Please complete the prerequisites before you get started.
- Step 1
Create a resource group with ID
tf-demo. You may use any existing resource group or even create multiple resource groups with different IDs.PYTHONCopyresponse = ai_core_client.resource_groups.create("tf-demo")List all the resource groups IDs to confirm creation.
PYTHONCopyresponse = ai_core_client.resource_groups.query() for rg in response.resources: print(rg.resource_group_id)
- Step 2
-
Install the AWS CLI client. Download here.
-
Login to AWS using your AWS CLI.
Enter your AWS credentials. You can leave the
Default output formatentry blank. Press enter.BASHCopyaws configure
-
Download and save the following model files in your local system.
These files are generated locally. They contain embeddings and other settings of the
Tensorflowmodel which you will deploy.File Download model.h5LINK to ZIP Please extract the files after download max_pad_len.txtLINK label_endcoded_classes.npyLINK tokens.jsonLINK to ZIP Please extract the files after download After download, your directory should look like the following:

-
Upload all model files to your AWS S3 bucket. Edit and run the following commands.
BASHCopyaws s3 cp model.h5 s3://<YOUR_BUCKET_ID>/movie-clf/model/ aws s3 cp max_pad_len.txt s3://<YOUR_BUCKET_ID>/movie-clf/model/ aws s3 cp label_encoded_classes.npy s3://<YOUR_BUCKET_ID>/movie-clf/model/ aws s3 cp tokens.json s3://<YOUR_BUCKET_ID>/movie-clf/model/
-
Verify your AWS S3 files upload.
BASHCopyaws s3 ls s3://<YOUR_BUCKET_ID>/movie-clf/model/It should look like the following:

-
- Step 3
Create an object store secret to connect your AWS S3 bucket to SAP AI Core. You can create multiple object store secrets.
Replace the following with your credentials and execute.
Note that the parameter
path_prefixshould point to the parent folder of the folder where your model is located in AWS S3. Hence the valuemovie-clf.PYTHONCopyresponse = ai_core_client.object_store_secrets.create( resource_group = 'tf-demo', type = "S3", name = "my-s3-secret1", path_prefix = "movie-clf", endpoint = "s3-eu-central-1.amazonaws.com", # Change this bucket = "asd-11111111-2222-3333-4444-55555555555", # Change this region = "eu-central-1", # Change this data = { "AWS_ACCESS_KEY_ID": "ASDFASDFASDFASDF", # Change this "AWS_SECRET_ACCESS_KEY": "asdfASDFqwerQWERasdfQWER" # Change this } ) print(response.__dict__)You should see the following response:

Note that depending on your region, your AWS endpoint syntax may differ from the example above. In the event of an error, try this step again with alternative syntax. For available syntaxes, please see the AWS documentation
- Step 4
Save the following executable file in your local system:
Filename Download link serving_executable.yamlLINK In the executable, ensure the following.

-
Ensure that your
resourcePlanis set toinfer.s. This will enable the GPU node in deployment. Find all the available resource plans here. -
Replace
docker-registry-secretwith the name of your docker registry secret. You can create and use multiple docker secrets in SAP AI Core. See how to create docker registry secret. -
Set your docker image URL.
Save your executable.
-
- Step 5
You will create a folder in your GitHub repository connected SAP AI Core, where you will store the workflow (executable). You will then register this folder as an Application in SAP AI Core to enable syncing of the workflow as an executable.
You can create multiple Applications in SAP AI Core for syncing multiple folders. This helps you organize separate folders for storing workflows YAML files for separate use cases.
-
Create a folder named
tutorial-tf-text-clfin your GitHub repository connected to SAP AI Core. Place the following workflows inside it:
-
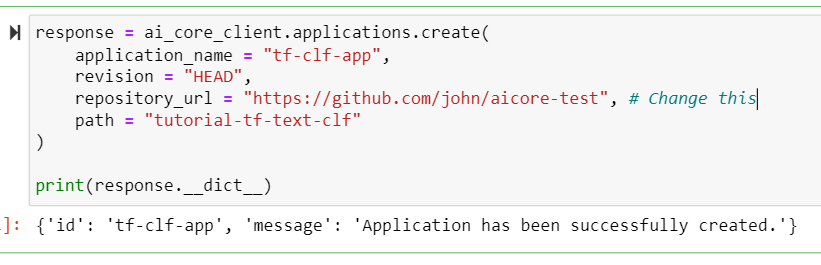
Edit and execute the code below to create an Application and sync the folder
tutorial-tf-text-clf.PYTHONCopyresponse = ai_core_client.applications.create( application_name = "tf-clf-app", revision = "HEAD", repository_url = "https://github.com/YOUR_GITHUB_USERNAME/YOUR_REPO_NAME", # Change this path = "tutorial-tf-text-clf" ) print(response.__dict__)You should then see:
-
Verify your workflow sync status, using the following code:
PYTHONCopyresponse = ai_core_client.applications.get_status(application_name = 'tf-clf-app') print(response.__dict__) print('*'*80) print(response.sync_ressources_status[0].__dict__)You should then see:

After your workflows are synced, your Scenario will be automatically created in SAP AI Core. The name and ID of the scenario will be same as the one mentioned in your workflows. After The syncing, your workflow will be recognized as an executable.
-
- Step 6
An artifact is a reference to your model files located in AWS S3.
Use the object store secret created in the previous step in the URL field. The URL takes the form
ai://YOUR_OBJECT_STORE_SECERT_NAME/path/to/files. TheYOUR_OBJECT_STORE_SECERT_NAMEvalue will be replaced by thepath_prefixyou had used in that object store secret.The value of
scenario_idshould not already exist in SAP AI Core at this step, but the following code will not create any errors.Execute the following:
PYTHONCopyfrom ai_core_sdk.models import Artifact response = ai_core_client.artifact.create( resource_group = 'tf-demo', name = "tf-txt-clf-model", kind = Artifact.Kind.MODEL, url = "ai://my-s3-secret1/model", scenario_id = "tf-text-clf", description = "Review Classification Model" ) print(response.__dict__)You should see the following response:

Important: Make a note of the ID. This ID uniquely identifies your artifact.
- Step 7
Download and save each of the following files to your local computer. These are the code files that you will upload as a docker image and use later for deployment in SAP AI Core.
File Download Note DockerfileLINK No file extension required. Remove manually if automatically added upon save. requirements.txtLINK tf_template.pyLINK serve.pyLINK After download your local directory should look like following:

A few important parts of the code are discussed here, which will help your understanding.
-
To enable GPU usage by
Tensorflow, yourDockerfilemust contain following line. This will set all the required dependencies for the GPU. Read more onTensorflowdocker imagesFROM tensorflow/tensorflow:latest-gpu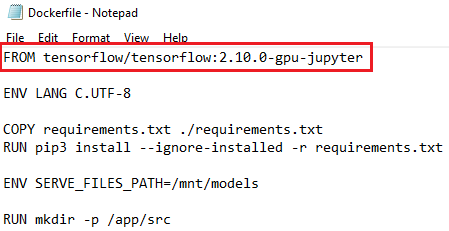
-
To verify GPU availability, your code must contain the following lines. The output will appear in the logs of SAP AI Core during deployment.
import tensorflow as tf
import logging
logging.info(f"Num GPUs Available: {len(tf.config.list_physical_devices('GPU'))}")
Follow the steps to upload the files downloaded in step two as a docker image.
-
Login to your docker account using your terminal. If you incur an error, ensure your Docker Desktop is installed and running.
BASHCopydocker login <YOUR_DOCKER_REGISTRY> -u <YOUR_DOCKER_USERNAME>Type your password, it may not be visible but continue to type and press the
Enterkey.
-
Navigate to your downloaded files location and build docker the image using the code files that you downloaded.
BASHCopydocker build -t <YOUR_DOCKER_REGISTRY>/<YOUR_DOCKER_USERNAME>/movie-review-clf-serve:0.0.1 .Don’t forget the period (.) at the end of the command, this denotes that the location of the
Dockerfileis the curent directory.WARNING The build process will require approximately 3 GBs of storage space.

-
Upload your docker image to the docker cloud.
BASHCopydocker push <YOUR_DOCKER_REGISTRY>/<YOUR_DOCKER_USERNAME>/movie-review-clf-serve:0.0.1
-
- Step 8
Here are the important pieces of your configuration:
-
The
scenario_idshould contain the same value as in your executable.
-
The
executable_idis thenamekey of your executable.
-
The
artifact_iduses the value that was generated after you registered model files as artifacts.
Copy the code below, and replace the
artifact_idfield value with your own ID, then execute the code.PYTHONCopyfrom ai_core_sdk.models import InputArtifactBinding response = ai_core_client.configuration.create( name = "TF-clf-serve-conf", resource_group = "tf-demo", scenario_id = "tf-text-clf", executable_id = "tf-text-clf-serve", input_artifact_bindings = [ # list InputArtifactBinding(key="modelArtifact", artifact_id ="94d2b0fc-7fc3-4fe7-8f54-9509ad782609"), # Change artifact id ] ) print(response.__dict__)You should then see:

Important: Note down the ID generated. This is your unique configuration identification.
-
- Step 9
Replace the
configuration_idfield value with the ID from the previous step. Execute the code.PYTHONCopyresponse = ai_core_client.deployment.create( resource_group = "tf-demo", configuration_id = "904ee948-0e99-4007-811c-0aaf2118ffb6" # change this ) print(response.__dict__)You should then see:

Important: Note the unique ID generated of your deployment. You may create multiple deployments using the same configuration ID, each of which will have s unique endpoint.
- Step 10
Replace with the
deployment_idfield value with the ID from previous step and execute your code.PYTHONCopyresponse = ai_core_client.deployment.get( resource_group = "tf-demo", deployment_id = "d9dc9250d05f7df8" # Change this ) print("Status: ", response.status) print('*'*80) print(response.__dict__)This may take 2-3 minutes to change state from
UNKNOWN>PENDING>RUNNING.You should then see:

- Step 11
Replace the
deployment_idfield value with your deployment ID and execute the code.The
custom_endpointis generated by the code pieces inside of the docker image. This is customizable and you can add multiple routes for different purposes.PYTHONCopyquery_text = "The story after the interval had predictable twist-turns." deployment_id = "d9dc9250d05f7df8" # Change this custom_endpoint = "/v1/predict" prediction = ai_core_client.rest_client.post( resource_group = "tf-demo", path = "/inference/deployments/" + deployment_id + custom_endpoint, body = { "text": query_text } ) print(prediction)You should then see something like:

Your prediction will be either a
positiveornegativealong with a confidence value between 0 and 1. This prediction return structure is dependent of the code in docker the image. You can change this as per your requirement. - Step 12
In the preceding steps, you saw that your docker code has the following lines, which will log the number of GPUs that the
Tensorflowpackage recognizes during deployment.Now query the deployment logs to view its output. Replace with the
deployment_idfield value with your own ID, and execute.PYTHONCopyresponse = ai_core_client.deployment.query_logs( resource_group = "tf-demo", deployment_id = "d9dc9250d05f7df8" ) for log in response.data.result: print(log.msg) print("---")The output will contain the log message on the number of GPUs available.

- Step 13
A running deployment incurs costs.
Replace with the
deployment_idfield value with your ID, and execute the code, to stop the deployment.PYTHONCopyfrom ai_core_sdk.models import TargetStatus response = ai_core_client.deployment.modify( resource_group = "tf-demo", deployment_id = "d9dc9250d05f7df8", # Change this target_status = TargetStatus.STOPPED ) print(response.__dict__)You should then see:

Which of the following resource plans should you choose to enable GPU nodes in SAP AI Core?