Create a SAP Fiori App and Deploy it to SAP BTP, ABAP Environment
- How to assign role collections
- How to create dev spaces
- How to set up organization and space
- How to create list report object pages
- How to run SAP Fiori applications
- How to deploy applications
- How to check BSP library in Eclipse
- How to create IAM apps and business catalogs


Prerequisites
- Trial: You need an SAP BTP, ABAP environment trial user or a license.
- Licensed system:
- The business catalog
SAP_A4C_BC_DEV_UID_PC(Development - UI Deployment) needs to be assigned to a business role of the developer user. For an existing ABAP systems, the business catalog needs to be added manually to the existing developer business role. - You need to be a member at the used global account
- You need to be an organization manager at the used Cloud Foundry subaccount
- You need to be a security administrator at the used Cloud Foundry Subaccount
- The SAP Business Application Studio and the SAP BTP, ABAP environment instance must be under same subaccount.
- Read following blog post to get an overview on Connecting from SAP Business Application Studio to SAP BTP Cloud Foundry environment
- The business catalog
- Step 1
-
Login to SAP BTP Trial cockpit and click Enter Your Trial Account.

-
Select your subaccount trial.

-
Now you are in the trial overview page. Click Users and select your user.

-
Click Assign Role Collection.

-
Select
Business_Application_Studio_Developerand click Assign Role Collection.
-
- Step 2
-
On the left menu scroll to the top and select Instances and Subscriptions and open SAP Business Application Studio.

-
Now the SAP Business Application Studio has started. Click Create Dev Space.

-
Create a new dev space:
- Name: Fiori
- Type: SAP Fiori
Click Create Dev Space.

-
When your status is Running, select your dev space Fiori.

-
- Step 3
-
Now you are in your Fiori dev space in SAP Business Application Studio.
Select the menu on the left side and click Open Folder to set your workspace.
-
Select
/home/user/projects/and click OK.
-
Switch to SAP BTP Trial and select your trial subaccount.
-
Copy your Cloud Foundry Environment API endpoint for later use.

-
Switch to SAP Business Application Studio, select the menu on the left side and click View > Command Palette.
-
Search for CF: Login to Cloud Foundry and select it.

-
Paste your Cloud Foundry API endpoint, enter your credentials and click Sign in.

-
Now you can see that you are logged in. Set now your cloud foundry target:
- Cloud Foundry Organization:
<your_global_account> - Cloud Foundry Space: dev

Click Apply.
- Cloud Foundry Organization:
-
- Step 4
-
Select the menu on the left side and click View > Command Palette.

-
Search for Fiori: Open Application Generator and select it.

-
Select List Report Page and click Next >.

-
Configure data source, system and service:
- Data source: Connect to a System
- System:
ABAP Environment on SAP Business Technology Platform - ABAP Environment:
default_abap-trial - Service:
ZUI_C_TRAVEL_M_XXX(1) - OData V2

Click Next >.
A destination for theabap-trialservice instance is generated automatically. -
Select your main entity
TravelProcessorand click Next >.
-
Configure project attributes:
- Name:
ztravel_app_xxx - Title: Travel App XXX
- Description: A Fiori application.
- Add deployment configuration: Yes
- Add FLP configuration: Yes
- Configure advanced options: No
Click Next >.

Your application name must begin with a
z letterand must be in lowercase letters. - Name:
-
Configure deployment:
- Target: ABAP
- Destination:
<your_abap_system_url> SAPUI5ABAP Repository:ztravel_app_xxx- Package:
ztravel_app_xxx - How do you want to enter Transport Request? Manually
- Transport Request:
<your_transport_request>

Click Next >.
If you want to copy your transport request, please do following: Open Eclipse, search your package
ZTRAVEL_APP_XXXand open it. Open your transport organizer to see your transport request. Copy your transport request for later use. You can find your transport request underneath the Modifiable folder.
-
Configure SAP Fiori launchpad:
- Semantic object:
ztravel_app_xxx - Action: display
- Title: Travel App XXX
Click Finish.
- Semantic object:
-
- Step 5
-
Select the menu on the left side, right-click your project
ztravel_app_xxxand select Open in Integrated Terminal.
-
Type
npm startand press Enter.
-
The preview opens. Click Go.

-
Now check your result.

-
- Step 6
-
Select the menu on the left side, right-click your project
ztravel_app_xxxand select Open in Integrated Terminal. -
Enter
npm run deployto deploy your application. When prompted, check deployment configuration and press y. Open the URL at the end of the deployment log in browser to preview the application.
When the deployment is successful, you will get these two information back as a result: UIAD details and deployment successful.
Hint: If an error message appears, use the Environment Check.
-
- Step 7
- Open Eclipse and check the BSP library and SAP Fiori Launchpad app descriptor item folder in your package
ZTRAVEL_APP_XXX. If you are not able to see BSP applications and SAP Fiori Launchpad app description items, refresh your packageZTRAVEL_APP_XXXby pressingF5.
- Open Eclipse and check the BSP library and SAP Fiori Launchpad app descriptor item folder in your package
- Step 8
-
In Eclipse right-click your package
ZTRAVEL_APP_XXXand select New > Other Repository Object.
-
Search for IAM App, select it and click Next >.

-
Create a new IAM App:
- Name:
ZTRAVEL_IAM_XXX - Description: IAM App
Click Next >.
- Name:
-
Click Finish.

-
Select Services and add a new one.

-
Select following:
- Service Type:
OData V2 (deprecated) - Service Name:
ZUI_C_TRAVEL_M_XXX_0001

Click OK.
Right-click your IAM App and click Activate.
If you can’t find your service name, you can press CTRL + space to search for it.
- Service Type:
-
Right-click your package
ZTRAVEL_APP_XXXand select New > Other Repository Object.
-
Search for Business Catalog, select it and click Next >.

-
Create a new business catalog:
- Name:
ZTRAVEL_BC_XXX - Description: Business catalog
Click Next >.
- Name:
-
Click Finish.

-
Select Apps and add a new one.

-
Create a new business catalog:
- IAM App:
ZTRAVEL_IAM_XXX_EXT - Name:
ZTRAVEL_BC_XXX_0001
Click Next >.
- IAM App:
-
Click Finish.
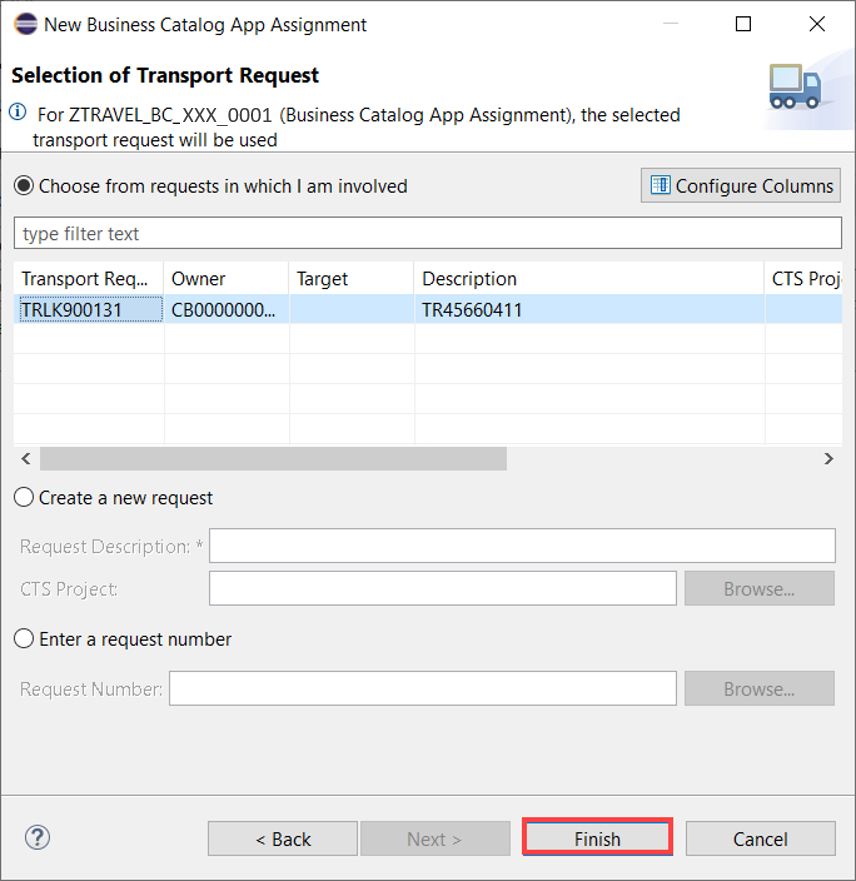
-
Click Publish Locally to publish your business catalog.

-
- Step 9
-
Go back to SAP Business Application Studio and deploy your changes. Select the menu on the left side, right-click your project
ztravel_app_xxxand select Open in Integrated Terminal. -
Enter
npm run deploy. When prompted, check deployment configuration and press y. -
Press
CTRL and click the following linkto open the URL in a browser.
-
Log in to ABAP Trial.

-
Click Go.

-
Check your result.

-