Skip to Content

Create an ABAP Database Table and Relevant ABAP Dictionary Objects

Create a database table from scratch using ABAP development tools for Eclipse (ADT); use different Data Dictionary objects to define the fields; then fill the table with test data.
You will learn
  • How to create a table in ABAP, representing a table in your database
  • How to create a reusable domain, which provides technical attributes for data elements
  • How to create an elementary data type, or data element
  • How to fill the table with three rows of test data
julieplummer20Julie PlummerDecember 9, 2024
Created by
julieplummer20
March 9, 2023
Contributors
mervey45
julieplummer20

Prerequisites

Tables are defined independently of the database in the ABAP Dictionary. When you activate the table in the Data Dictionary, the table is created in the underlying database.

The table in this tutorial will store bank account details for customers. The table will have the following columns (or fields):

  • client (key field)
  • account_number (key field)
  • bank_name (key field)
  • bank_customer_id
  • city
  • balance
  • currency
  • account_category
  • lastchangedat

Throughout this tutorial, replace ### or 000 with your initials or group number.

  • Step 1

    Create a table in your package:

    1. Select (right-click) the package and choose New > Other ABAP Repository Object from the context menu:

      Image depicting step1-new-repo-object
    2. Enter the filter text Table > Database table, then choose Next.

    3. Enter a name such as ZACCOUNTS_### - always replacing ### with your initials or group number - and a description, then choose Next.

      step1b-table-name
    4. Accept the proposed transport request and choose Finish.

    The code for the table appears in a new editor. Ignore the annotations at the top for now.

    Image depicting step1d-table-editor
  • Step 2

    In the next step, you will define the table fields. First you need to understand your options:

    Built-in ABAP types and new types

    There are 3 ways to create a field for a database table:

    • Built-in type: The quickest: You specify a built-in type, length, and description, but no more. You cannot then reuse this field. For more information, see ABAP Keyword Documentation: Predefined Dictionary Types.

    • Use an existing data element: The most powerful: A data element describes both the technical and semantic attributes of a field, such as a currency, or a customer name. You can define properties such as search help and (translatable) column header, and then use the same data element in many contexts. You often define the technical attributes of the data element in a domain, so they can be reused.

    • Create a new data element: If you want to reuse the benefits of a data element - that is, semantic attributes, such as reuse of translatable column headers - but a suitable one does not exist yet.

      overview-domain-dtel

    In this tutorial, you will create one domain and one data element. For the other fields, you will use a built-in type or existing data element.

    System clients

    One key field has been added automatically:

    client : abap.clnt;

    This specifies that the table is client-dependent.
    Tables can be client-dependent or client-independent. Each client is a self-contained unit within an organization, such as a subsidiary. For client-dependent tables, the client is the first key field in the table.

    The field is also specified as not null. This means that the type-dependent initial value is automatically assigned to this field for all newly created records.

  • Step 3

    Now you will add the key field account_number, based on a built-in type.

    1. Enter the following (including the period), then choose Code completion (Ctrl+Space):

      ABAP
      Copy
        key account_number : abap.
      
      
    2. From the dropdown list, choose numc(len) and specify len as 8. Also, specify this key field as not null:
      key account_number : abap.numc(8) not null;

  • Step 4
    1. In the editor, enter the name for your field, followed by a colon: city:. Ignore the error for now.

    2. Enter the type, by entering /DMO/C and using auto-complete (**Ctrl+Space**).

    3. Then add a semi-colon:

      ABAP
      Copy
      city: /dmo/city;
      
      
  • Step 5

    Now add the key field bank_name, based on a new data element, z_bank_name_###. You will get an error, which you will also fix in this step.

    1. Enter the following:

      ABAP
      Copy

      key field bank_name : z_bank_name_###;
    2. Select the new data element and choose Get Quick Fix (Ctrl+1). From the list, choose Create data element … :

      step5a-quick-fix-new-dtel
    3. The Create data element wizard appears. Enter a name and description and choose Next:

      step6a-new-dtel
    4. Accept the default transport request and choose Finish:

    5. You want your data element to have a character type. Enter the following:

      • Category : Predefined Type
      • Data Type : CHAR
      • Length : 55
    6. Now enter the field labels and lengths:

      step6b-dtel-details
    7. Save and activate the data element (Ctrl+S, Ctrl+F3).

    8. Go back to your table, ZACCOUNTS_###. Run a syntax check with Ctrl+F2. The error should disappear.

  • Step 6

    Now add other fields, so your code looks as follows. The field Balance will cause an error. Ignore this for now.

    ```ABAP

      define table ZACCOUNTS_TABLE_### {
    
      key client         : abap.clnt not null;
      key account_number : abap.numc(8) not null;
      key bank_name      : z_bank_name_###;
      bank_customer_id   : /dmo/customer_id not null;
      city               : /dmo/city;
      balance            : abap.curr(16,2);
      currency           : /dmo/currency_code;
      account_category   : abap.numc(2);
      lastchangedat      : timestampl;
    
      }
    

    ```

    1. Then choose Save (Ctrl+S) but do not activate your table yet.
  • Step 7

    You will now fix the error caused by the field Balance:

    1. Place your cursor on the error symbol (it will change from an arrow to a pointing finger). Then click on it:

      Image depicting step8a-fix-error
    2. The quick fix proposal appears. Choose (double-click on) the proposal Assign currency code reference to field currency

      Image depicting step8b-assign-curr-code

      The error message disappears.

    3. Save your changes (Ctrl+S), but again, do not activate the table yet.

  • Step 8

    Before you activate the table, change the technical settings at the top as follows (or copy the code at the end of this step):

    1. The label is derived from the description you entered; leave this.

    2. EnhancementCategory : Place your cursor immediately after the hash symbol (#), delete the existing text, then choose Auto-complete (Ctrl+Space):

      step9a-tech-settings
    3. Then choose #EXTENSIBLE_CHARACTER_NUMERIC from the dropdown list. Your table contains both character-type and numeric-type fields but does not contain any deep structures (such as a structure included within a table row).

    4. Complete the other settings as follows (or copy the code below).

      • tableCategory : #TRANSPARENT = your table represents a table in the database.
        Tables are defined independently of the database in the ABAP Dictionary. When you activate the table in the Data Dictionary, the table is created in the underlying database. There is no need for any code to define the data in the database, nor for any vendor-specific code. Your database tables will be created in any database supported by the ABAP server.

      • deliveryClass : #A = application table, which stores master data and transaction data (default)

      • dataMaintenance : #RESTRICTED

    ABAP
    Copy
    @EndUserText.label : 'Bank Accounts'
    @AbapCatalog.enhancementCategory : #EXTENSIBLE_CHARACTER_NUMERIC
    @AbapCatalog.tableCategory : #TRANSPARENT
    @AbapCatalog.deliveryClass : #A
    @AbapCatalog.dataMaintenance : #RESTRICTED
    
  • Step 9

    Now, save (Ctrl+S) and activate (Ctrl+F3) your table. Your code should look like this:

    ABAP
    Copy
    @EndUserText.label : 'Table of Bank Accounts'
    @AbapCatalog.enhancementCategory : #EXTENSIBLE_CHARACTER_NUMERIC
    @AbapCatalog.tableCategory : #TRANSPARENT
    @AbapCatalog.deliveryClass : #A
    @AbapCatalog.dataMaintenance : #RESTRICTED
    define table zaccounts_### {
      key client         : abap.clnt not null;
      key account_number : abap.numc(8) not null;
      bank_customer_id   : /dmo/customer_id not null
      bank_name          : z_bank_name_###;
      city               : /dmo/city;
    
      @Semantics.amount.currencyCode : 'zaccounts_###.currency'
      balance            : abap.curr(16,2);
      
      currency           : /dmo/currency_code;
      account_category   : abap.numc(2);
      lastchangedat      : timestampl;
    
    }
    
    
  • Step 10

    Which is the correct syntax for a check table for the field `myField` of the table `myTable` (based on the example of `bank_customer_id`)?

  • Step 11

    Finally, you will fill the table with three rows of test data:

    1. First create the ABAP Class, by selecting your package and choosing New > ABAP Class from the context menu:

      Image depicting step5-create-class
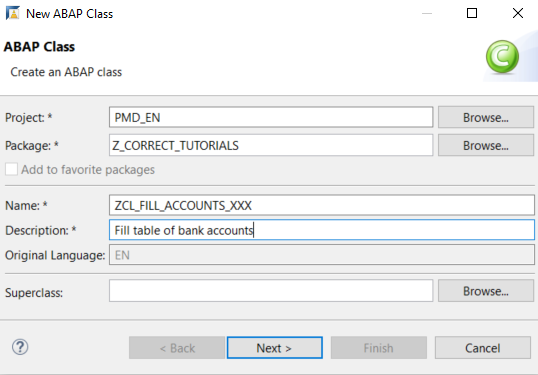
    2. Enter a name ZCL_FILL_ACCOUNTS_### and description for your class (replacing ### with your group number or initials).

      step15b-name-class
    3. Assign a transport request and choose Finish.

    The class appears in a new editor.

  • Step 12
    1. Add the following interface to your class:

      ABAP
      Copy
       interfaces if_oo_adt_classrun.
      

      This interface provides a lightweight solution for executing an ABAP program without launching a full user interface.
      It also lets you display text or data in the ABAP Console.

    2. Add the implementation for the main method of this interface by selecting the interface name and choosing Add implementation… from the context menu.

      step6a-add-intf
  • Step 13
    1. Add the following code to the method implementation:

      ABAP
      Copy
      DATA: lt_accounts type table of ZACCOUNTS_###.
      
      "read current timestamp
      GET TIME STAMP FIELD DATA(zv_tsl).
      
      "fill internal table
      lt_accounts = VALUE #(
      
          ( client ='100' account_number ='00000001' bank_customer_id ='100001' bank_name ='Volksbank' city = 'Gaertringen' balance ='200.00 ' currency ='EUR' account_category ='01' lastchangedat = zv_tsl )
          ( client ='100' account_number ='00000002' bank_customer_id ='200002' bank_name ='Sparkasse' city ='Schwetzingen' balance ='500.00 ' currency ='EUR' account_category ='02' lastchangedat = zv_tsl )
          ( client ='100' account_number ='00000003' bank_customer_id ='200003' bank_name ='Commerzbank' city ='Nuernberg' balance ='150.00 ' currency ='EUR' account_category ='02' lastchangedat = zv_tsl )
      ).
      
      "Delete possible entries; insert new entries
      DELETE FROM ZACCOUNTS_###.
      
      INSERT ZACCOUNTS_### from table @lt_accounts.
      
      "Check result in console
      out->write( sy-dbcnt ).
      out->write(  'DONE!' ).
      
      
    2. Save and activate ( Ctrl+S, Ctrl+F3 ) your code.

    3. Run your class by choosing Run as Console Application (F9).

    The output should look roughly like this.

    step16a-console
  • Step 14

    Select your table from the Project Explorer and choose Open With > Data Preview from the context menu (**F8**).

    step17a-data-preview

    Your table should look like this:

    step17b-data-preview-2

    You can also right click on the table and choose Copy All Rows as ABAP Value Statement from the context menu. You can then paste it into other code.

    step17c-copy-all-rows
  • Step 15

Back to top