Create an application using SAP HANA and the Cloud Application Programming Model
- How to create a simple application based on the SAP Cloud Application Business wizard
- You will be introduced to basics on cloud-native development and multi-target applications


Prerequisites
- This tutorial is designed for SAP HANA on premise and SAP HANA, express edition. It is not designed for SAP HANA Cloud.
- Getting started with SAP HANA, XS Advanced Development
- Step 1
Right-click on workspace and choose
Project from Template
Make sure
Cloud Foundryis the selected environment. Select SAP Cloud Platform Business Application and click Next
Call the project
APPand click Next
Mark Use HTML5 application repository and click Next

Change the database version to 2.0 SPS02

- Step 2
Expand the
dbfolder and double-click ondata-model.cdsto expand it
Replace the content in
data-model.cdswith the following:textCopy
namespace my.app;

entity Recipes{
	key ID : Integer;
	instructions : String;
	dish : String;
	time : Integer;
	unit : String;
	ingredients : association to many Ingredients on ingredients.recipe = $self;
};


entity Ingredients{
	key ID : Integer;
	recipe : association to Recipes;
	quantity : Double;
	unit : String;
	ingredient : String;
};
For example:

- Step 3
Navigate into the
srvfolder. Double-click oncat-service.cds.
Replace the existing content in
cat-service.cdswith the followingtextCopyusing my.app from '../db/data-model'; service CatalogService { entity Recipes @readonly as projection on app.Recipes; entity Ingredients @readonly as projection on app.Ingredients; }Save all files

What is going on?
You can see Core Data and Services generating design time artifacts based on SAP HANA (
.hdbcds) under a new folder calleddb\src\gen. You can also follow progress by opening the console.
- Step 4
The
.cdsfile in which you defined the entities for persistence was used to create files with extension.hdbcds. These files will be used by the deployment infrastructure to create physical objects, such as tables, in the database.Right-click on the
dbfolder and choose Build
You can follow progress in the Console:

- Step 5
Now that the database module has been built, you can explore the HDI container and the physical tables.
Right-click on
dband choose Open HDI Container.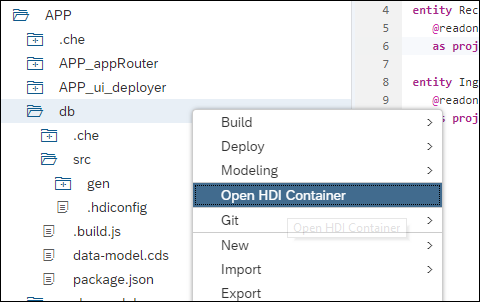
Click on Tables. Right-click on
MY_APP_INGREDIENTSand choose Generate INSERT statement.
Make a note of the name of the schema and table, as you may need to adjust the code.
Use the following code to insert values into the table:
sqlCopyINSERT INTO "APP_HDI_CONTAINER"."MY_APP_INGREDIENTS" VALUES(1,175,'G','Softened Butter',1); INSERT INTO "APP_HDI_CONTAINER"."MY_APP_INGREDIENTS" VALUES(2,3,'UN','Egg',1); INSERT INTO "APP_HDI_CONTAINER"."MY_APP_INGREDIENTS" VALUES(4,4,'TBSP','Nutella',1); INSERT INTO "APP_HDI_CONTAINER"."MY_APP_INGREDIENTS" VALUES(5,250,'G','Nishiki Rice',2); INSERT INTO "APP_HDI_CONTAINER"."MY_APP_INGREDIENTS" VALUES(6,750,'ML','Water',2); INSERT INTO "APP_HDI_CONTAINER"."MY_APP_INGREDIENTS" VALUES(8,800,'G','Fresh salmon',2); INSERT INTO "APP_HDI_CONTAINER"."MY_APP_INGREDIENTS" VALUES(9,50,'G','Macaroni',3); INSERT INTO "APP_HDI_CONTAINER"."MY_APP_INGREDIENTS" VALUES(10,150,'ML','Water',3); INSERT INTO "APP_HDI_CONTAINER"."MY_APP_INGREDIENTS" VALUES(11,50,'G','Cheddar cheese',3);Hint:
Ctrl+Hallows you to replace the schema in the code above if necessary.Press
F8or use the Run button to insert the records
- Step 6
Repeat the previous steps for the table
MY_APP_RECIPESand use the following SQL statements to create data:sqlCopyINSERT INTO "APP_APP_HDI_CONTAINER"."MY_APP_RECIPES" VALUES(1,'Mix the egg, butter and flour into a cup. Incorporate Nutella. Bake in microwave for 2 minutes','Nutella cupcake',15,'min'); INSERT INTO "APP_APP_HDI_CONTAINER"."MY_APP_RECIPES" VALUES(2,'Lay a piece of nori on sushi mat. Spread rice. Add salmon. Roll','Salmon roll',1,'h'); INSERT INTO "APP_APP_HDI_CONTAINER"."MY_APP_RECIPES" VALUES(3,'Mix the macaroni, water, and salt in a microwaveable mug. Microwave for 2-3 minutes','Mac and Cheese',7,'min');Right-click on
MY_APP_RECIPESand choose Generate SELECT statement.Change the select clause to count the number of records to complete the validation below

What is the total number of records?
- Step 7
Go back to the code editor.
Right-click on the
srvfolder and choose Build
Wait until the process has finished and make sure the build has finished successfully in the console:

Right-click on the module and choose Run as Java Application

Once the application is running, click on the URL for the services.

What is displayed when clicking on the URL in Web IDE?
- Step 8
Right-click on your app and choose HTML5 module

Choose SAP Fiori
WorklistApplication. Click Next
Call the module
web. Fill in the Title and Namespace and click Next
Choose
CatalogServiceand click Next
Complete the data binding as follows and click Finish

- Step 9
Right-click on the web module and choose Run as Web Application

Choose
index.html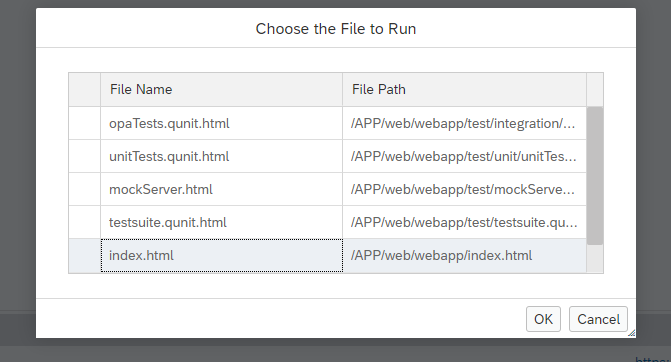
If prompted, enter your credentials:

Note: Your credentials are the same you used to log in to the SAP Cloud Platform trial account
Congratulations! You have created your first multi-target application using the Cloud Application Programming Model. You can read more about Multi Target applications and SAP HANA in this series of blogs posts or about the Cloud Application Programming Model in the official SAP Documentation
If you look into the SAP Cloud Platform Cockpit, you will see the Java micro-service running as an application:

And the HDI container, with the SAP HANA database artifacts, listed in the services:

Which recipe takes longer?