Add Rich Enterprise Controls to the User Interface
- How to use smart controls like the
SmartFilterBar
,SmartList
, or theObjectPage
- Why smart controls can save you much boilerplate code
- Step 1
- To import smart controls to the view, add new XML namespaces to the
uimodule/webapp/view/Products.view.xml
file. - Replace
in the same view with a page that contains the smart controls smartFilterBar
andsmartList
XMLCopy<mvc:View controllerName="tutorial.products.controller.Products" displayBlock="true" xmlns="sap.m" xmlns:smartFilterBar="sap.ui.comp.smartfilterbar" xmlns:smartList="sap.ui.comp.smartlist" xmlns:smartTable="sap.ui.comp.smarttable" xmlns:mvc="sap.ui.core.mvc"> <Page id="Products"> <smartFilterBar:SmartFilterBar id="smartFilterBar" persistencyKey="UniqueAndStablePersistencyKey" entitySet="Products" considerSelectionVariants="true" /> <smartList:SmartList id="smartProductList" smartFilter="smartFilterBar" entitySet="Products" expandFields="Category" header="Products List" showRowCount="true" showFullScreenButton="true" enableAutoBinding="true"> <smartList:listItemTemplate> <StandardListItem id="listTemplate" type="Navigation" press="handleListItemPress" title="{ProductName}" info="{= ${UnitPrice} + ' €' }" description="{Category/CategoryName}" /> </smartList:listItemTemplate> </smartList:SmartList> </Page> </mvc:View>
Your page should now display product names and contain a smart header.
Did you notice that the list items display the category names, even though the selected entity set Products doesn’t contain these values. You can still see it because the property
expandFields="Category"
was defined, which expands theCategoryID
to a full, nested entity. There is nothing you need to do, expect to define the field names to expand. All magic happens behind the scenes in the OData protocol.
Feel free to remove this property from the view to see how the displayed data changes. - To import smart controls to the view, add new XML namespaces to the
- Step 2
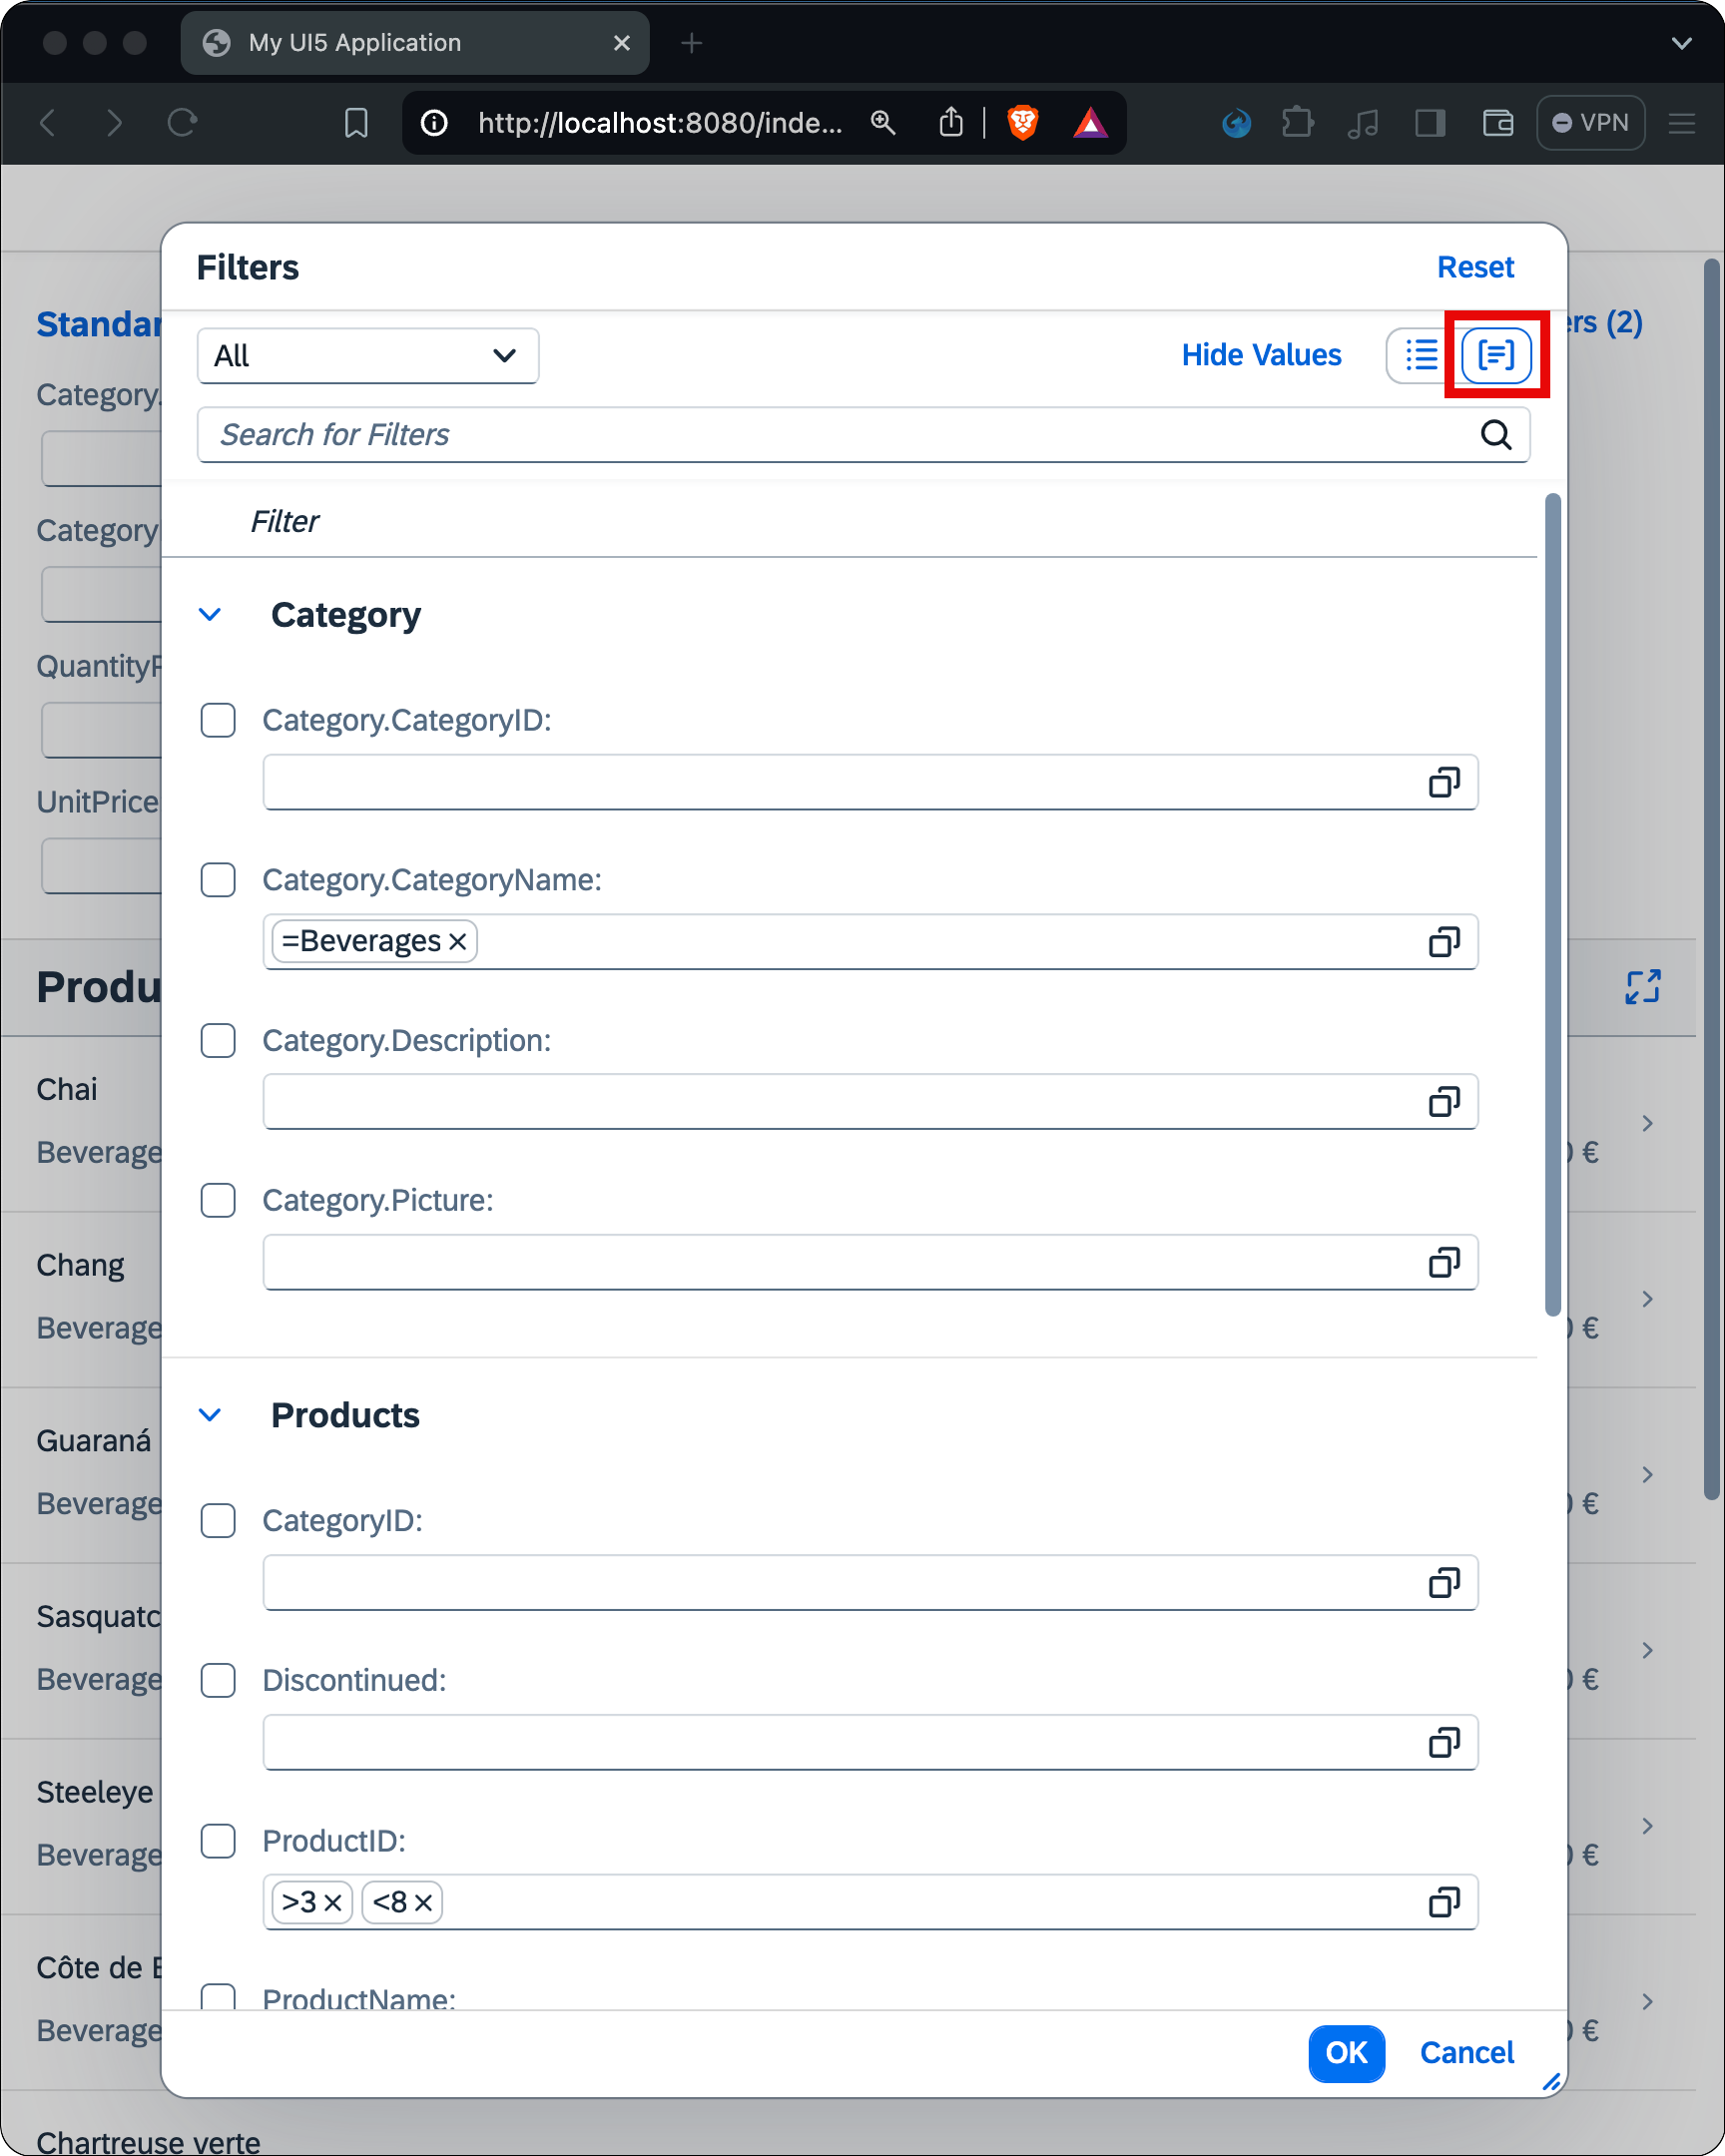
You’ve already learned about the cool expand-feature of OData in the previous step. In this step, you’ll learn about the complex filter operations OData supports out-of-the-box. For this, click on the Filters button. A dialog pops up, and you’ll be able to define filters on all properties of the displayed entities. Select the grouped view and define a filter for the following criteria:
- The
ProductID
shall be larger than 3 - The
ProductID
shall also be less than 8 - The name of the category should be “Beverages”
Close the dialog by clicking OK and apply the filter by clicking Go.
How many products are left after applying these filter criteria?
- The
- Step 3
Click on item
Rhönbräu Klosterbier
to navigate to the detail view. You’ll upgrade this simple view to a fullObjectPage
control in the next steps. - Step 4
- Similar to step 1, include new XML namespaces to the
uimodule/webapp/view/ProductDetail.view.xml
view to allow the usage of new controls. - Replace the current page of the view with this smart
ObjectPage
.
XMLCopy<mvc:View controllerName="tutorial.products.controller.ProductDetail" displayBlock="true" xmlns="sap.m" xmlns:uxap="sap.uxap" xmlns:layout="sap.ui.layout" xmlns:form="sap.ui.layout.form" xmlns:mvc="sap.ui.core.mvc"> <uxap:ObjectPageLayout id="ProductDetail"> <uxap:headerTitle> <uxap:ObjectPageHeader id="headerForTest" objectTitle="{ProductName}" objectSubtitle="{ProductID}"> <uxap:actions> <uxap:ObjectPageHeaderActionButton id="buttonCart" icon="sap-icon://cart-4" press="addToCart" tooltip="Add to cart" /> <uxap:ObjectPageHeaderActionButton id="buttonFav" icon="sap-icon://unfavorite" press="markAsFav" tooltip="Mark as favorite" /> </uxap:actions> </uxap:ObjectPageHeader> </uxap:headerTitle> <uxap:headerContent> <layout:VerticalLayout> <Label id="labelUnits" text="Units in Stock" /> <ObjectAttribute id="attrUnits" text="{UnitsInStock}" /> </layout:VerticalLayout> <layout:VerticalLayout> <Label id="labelOrder" text="Units on Order" /> <ObjectAttribute id="attrOrder" text="{UnitsOnOrder}" /> </layout:VerticalLayout> <layout:VerticalLayout> <Label id="labelState" text="Discontinued" /> <ObjectAttribute id="attrState" text="{= ${discontinued} ? 'Yes' : 'No' }" /> </layout:VerticalLayout> </uxap:headerContent> </uxap:ObjectPageLayout> </mvc:View>
As of now, this page only consists of a header that leverages data binding to display data. Note the control
attrState
uses a special type of binding, the so-called expression binding to display “Yes” or “No” depending on the state of the boolean variablediscontinued
. - Similar to step 1, include new XML namespaces to the
- Step 5
The header of the view also contains two buttons. In the next sub-steps, you’ll implement the event listener for these buttons. Replace the existing file header with this one to import another library during the controller-initialization in file
uimodule/webapp/controller/ProductDetail.controller.js
.JavaScriptCopysap.ui.define([ "tutorial/products/controller/BaseController", "sap/m/MessageToast" ], function (Controller, MessageToast) { "use strict";
Add the following methods to the body of the controller (after the
_onRouteMatched
method).JavaScriptCopyaddToCart: function () { MessageToast.show("Added to cart"); }, markAsFav: function (evt) { const oButton = evt.getSource(); if (oButton.getIcon() === "sap-icon://unfavorite") { oButton.setIcon("sap-icon://favorite"); MessageToast.show("Added to favorites"); return; } oButton.setIcon("sap-icon://unfavorite"); MessageToast.show("Removed from favorites"); },
Mark the page as a favorite via the button in the header of the page to make sure the event handlers work as expected.
Note that the icon is not supposed to do anything but being a toggle button (as there is no real controller logic associated with the control). It won’t store the state in the data model.
- Step 6
The following snippet defines the content of the
ObjectPage
. It’s mostly basic code, outstanding sections are another usage of expression binding for the link controllinkWebsite
, property binding to the navigation entities “Supplier” and “Category”, and the usage of a custom formatter for the image controlimageCategory
.Insert the snippet after the closing tag
</uxap:headerContent>
in the view.XMLCopy<mvc:View controllerName="tutorial.products.controller.ProductDetail" displayBlock="true" xmlns="sap.m" xmlns:uxap="sap.uxap" xmlns:layout="sap.ui.layout" xmlns:form="sap.ui.layout.form" xmlns:mvc="sap.ui.core.mvc"> <uxap:ObjectPageLayout id="ProductDetail"> <uxap:headerTitle> <uxap:ObjectPageHeader id="headerForTest" objectTitle="{ProductName}" objectSubtitle="{ProductID}"> <uxap:actions> <uxap:ObjectPageHeaderActionButton id="buttonCart" icon="sap-icon://cart-4" press="addToCart" tooltip="Add to cart" /> <uxap:ObjectPageHeaderActionButton id="buttonFav" icon="sap-icon://unfavorite" press="markAsFav" tooltip="Mark as favorite" /> </uxap:actions> </uxap:ObjectPageHeader> </uxap:headerTitle> <uxap:headerContent> <layout:VerticalLayout> <Label id="labelUnits" text="Units in Stock" /> <ObjectAttribute id="attrUnits" text="{UnitsInStock}" /> </layout:VerticalLayout> <layout:VerticalLayout> <Label id="labelOrder" text="Units on Order" /> <ObjectAttribute id="attrOrder" text="{UnitsOnOrder}" /> </layout:VerticalLayout> <layout:VerticalLayout> <Label id="labelState" text="Discontinued" /> <ObjectAttribute id="attrState" text="{= ${discontinued} ? 'Yes' : 'No' }" /> </layout:VerticalLayout> </uxap:headerContent> <uxap:sections> <uxap:ObjectPageSection id="pageSectionSupplier" title="Supplier"> <uxap:subSections> <uxap:ObjectPageSubSection id="subSectionInfo" title=""> <uxap:blocks> <form:SimpleForm id="formInfo" title="Info" editable="false" layout="ResponsiveGridLayout"> <form:content> <Label id="labelCName" text="Company Name" /> <Text id="textCName" text="{Supplier/CompanyName}" /> <Label id="labelWebsite" text="Website" /> <Link id="linkWebsite" text="{= ${Supplier/HomePage}.split('#')[0] }" href="{= ${Supplier/HomePage}.split('#')[1] }" target="_blank" /> </form:content> </form:SimpleForm> <form:SimpleForm id="formAddress" title="Address" editable="false" layout="ResponsiveGridLayout"> <form:content> <Label id="labelStreet" text="Street" /> <Text id="textStreet" text="{Supplier/Address}" /> <Label id="labelCity" text="City" /> <Text id="textCity" text="{Supplier/City}" /> <Label id="labelRegion" text="Region" /> <Text id="textRegion" text="{Supplier/Region}" /> <Label id="labelCountry" text="Country" /> <Text id="textCountry" text="{Supplier/Country}" /> <Label id="labelCode" text="Postal Code" /> <Text id="textCode" text="{Supplier/PostalCode}" /> </form:content> </form:SimpleForm> <form:SimpleForm id="formContact" title="Contact" editable="false" layout="ResponsiveGridLayout"> <form:content> <Label id="labelTitle" text="Title" /> <Text id="textTitle" text="{Supplier/ContactTitle}" /> <Label id="labelContactName" text="Name" /> <Text id="textContactName" text="{Supplier/ContactName}" /> <Label id="labelPhone" text="Phone" /> <Text id="textPhone" text="{Supplier/Phone}" /> <Label id="labelFax" text="Fax" /> <Text id="textFax" text="{Supplier/Fax}" /> </form:content> </form:SimpleForm> </uxap:blocks> </uxap:ObjectPageSubSection> </uxap:subSections> </uxap:ObjectPageSection> <uxap:ObjectPageSection id="pageSesctionCategory" title="Category"> <uxap:subSections> <uxap:ObjectPageSubSection id="subSectionCategory" title=""> <uxap:blocks> <form:SimpleForm id="formCategory" editable="false" layout="ResponsiveGridLayout"> <form:content> <Label id="labelCategoryName" text="Name" /> <Text id="textCategoryName" text="{Category/CategoryName}" /> <Label id="labelCategoryDescription" text="Description" /> <Text id="textCategoryDescription" text="{Category/Description}" /> <Label id="labelPicture" text="Picture" /> <Image id="imageCategory" src="{ path : 'Category/Picture', formatter : '.trimSuperfluousBytes' }" width="150px" height="150px" /> </form:content> </form:SimpleForm> </uxap:blocks> </uxap:ObjectPageSubSection> </uxap:subSections> </uxap:ObjectPageSection> </uxap:sections> </uxap:ObjectPageLayout> </mvc:View>
- Step 7
You probably noticed empty fields that do not show data yet.
-
Most of the fields are empty because they are bound to properties of navigation entities like the “Supplier”. The data is missing because you didn’t specify that these entities should be expanded during the binding of the view.
Update the binding definition, to expand the suppliers and categories, in the
_onRouteMatched
method of the controlleruimodule/webapp/controller/ProductDetail.controller.js
.JavaScriptCopy_onRouteMatched: function (oEvent) { const iProductId = oEvent.getParameter("arguments").productId; const oView = this.getView(); oView.bindElement({ path: "/Products(" + iProductId + ")", parameters: { expand: "Supplier,Category" }, events: { dataRequested: function () { oView.setBusy(true); }, dataReceived: function () { oView.setBusy(false); } } }); },
-
Now only the “picture” field should be the empty one. The field is still empty, as you need to add a custom formatter, to deal with a quirk of the Northwind image encoding.
Add this formatter after the
markAsFav
method to complete the controller.JavaScriptCopytrimSuperfluousBytes: function (sVal) { // background info https://blogs.sap.com/2017/02/08/displaying-images-in-sapui5-received-from-the-northwind-odata-service/ if (typeof sVal === "string") { const sTrimmed = sVal.substr(104); return "data:image/bmp;base64," + sTrimmed; } return sVal; },
-
The view should now look like displayed here.
-
- Step 8
In this step, you add hierarchy information to the
Shellbar
to enable fast navigation shortcuts.-
Add a method to the
uimodule/webapp/controller/BaseController.js
which you will use to interface the hierarchy feature of theShellbar
. Note that a JavaScript closure is being used to store the history. Add this method after theonNavBack
method.JavaScriptCopy, addHistoryEntry: (function() { let aHistoryEntries = []; return function(oEntry, bReset) { if (bReset) { aHistoryEntries = []; } var bInHistory = aHistoryEntries.some(function(oHistoryEntry) { return oHistoryEntry.intent === oEntry.intent; }); if (!bInHistory) { aHistoryEntries.unshift(oEntry); this.getOwnerComponent().getService("ShellUIService").then(function(oService) { oService.setHierarchy(aHistoryEntries); }); } }; })()
Note that this implementation is used to display the history instead of the hierarchy of pages.
-
In the previous sub-step you used the
ShellUIService
which is not loaded by default. Change this in theuimodule/webapp/manifest.json
and add a new configuration in thesap.ui5
property after themodels
section.JSONCopy{ "sap.app": {}, "sap.ui": {}, "sap.ui5": { "models": {}, "services": { "ShellUIService": { "factoryName": "sap.ushell.ui5service.ShellUIService", "lazy": false, "settings": { "setTitle": "auto" } } }, } }
-
Add a new history item when the controller of the list view (
uimodule/webapp/controller/Products.controller.js
) is initialized.JavaScriptCopyonInit : function () { this.addHistoryEntry({ title: "All Products", icon: "sap-icon://product", intent: "#display-uimodule" }, true); },
-
Add a new history item when the product detail page has been loaded. Change the
dataReceived
hook inside the_onRouteMatched
method.JavaScriptCopy_onRouteMatched: function (oEvent) { const iProductId = oEvent.getParameter("arguments").productId; const oView = this.getView(); oView.bindElement({ path: "/Products(" + iProductId + ")", parameters: { expand: "Supplier,Category" }, events: { dataRequested: function () { oView.setBusy(true); }, dataReceived: function () { oView.setBusy(false); this.addHistoryEntry({ title: "Product - " + oView.getBindingContext().getProperty("ProductName"), icon: "sap-icon://product", intent: "#display-uimodule&/Product/" + iProductId }); }.bind(this) } }); },
Click on the name of the Fiori App to see the hierarchy menu in action.
-