Predictive Analytics Using Application Function Modeler
- How to use the Predictive Analysis Library through SAP HANA Studio
Prerequisites
- [Predictive Analytics Using SQL Script]
This tutorial creates the same models as the previous tutorial by only using template modules within SAP HANA Studio. For more tutorials on using Predictive Analysis Library, see the SAP HANA Academy YouTube Playlist.
Additional Information
- Find more Predictive Analysis Library tutorials on the SAP HANA Academy YouTube Channel
- Step 1
In your SAP HANA Studio window, hover over Window -> Perspective -> Open Perspective. Select SAP HANA Development if is available, otherwise, click Other…. From the drop down list, select SAP HANA Development.

The SAP HANA Development perspective opens.
- Step 2
Through the Repositories tab, right-click on your user login for your tenant database and select Create Repository Workspace.

The Create New Repository Workspace window opens.
Make sure your user login for your tenant database is selected. You may use your default workspace, or untick the Use Default Workspace box and create a new workspace by filling in Workspace Name and Workspace Root. By default, these locations are the same as the home repository you select when starting Eclipse and SAP HANA Studio.

Click Finish to create your new workspace.
- Step 3
Right-click on your new repository workspace and select New -> Repository Package.

The Create Repository Package window opens.
Give your package a name and click Finish to create the package.

- Step 4
Right-click on your new package and select New -> Other….

The New window opens.
Scroll down to SAP HANA -> Database Development -> Flowgraph Model. Click Next >.

The New Flowgraph Model window opens.
Ensure that your new package is highlighted. Give your flowgraph a name. Ensure that Flowgraph for Activation as Stored Procedure is selected. Click Finish.
Note:
SAP HANA Studio will automatically add.hdbflowgraphto your file name.
Your new flowgraph opens.
- Step 5
Under the Predictive Analysis Library window, select Time Series Analysis, scroll down and drag and drop Auto ARIMA onto your flowgraph.

Under the General window, drag and drop Data Source onto your flowgraph.

The Choose a Table or a View window opens. For this example, search for and select the STOCKS (PAL) table. Click OK.

Hover over the STOCKS block. Click and hold the Connect icon
from Data_2 and drag over to Data under the Auto ARIMA block.

Under the General window, drag and drop Data Sink (Template Table) onto your flowgraph.

Hover over the AUTOARIMA block. Click and hold the Connect icon
from RESULT and drag over to DATA_3 under the TEMPLATESINK block.
- Step 6
To view the results you will need to change the RESULT and TEMPLATESINK properties. Hover over RESULT under AUTOARIMA. Click the Properties icon
.

The Properties window opens. Click Signature. Change VALUE Length to 5000.

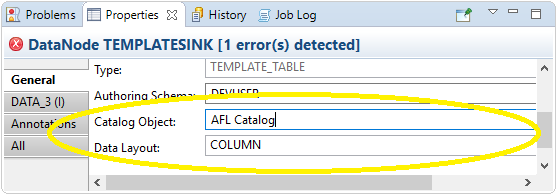
Change the TEMPLATESINK properties. Hover over TEMPLATESINK and click the Properties icon
.
Under the Properties window, add your user schema to Authoring Schema. Add a name for Catalog Object. You may also check the Truncate Table box.
- Step 7
Change the properties of the flowgraph. Right-click on the white space and select Properties.

By Target Schema, add your user schema.

Click the Activate icon
. A new job will appear in your Job Log.
Click the Execute icon
.
Note:
If you receive an error during this step, see the troubleshooting section below. - Step 8
Return to the SAP HANA Administration Console perspective. Under your user login to your tenant database, cascade down from Catalog -> User -> Tables. Right-click on
Catalog_Objectand click Open Data Preview.Note:
The Catalog Object is named earlier in this tutorial.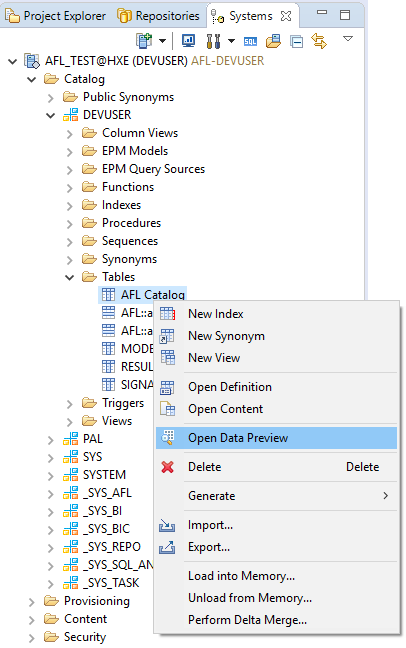
You may notice that this data is identical to Step 2: Run the Model SQL Script in the previous tutorial.
- Step 9
Return to your flowgraph.
Under the Predictive Analysis Library window, select Time Series Analysis and scroll down and drag and drop ARIMA (Forecast) onto your flowgraph.

Hover over the AUTOARIMA block. Click and hold the Connect icon
from RESULT and drag over to INPUT under the ARIMAFORECAST block.Change the PARAMS_2 by hovering over it and clicking the Properties icon
. Under the Fixed Content tab, change the INTARGS to 200.
- Step 10
Under the General window, drag and drop another Data Sink (Template Table) onto your flowgraph.
Hover over the ARIMAFORECAST block. Click and hold the Connect icon
from OUTPUT and drag over to DATA_4 under the new TEMPLATESINK_2 block.As before, change the TEMPLATESINK properties. Hover over TEMPLATESINK_2 and click the Properties icon
. Under the Properties window, add your user schema to Authoring Schema. Add a name to Catalog Object. You may also check the Truncate Table box.
Click the Activate icon
. A new job will appear in your Job Log. - Step 11
Click the Execute icon
.Go to the Systems tab. Refresh your tenant database. Find the results table under your user login. Go to Catalog -> User -> Tables ->
Second_Catalog_Object. Right-click on the table and select Open Data Preview.
You will notice that this data is identical to Step 4: Run the Predict SQL Script in the previous tutorial.
- Step 12
When you Activate your Auto ARIMA model, you may encounter this error:

To fix this error, open the Problems window. Go to Window -> Show View -> Other…. From there, go to General and select Problems. Click OK.

You will see the error in the log. Right-click the error and click Quick Fix. The Quick Fix window opens.

Click Finish. A message explaining the fix will appear.

Click OK.
Click the Activate icon
and continue with the tutorial.