Enhance Your Project with Services, Synonyms and Grants
- How to create a user-provided service in SAP Business Application Studio
- How to grant privileges using a user-provided service
- How to create a synonym


Prerequisites
- Complete the previous tutorial of this tutorial group.
Are you wondering what the best way is to manage changing data structures? Do you want to know how to collaborate more efficiently when working in development projects?
To answer the first question, learn what benefits different table types in SAP HANA Cloud, SAP HANA database can offer you based on your needs. The following 3 tutorials in this tutorial group will help you navigate through your challenges with the managing data structures:
- Get started to collaborate in SAP Business Application Studio
- Import data into a table in SAP HANA Database Project
-
Change data structures using HDBTABLE and HDBMIGRATIONTABLE objects
-
Prepare your SAP HANA Database Project for collaboration
- Generate users and roles for assigning privileges
- You are here ☛ Enhance your project with services, synonyms and grants
- Collaborate on an SAP HANA Database Project template
To answer the second question, create template projects that help you set up service connections, handle synonyms and prepare authorization management. You can create these templates once in the beginning and give your project team members a head-start. Using the template, they can build on your work and can quickly start working productively. The following 4 tutorials in this tutorial group will help you learn how to collaborate efficiently:
This tutorial will show you how to enhance your project with services, synonyms, and grants.
- Step 1
The user-provided service will be responsible for granting privileges to the project in the future.
-
Go back to your SAP Business Application Studio tab and to your project
WS3_3. If it is not open already, you can find it on the Welcome screen. -
Navigate to the explorer if you are still in the source control view. You can get there by clicking on the File Explorer icon at the top of the vertical menu bar on the left of the screen.
-
On the bottom left corner, you can see the project folder
WS3_3/dbin the SAP HANA Projects panel. Click on the deploy icon for the file to deploy the changes to your HDI container. -
Next, click on the plus icon for adding database connections.

-
The Add Database Connections window will open.
-
In the field Select connection type, select Create a user-provided service instance from the drop-down menu.

-
Enter the name of the service instance as
UPS_GENERIC. -
Under Connect to database, select Use deployment target container database.
-
Under Enter username, enter
UPS_GRANTOR. -
Under Enter password, enter the password
DnATBG!1that you used while creating the user in the SAP HANA Database Explorer using SQL. -
Click on Add to complete the creation of the user-provided service instance. You will see this addition in the SAP HANA PROJECTS panel.

-
- Step 2
-
Select the
srcfolder from the explorer. Press the F1 key or click on View – Find Command at the top of the screen to open a prompt. Enter HANA in the field and from the dropdown list of functionalities, choose SAP HANA: Create SAP HANA Database Artifact. -
In the window for creating a new SAP HANA Database Artifact, click on the
folder icon in the first field (“Choose path where you want to create the artifact”). Navigate to your project, the
srcfolder, and then click on Open. -
Select the artifact type as Grants (
hdbgrants). -
In the field Specify the artifact name, enter the name
generic. -
The database version should be HANA Cloud, by default. Without making any further changes, click on Create.
-
A new file
generic.hdbgrantscan be seen in thesrcfolder in the File Explorer. Click on this file to open the file window. -
The
hdbgrantsfile comes pre-filled with templates you can use. In this session, we will only need to grant global roles to object owners and application users. Below you can see the code needed to do that. Remove all the default code and copy and paste the code below to thegeneric.hdbgrantsfile.JSONCopy{ "UPS_GENERIC": { "object_owner": { "global_roles": [ { "roles": [ "genericRoleForOO" ] } ] }, "application_user": { "global_roles": [ { "roles": [ "genericRoleForAP" ] } ] } } } -
Click on the deploy icon for the file. You can do this either from the SAP HANA Projects panel or from the deploy icon on the top right corner of the file window.
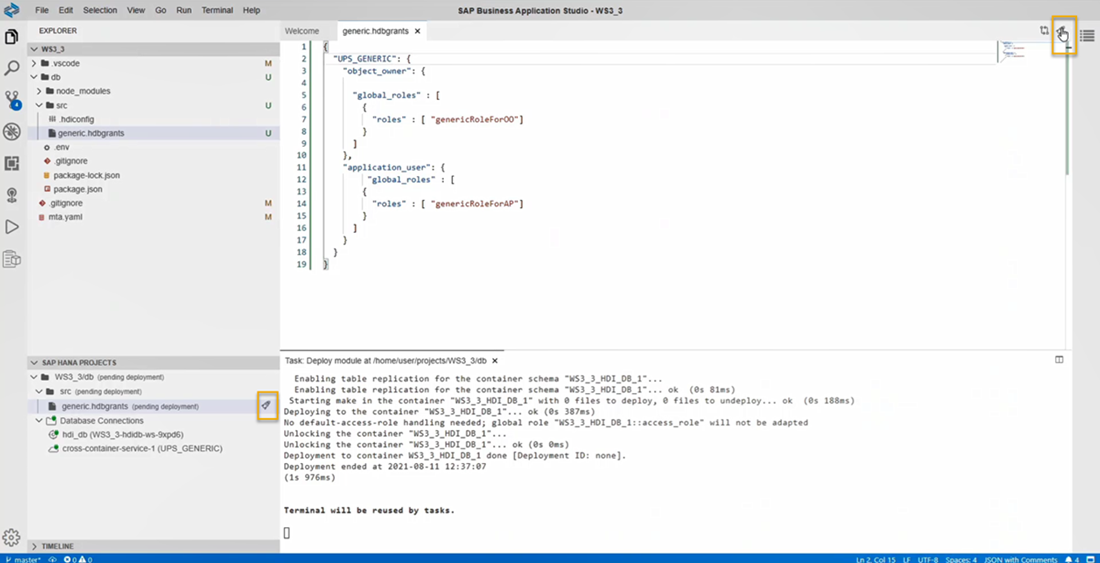
After successful deployment of the
generic.hdbgrantsfile, object owner users and application users will be authorized to report on the data in the container. -
- Step 3
Next, you will create a synonym that allows users of the template project to access the inventory table even if they do not have it present in their own HDI container.
-
Right-click on the
srcfolder and select New File. -
Name the file as
generic.hdbsynonym. Click OK. -
A new file named
generic.hdbsynonymwill be visible under thesrcfolder. Select the file to open the window. -
Click on Click to Add to add a new synonym.

-
Click on the new synonym created under the column Synonym Name and rename it as
SInventory. -
In the Object Name column, click on the three dots icon to search for the object.
-
A new dialog Find Data Sources will open. Make sure to select
UPS_GENERICin the services filter.
-
Type
**in the search bar to view the list of all objects available. Double-click on the objectINVENTORYcontained in the schema used in the first session of this workshop series.
-
Select the synonym
SInventory.The Schema Name column should have the appropriate schema of the object by default (in this case,
WS3_1_HDI_DB_1). Make sure this matches the name of your container. If this is not the case for you, please add the name of the schema you obtained in step 7 (sub-step 5) of the tutorial “Generate users and roles for assigning privileges”. -
Click on the deploy icon to deploy this synonym.

-