Create Calculation View and Expose via CAP (SAP HANA Cloud)
- The basics of creating HANA Native Artifacts within a Cloud Application Programming Model project
- How to create SAP HANA calculation views
- How to integrate SAP HANA native artifacts, like calculation views, within the SAP Cloud Application Programming Model


Prerequisites
- This tutorial is designed for SAP HANA Cloud. It is not designed for SAP HANA on premise or SAP HANA, express edition.
- You have created database artifacts and loaded data as explained in the previous tutorial.
Video Version
Video tutorial version:
- Step 1
With the SAP Cloud Application Programming Model and its implementation of Core Data Services (CDS), we don’t directly import a Calculation View or other native DB artifact. This import, however, is important if you want to expose these artifacts via OData V4 services, since that requires a CDS entity or view.
But CDS does have an annotation called
@cds.persistence.exists. This annotation allows you to re-define an existing DB object and CDS won’t attempt to create or alter it. It will just assume it already exists in the matching state.This feature does require you to completely redefine the DB artifact with exactly the same name, columns and column names.
In this exercise, lets see how we can create a calculation view and other artifacts and expose them to CDS.
For more details on this topic, including advanced features such as parameters and quoted names, please refer to the online documentation here: https://cap.cloud.sap/docs/advanced/hana#create-sap-hana-native-object
Calculation Views and other HANA native artifacts allow you to leverage HANA specific features and optimizations that might not otherwise be available at the abstraction layers within the SAP Cloud Application Programming Model. Calculation Views are especially good at aggregation and filtering of large datasets. In this exercise will create a simple join Calculation View based upon or small data set and data model. This is done so we focus on the mechanics of combining HANA native with CAP without needing the typical large data set where the technical advantages of Calculation Views become more apparent.
-
Create a new Calculation View via View > Command Pallette and then SAP HANA: Create SAP HANA Database Artifact command pallet entry.

-
Create a calculation view called
V_INTERACTIONof Data Category DIMENSION and Dimension Type of STANDARD. Press Create
-
The new artifact is created in the
/db/srcfolder. This way you can have a single HANA database model that contains both HANA native content and CAP generated content.
-
Click on the
V_INTERACTION.hdbcalculationviewto load the graphical calculation view editor.
-
- Step 2
-
Drop a
joinnode into the modeling space
-
Use the
sign to add tables to the node.

-
Type in
HEADERand then select the table you created earlier via CDS calledAPP_INTERACTIONS_HEADERand press Finish.
-
Repeat the process to add the
APP_INTERACTIONS_ITEMStable to the same join node. You should see both artifacts in the join node.
-
Double-click on the join node. A panel will open on the right.

-
Drag and drop the
IDfield to theINTERACTION_IDfield.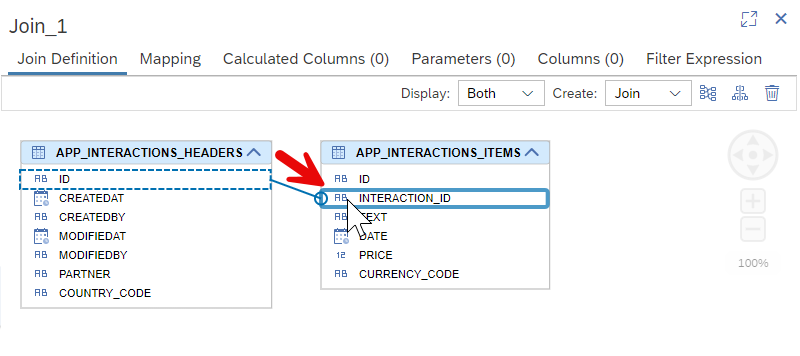
-
Set the cardinality to
1..n
-
In the Mapping tab, add all the columns except
ID*Columns as output columns.
-
Connect the join node with the Projection node using the


-
Click on the Projection node and double-click on the join parent to add all the columns to the output

-
From the SAP HANA Projects view, press the Deploy button

-
Check the deployment log to make sure everything was successfully created in the database.

-
Open the HDI Container in the Database Explorer

-
Under Column Views you will find your Calculation View. Choose Open Data

-
Go to the Raw Data and you should see the header and item data joined together.

-
- Step 3
We now want to expose our Calculation View to the Cloud Application Programming model by creating a “proxy” entity for the view in the CDS data model.
-
Return to the Business Application Studio and open
interactions.cds.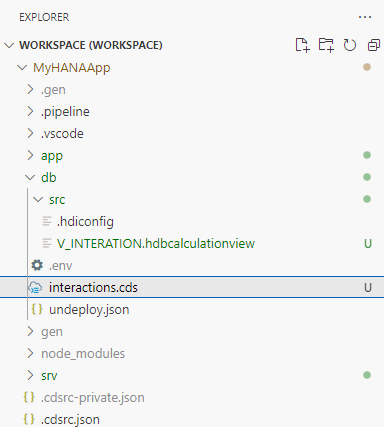
-
We need our proxy entity to be created without the namespace in our current
interactions.cds. Therefore comment out the namespace line and add all the existing content except theusing ...line in a new context forapp.interactions.
-
We need to add a matching entity definition for the Calculation View. This means redefining all the column names and data types / lengths. Doing so manually would be error prone, but the
hana-clihas a utility that will help. Open a terminal and change to thedbfolder with the commandcd db. Now issue the command:shellCopyhana-cli inspectView -v V_INTERACTION -o cds
With this command you are looking up the definition of the view but asking for the output (-o) in the CDS format.
-
Copy this block from the terminal and paste it into the
interactions.cdsfile at the end outside the context block.
-
CDS does have an annotation called
@cds.persistence.exists. This annotation allows you to re-define an existing DB object and CDS won’t attempt to create or alter it. It will just assume it already exists in the matching state.There is also the annotation@cds.persistence.calcview. This will further tell the Cloud Application Programming Model that this target entity is also a Calculation View. -
Now open the
interactions_srv.cdsfile from the/srvfolder. Add this new Calculation View based entity to the CAP service as read-only.
-
From the terminal return to the root of the project and issue the command:
cds build --productionshellCopycds build --production
-
Although we didn’t add any new database artifacts to the project, the addition of an entity to the service layer causes new views to be generated within SAP HANA. Therefore we need to deploy to the database using the SAP HANA Projects view before we can test.
-
From the console in the project root hopefully you still have the
cds watch ...running. Otherwise start it again withcds watch --profile hybridto start the CAP service layer for testing. If you have performed the tutorial SAP HANA Cloud, Add User Authentication to Your Application, remember you must also run the application router to test your service with authentication. -
You can test your view via the service layer by adding
/odata/v4/catalog/V_Interactionto the path.
Congratulations! You have now successfully combined HANA native artifacts with the SAP Cloud Application Programming Model and learned the modern HANA way to expose Calculation Views via OData.
-