Run a SAP Fiori Elements Application using Mockserver
- How to use mock server with SAP Fiori elements application
- How to create mock data with Data Editor
- How to add additional services to mock server


Prerequisites
-An OData V4 service and an application based on that service that was generated by SAP Fiori tools.
-Starting point could be to run through the tutorial Create a Travel App with SAP Fiori Elements Based on OData V4 RAP Service.
- Step 1
-
Check the dependency that the mock server is installed.
Check
package.json
Check
ui5-mock.yaml
-
If you need to install mock server manually to a project, see the following.
URLCopyhttps://github.com/SAP/open-ux-odata
-
- Step 2
-
In the SAP Business Application Studio open the context menu by right clicking on your
webappfolder and select menu entry Preview Application.
-
From the dropdown menu select
start-mock
If you see some status message in the console window and a popup-message telling you that the application will open in a new browser tab, click the
Openbutton to switch to the new browser tab.In the new browser tab showing your application, choose Go to load data.

In which files of your project do you find the setup for your mockserver?
-
- Step 3
When running an application using
start-mockthe mock data is generated on the fly. But, by using the Data Editor you can generate mock data that will be stored as .json format under thewebapp/localService/datafolder. Therefore, allowing you to change data and make it more meaningful for your application.-
In the SAP Business Application Studio open the context menu by right clicking on your
webappfolder and select menu entry Open Data Editor.
-
Data Editor opens with No Data. Click on
Create Mock Data
Data will be generated for each entity and property combination and stored under
webapp/localService/data
-
Preview your application using
start-mockagain and the application will be using mock data from the stored location.
-
- Step 4
In the step above you generated mock data for your table. But your application also has a filter bar that is still connected to the backend for its Value Help.

You can also see the call in your
metadata.xmlfile.
To test this out you can also disable the backend and check that the Value Help does not open. Open your
ui5-mock.yamlfile, and comment out the backend call.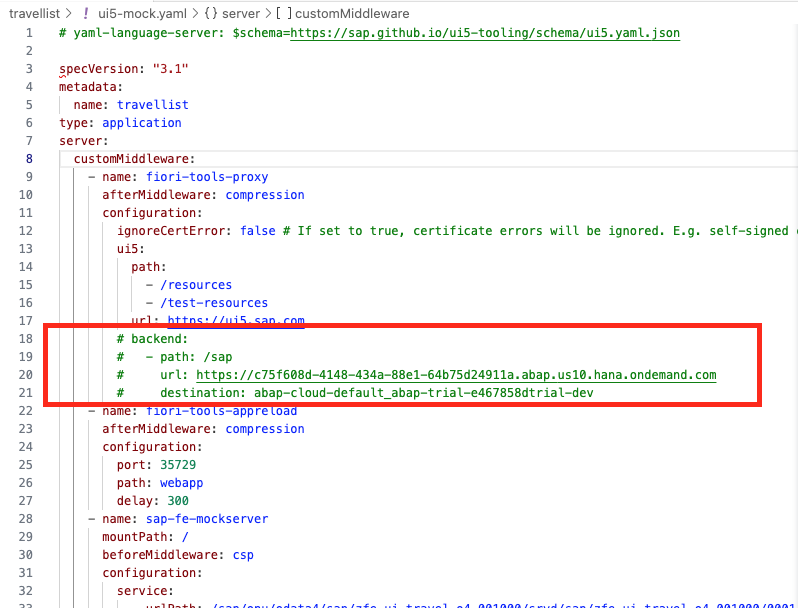
Validate that Agency Value help does not open.
If you still see data in Value Help,please make sure you stop your server and restart.
Before proceeding to the next steps, please enable your backend.
To be completely off-line, you would need to add additional mock services for each of the Value List References in your
metadata.xml. In this step you will add a mock service for Agency that will support your Value Help.-
To mock the service for Agency value Help you need the following:
- Agency Value Help metadata file
- Agency Value Help service URL (
urlPath) - A
config.jsonfile that will tell mock server where to find these file - Adjust your
ui5-mock.yamlfile to read your newconfig.jsonfile
-
Agency Value Help metadata
Open the application and click on the Agency Value Help button.

Go back to your projects Terminal , you should see a dedicated info server:ux-proxy call to a new $metadata file.

It might help to use notepad to construct the following
url.Construct a new URL to your Agency value help metadata file by combining from your running application
https://xxxx.xxx+ Metadata Call
You should see the new metadata document, save it to
webapp/localService/AgencyVHMetadata.xml -
Agency Value Help service URL (
urlPath)urlPath- is the path you copied from your info server:ux-proxy without the $metadata -
Putting it all together in a new
config.jsonfile.Right-click on
localServicefolder and selectNew File. Create theconfig.jsonunder the following pathwebapp/localService/config.json. -
From your
ui5-mock.yamlfile copy the service-configuration.
Depending on where you place your
config.jsonadjust the path for the metadata file inmetadataPathand the mock data inmockdataPath.jsonCopy[{ "urlBasePath": "/sap/opu/odata4/sap/zfe_ui_travel_o4_######/srvd/sap/zfe_ui_travel_o4_######/0001", "name": "", "metadataPath": "./metadata.xml", "mockdataPath": "./data", "generateMockData": true }]Paste the code into your new
config.jsonfile.You will need to add parenthesis and double quotes since the format of the
.jsonfile is different then the.yamlfile.
-
In your
ui5-mock.yamlswitch the configuration to use theconfig.jsonfile that you created earlier.It is extremely important that the
yamlfile reflects hierarchy.In order to do that you need to replace your
sap-fe-mockservercode snippet with this:yamlCopyname: sap-fe-mockserver beforeMiddleware: csp configuration: mockFolder: webapp/localService -
Validate that your mock server still works by executing
start-mockcommand under Preview ApplicationIf you are running into issues, make sure your formatting of the
ui5-mock.yamlis correct.
-
Adding the new configuration to your
config.jsonurlPath- is the path you copied from your info server:ux-proxy without the $metadatametadataPath- reflects the path and the name of your new metadata file that was saved in the above step.
jsonCopy{ "urlPath": "/sap/opu/odata4/sap/zfe_ui_travel_o4_######/srvd_f4/dmo/i_agency/0001;ps=%27srvd-zfe_ui_travel_######-0001%27;va=%27com.sap.gateway.srvd.zfe_ui_travel_######.v0001.et-zfe_c_travel_######.agencyid%27", "name": "", "metadataPath": "./AgencyVHMetadata.xml", "mockdataPath": "./data", "generateMockData": true }
After restarting your application using
start-mockyou should see mock values in your value help dialog for Agency.
Currently the data editor only supports the saving of a single mock service. For the time being, you may see a difference between table data (which was created in Step 2) and value help.
-