Use a Regression Dataset Schema to Upload Training Data to Data Attribute Recommendation
- How to authorize your client to communicate with your Data Attribute Recommendation service instance
- How to do upload data to your Data Attribute Recommendation service instance to train a machine learning model

To try out Data Attribute Recommendation, the first step is to upload data that will be used to train a machine learning model. For more information, see Data Attribute Recommendation help portal documentation. For further definition of specific terms, see Concepts.
Business Use Case: Use the regression model template to predict the price of new products based on a training dataset that has the following product information: manufacturer, description and price.
The regression model template is a generic neural network for regression which seeks to minimize the mean squared error (MSE). This model template does not support multi-label dataset schemas. Use single-label dataset schemas only.
To better understand the regression model template from the Data Attribute Recommendation service, take a look at the following blog post: Solving regression use-cases with Data Attribute Recommendation. See also Free Tier Option Technical Constraints.
To create a machine learning model that predicts the price of new products you will first prepare the dataset schema and upload the training data to the service. In this tutorial, you will focus on the data preparation, uploading and defining the dataset schema. For that, you will use a public product dataset from Best Buy.
- Step 1
You will use Swagger UI, via any web browser, to call the Data Attribute Recommendation APIs. Swagger UI allows developers to effortlessly interact and try out every single operation an API exposes for easy consumption. For more information, see Swagger UI.
In the service key you created for Data Attribute Recommendation in the previous tutorial: Use Free Tier to Set Up Account for Data Attribute Recommendation and Get Service Key or Use Trial to Set Up Account for Data Attribute Recommendation and Get Service Key, you find a section called
swagger(as highlighted in the image below) with three entries, calleddm(data manager),mm(model manager) andinference. You will use all three Swagger UIs throughout the tutorials.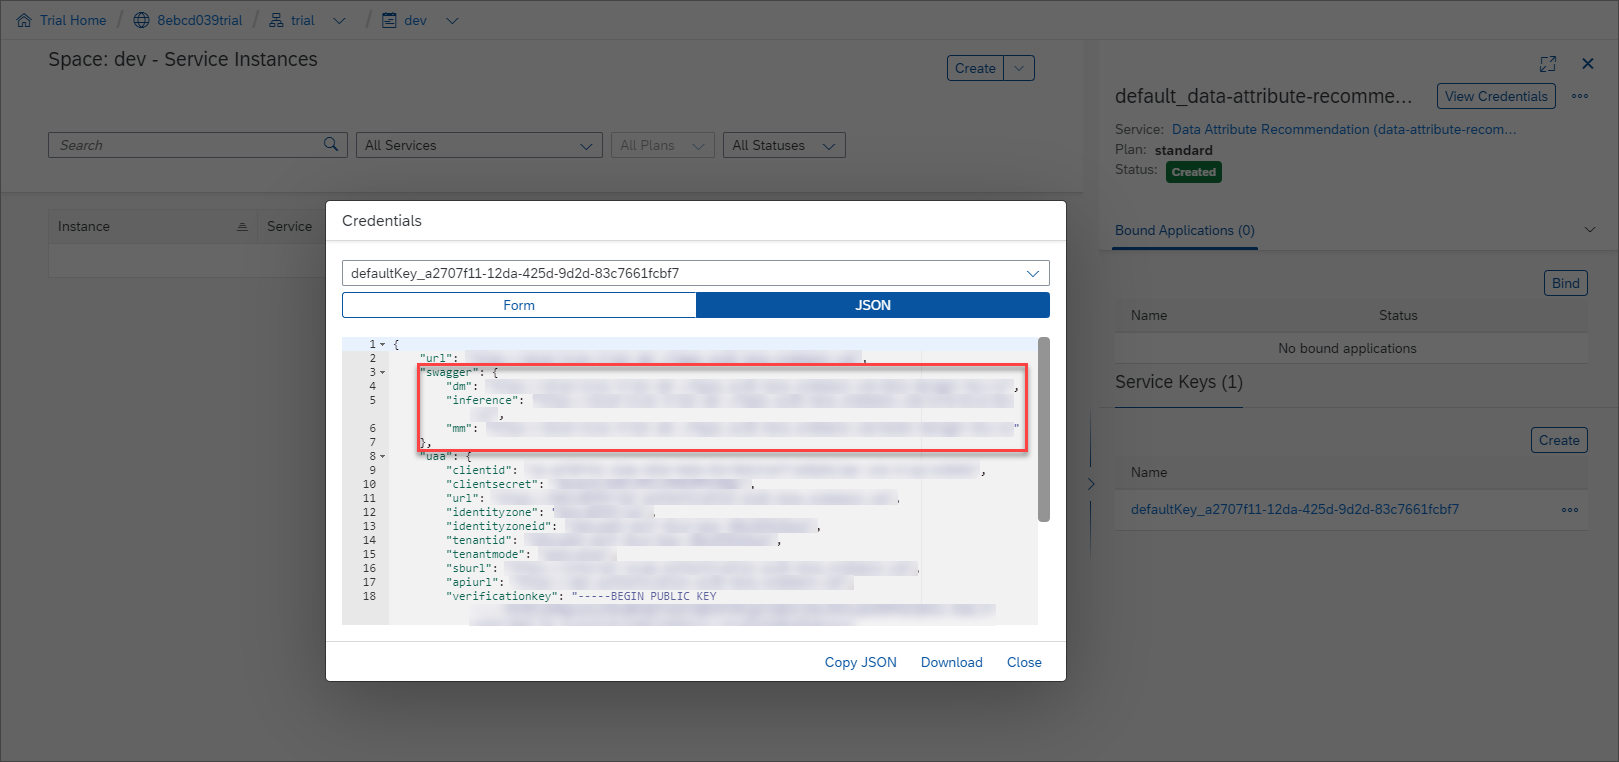
For this tutorial, copy the URL of the Swagger UI for
dmand open it in a browser tab.After finishing this tutorial, keep the Swagger UI for
dmopen to perform the clean up tasks in Use the Regression Model Template to Predict Data Records.-
To be able to use the Swagger UI endpoints, you need to authorize yourself. In the top right corner, click Authorize.
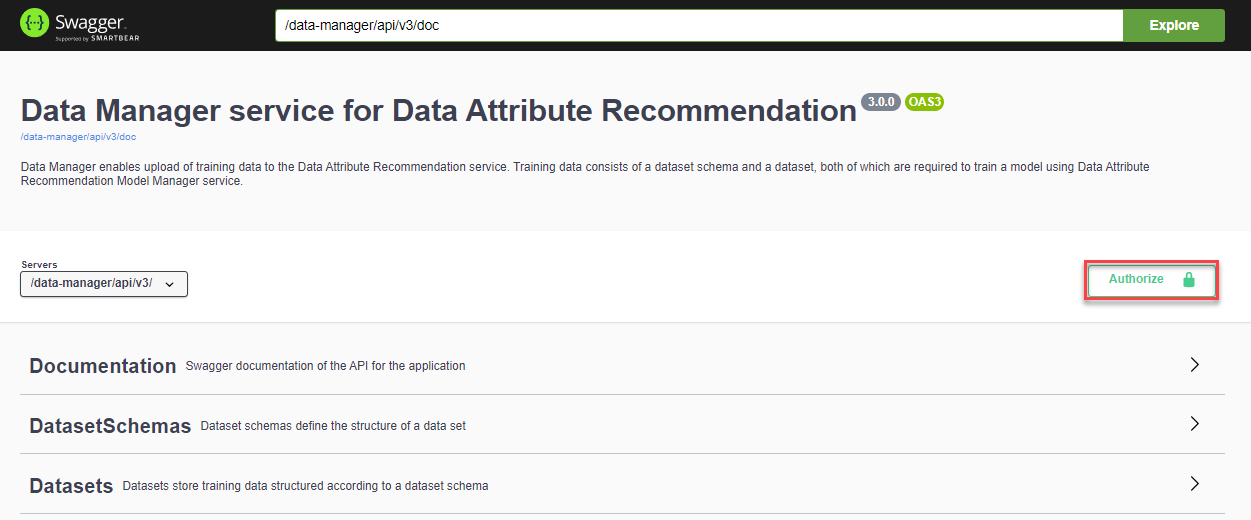
-
Get the
access_tokenvalue created in the previous tutorial: Get OAuth Access Token for Data Attribute Recommendation Using Any Web Browser, then add Bearer (with capitalized “B”) in front of it, and enter in the Value field.Bearer <access_token> -
Click Authorize and then click Close.

-
- Step 2
Now, you need to create a new dataset schema. A dataset schema describes the structure of datasets.
In these tutorials, you’ll use a dataset from Best Buy. The original dataset as well as other dataset from Best Buy can be found here. From the original dataset the product information manufacturer, description and price were picked to illustrate the possibility of the service and the regression model template to deal with such information.
Use the following dataset schema:
JSONCopy{ "features":[ { "label":"manufacturer", "type":"CATEGORY" }, { "label":"description", "type":"TEXT" } ], "labels":[ { "label":"price", "type":"NUMBER" } ], "name":"regression-dataset-schema" }The schema is divided into
featuresandlabels. The features are the inputs for the machine learning model whereas the labels are the fields that shall be predicted. Thus, this schema provides the product information (manufacturer and description) as an input and wants to predict the price of the product.To create the dataset schema, proceed as follows:
-
In Swagger UI, expand the endpoint
POST /datasetSchemasby clicking on it. Then click Try it out.
-
Copy the above dataset schema into the text area. Then click Execute to create it.

-
Further below, you find the response of the service. The response includes a representation of dataset schema that was just created. Additionally, the dataset schema received an
id. Copy it locally as you will need it in the next step.
You have successfully created a dataset schema.
-
- Step 3
Next, you need to create a dataset using the dataset schema that you have created. The dataset is a table that holds the data that you will upload later.
To create the dataset, proceed as follows:
-
Expand the endpoint
POST /datasetsby clicking on it. Then click Try it out.
-
In the text area, replace the parameter
datasetSchemaIdwith id that you copied from the previous step and replace the parameternamewith an appropriate name for you dataset,regression_tutorial_dataset, for example. Then click Execute to create the dataset.
-
In the response of the service, you find the
idof your dataset. Copy it locally as you will need it in the next steps and also in the next tutorial: Use the Regression Model Template to Train a Machine Learning Model. Additionally, you find thestatusof the dataset. The status isNO_DATAas no data file has been uploaded yet.
You have successfully created a dataset.
-
- Step 4
The final step is to upload data to your dataset.
In this tutorial, you use this dataset which is a reduced version of Best Buy’s dataset. Right click on the link, then click Save link as to open the file dialog. In the dialog, replace the file ending
txtwithcsvas indicated below. Then save the file.
Open the dataset and take a moment to look at it. As mentioned in step 2 the dataset contains product information as well as product prices. You might ask why the product prices are in the dataset when you actually want to predict them.
The prices are only necessary for training as the service does not know yet which product information are common for certain prices. Instead, the service will recognize patterns and establish such connections during the training process. This allows the service to make price predictions based on the product information later on.
In Swagger UI, proceed as follows to upload to the data:
-
Expand the endpoint
POST /datasets/{id}/databy clicking on it. Then click Try it out.
-
Fill the parameter
idwith the ID of your dataset that you previously copied. -
Click Choose File below the parameter
Request body. In the dialog that opens, select the regression dataset that you just downloaded. Then click Execute to upload the data.

In the response, you see that the status of your dataset has changed to
VALIDATING. The service is now validating the data that you have uploaded.
You have successfully uploaded data to your dataset.
-
- Step 5
To check the validation status of your data, proceed as follows:
-
Expand the endpoint
GET /datasets/{id}by clicking on it. Then click Try it out.
-
Fill the parameter
idwith the ID of your dataset. Click Execute.
-
In the response of the service, you find the status of your dataset. If the status is still
VALIDATING, check back in a few minutes. If the status isSUCCEEDED, your data is valid. In case the status is eitherINVALID_DATAorVALIDATION_FAILED, create a new dataset and upload the data once again.
You have successfully created a dataset and uploaded data. You can now use the dataset to train a machine learning model.
Choose the correct status your dataset must have to train a machine learning model with it.
-