Create the CDS Data Model for the SAP SuccessFactors Extension
- Review the extension data model
- How to create the CDS data model in the CAP project
- How to populate the model with initial test data
- How to perform the first CAP service test

Prerequisites
- Complete the tutorial: Prepare to Develop the SAP SuccessFactors Extension
- Complete the tutorial: Jump start the SAP SuccessFactors Extension CAP Project
- Complete the tutorial: Import SAP SuccessFactors OData Services definitions
- Step 1
Before you move on with the coding, just quickly review the conceptual data model of your solution:

The logical model depicted in the diagram above has been conceived to comply with the following business rules:
- Each project is composed by members (team) and activities;
- The project team (members) is made of SAP SuccessFactors employees;
- Each project member has an specific role in the project;
- Each project activity is assigned to a specific project member;
- Projects and activities have one status each (i.e. not started, in progress, overdue, completed etc.);
- And last, but not least, whenever a team member is assigned to a project, a special assignment is registered to the employee’s background to signal that such employee has participated in the project, acting in a specific role, as part of the employee’s professional experience.
Now, having that model in mind, you can make its definition into the CAP project.
- Step 2
On the left-hand pane of SAP Business Application Studio, (1) select the
dbfolder, then (2) click on the three dots to the right of the project name and (3) select New File.
On the dialog, name the file
projman-model.cdsand click OK.
- Step 4
Now, populate your data model with some initial test data. This can be done by creating some files in CSV format into a subfolder of the
dbfolder named “data” with the specific naming convention of<namespace>-<entity name>.csv.In the root folder of your project on the Terminal, type
cd dband press Enter.
Type
mkdir dataand press Enter.
Type
cd dataand press Enter.
Type the sequence of commands below pressing Enter after each one:
touch sfsf.projman.model.db-Role.csvtouch sfsf.projman.model.db-Status.csvtouch sfsf.projman.model.db-Employee.csvtouch sfsf.projman.model.db-Project.csvtouch sfsf.projman.model.db-Member.csvtouch sfsf.projman.model.db-Activity.csv

On the left-hand pane, expand the
datafolder to view the recently created files, then click on thesfsf.projman.model.db-Role.csvfile to open it.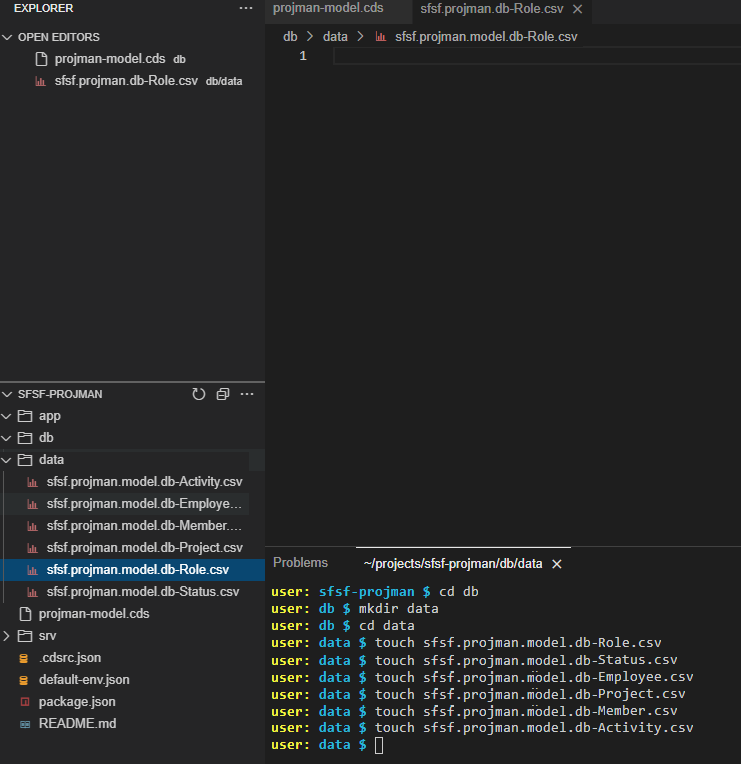
Copy & paste the content below into the
sfsf.projman.model.db-Role.csvfile:CSV File ContentCopyID;name;descr 1;Project Manager;Project Manager Role 2;Project Lead;Project Lead Role 3;Business Owner;Business Owner Role 4;Product Owner;Product Owner Role 5;SCRUM Master;SCRUM Master Role 6;Solution Architect;Solution Architect Role 7;Software Engineer;Software Engineer Role 8;UX Designer;UX Designer Role 9;Program Designer;Program Designer Role 10;Content Designer;Content Designer Role 11;Content Expert;Content Expert RoleOn the left-hand pane, click on the
sfsf.projman.model.db-Status.csvfile to open it, then copy & paste the content below:CSV File ContentCopyID;name;descr;criticality 1;Not Started;Activity has not been started yet;2 2;In Progress;Activity is in progress;5 3;Overdue;Activity is overdue;1 4;Blocked;Activity is blocked;2 5;Paused;Activity is paused;2 6;Canceled;Activity is canceled;1 7;Completed;Activity is completed;3On the left-hand pane, click on the
sfsf.projman.model.db-Employee.csvfile to open it, then copy & paste the content below:CSV File ContentCopyuserId;username;defaultFullName;email;division;department;title 100093;rsmolla;Rick Smolla;Rick.Smolla@bestrunsap.com;Corporate Services (CORP_SVCS);Employee Development (50012007);Development Analyst 100095;kholliston;Kay Holliston;Kay.Holliston@bestrunsap.com;Corporate Services (CORP_SVCS);Human Resources US (50150001);Program Manager 100096;smoultone;Sarah Lynn Moultone;Sarah.Moultone@bestrunsap.com;Manufacturing (MANU);Quality Assurance US (50150013);Inspector 100097;swang;Scott C Wang;Scott.Wang@bestrunsap.com;Manufacturing (MANU);Operations CN (50100010);Quality Assurance Manager 100112;jwilliams;John Williams;John.Williams@bestrunsap.com;Manufacturing (MANU);Operations US (50007753);SVP Operations & Maintenance 100115;mcooper;Mya Cooper;Mya.Cooper@bestrunsap.com;Manufacturing (MANU);Operations US (50007753);VP OperationsIMPORTANT NOTE: the above employees have been taken from an SAP SuccessFactors demo tenant as they must match the data that’s coming from it. Those users usually exist at SAP SuccessFactors demo tenants, so if you are using a demo tenant for your project that content should be fine, otherwise you must search for users in your SAP SuccessFactors tenant and adjust the content of this CSV accordingly.
On the left-hand pane, click on the
sfsf.projman.model.db-Project.csvfile to open it, then copy & paste the content below:CSV File ContentCopyID;name;description;startDate;endDate;status_ID 3ca47b3e-eff3-430e-9ae0-1937dd094212;S/4HANA Cloud implementation;Global implementation of the S/4HANA Cloud ERP in the organization;2022-01-02;2022-09-30;1 b85cf0b8-2ff3-40a7-af20-52fa024fbce6;Resource allocation app development;Development of a cloud application to manage presales resources allocation;2022-08-02;2022-11-30;2 b5c6bc42-6f95-4876-9658-13aaecb28008;BTP enablement program development;Development of the plan and content for the global BTP enablement program;2022-05-01;2022-10-31;3On the left-hand pane, click on the
sfsf.projman.model.db-Member.csvfile to open it, then copy & paste the content below:CSV File ContentCopyID;parent_ID;member_userId;role_ID;hasAssignment df87d8d4-16df-48da-a8bf-5b2218f62602;3ca47b3e-eff3-430e-9ae0-1937dd094212;100093;1;true 3470cf57-b0b9-49ce-b568-52f44df3b09c;3ca47b3e-eff3-430e-9ae0-1937dd094212;100095;2;true 81e89fd2-b2d8-4af3-a4b2-2cadfc69e6de;b85cf0b8-2ff3-40a7-af20-52fa024fbce6;100096;1;true 79da3255-627f-4782-af10-beb8d1c796b6;b85cf0b8-2ff3-40a7-af20-52fa024fbce6;100097;2;true 33c8e150-561a-4228-899f-faabe41094aa;b5c6bc42-6f95-4876-9658-13aaecb28008;100112;1;true d2696b36-3413-4522-a73b-f00560dc3fe5;b5c6bc42-6f95-4876-9658-13aaecb28008;100115;2;trueIMPORTANT NOTE: the
member_useIdvalues must match the values in theuserIdcolumn from thesfsf.projman.model.db-Employee.csvfile.On the left-hand pane, click on the
sfsf.projman.model.db-Activity.csvfile to open it, then copy & paste the content below:CSV File ContentCopyID;parent_ID;assignedTo_ID;name;description;dueDate;status_ID 4dae162a-56ea-4e99-8061-70ec3f30a2fd;3ca47b3e-eff3-430e-9ae0-1937dd094212;df87d8d4-16df-48da-a8bf-5b2218f62602;Do project planning;Plan the whole project;2022-01-05;7 fcba3d35-013a-4ab6-9ab9-9fb938eff8a4;3ca47b3e-eff3-430e-9ae0-1937dd094212;3470cf57-b0b9-49ce-b568-52f44df3b09c;Assign team to project;Look for the appropriate experts to work on project;2022-01-05;3 3fd253a8-4951-47d0-9946-58d97ac21b95;b85cf0b8-2ff3-40a7-af20-52fa024fbce6;81e89fd2-b2d8-4af3-a4b2-2cadfc69e6de;Do project planning;Plan the whole project;2022-05-04;7 91d18efa-3173-4f7e-86f0-74332c69c8cd;b85cf0b8-2ff3-40a7-af20-52fa024fbce6;79da3255-627f-4782-af10-beb8d1c796b6;Assign team to project;Look for the appropriate experts to work on project;2022-05-04;3 341a6fa0-6ecf-4eb4-8638-426eed4584f7;b5c6bc42-6f95-4876-9658-13aaecb28008;33c8e150-561a-4228-899f-faabe41094aa;Do project planning;Plan the whole project;2022-08-05;7 0194b2b8-b9f7-4c6f-8677-18ae7fd627b7;b5c6bc42-6f95-4876-9658-13aaecb28008;d2696b36-3413-4522-a73b-f00560dc3fe5;Assign team to project;Look for the appropriate experts to work on project;2022-08-05;3 - Step 5
Now it has come the time to test the project as it is so far. You will start by installing the required project dependencies.
In the Terminal, change back to the project root folder: type
cd ../..and press Enter.
Type
npm installand press Enter.
When the installation is completed you should see the following message in the Terminal:

Type
cds watchand press Enter to run the project and watch for changes in real time. You should see the following result in the Terminal:
Notice that CDS has automatically set the database to an in-memory
SQLitedatabase and filled it with the CSV files. It also says that it could not find any service definitions from the loaded models: that’s because you really haven’t defined any yet (you will do it in the next tutorial from this group).CTRL+Clickon thehttp://localhost:4004link that is displayed in the terminal to open the project home page in a new browser tab.
You can see that there are no web applications, and most importantly, no service endpoints yet.
You might be wondering: “what about the Employee, Role and Status entities that I annotated with
@cds.autoexpose? why are they not showing up here?”. Well, as you have not defined any service endpoints to expose the entities, CDS cannot expose them even though you explicitly asked to do it automatically.But don’t worry! They will show up in this page as soon as you complete the next tutorial in this group.