Learn About Selected CAP Conventions
- The defaults CAP provides and how that speeds up development
- Why these defaults are built-in and make your life easier
- How to reuse content
- How to model relationships
- How to use CAP and SAP HANA Cloud

Prerequisites
- You’ve finished Create a CAP Project with SAP Business Application Studio
If you haven’t set up your SAP HANA Cloud yet, follow this quick tutorial (Step 3) to set it up: Help Thomas Get Started with SAP HANA
Your SAP HANA Cloud instance requires a couple of minutes to start. You’ll need it later on and starting the instance now saves you some time as it can start in the background.
- Step 2
Everything happening at runtime is in response to events. Hence, all service implementations take place in event handlers.
CAP comes with basic implementations (generic handlers) that enable you to serve and interact with your service without adding custom implementations to your project. The list of generic handlers comprises:
- standard CRUD requests
- deep READ, INSERT, UPDATE, DELETE
- INSERT, UPDATE, DELETE with Associations
Learn more about generic handlers in CAP
Let’s see it in action and go to your project.
Start your service from the Run Configurations panel.
Create a file called
tests.httpin the root of your project and copy the following OData queries in it. This file can be used with the REST client that is available in the SAP Business Application Studio to make requests against your service. The generic handlers CAP provides sent the responses to your requests.HTTPCopy# Browse Books as any user GET http://localhost:4004/odata/v4/catalog/Books? # &$select=title,stock # &$expand=currency # &sap-locale=deClick on Send Request inside the
tests.httpfile, to execute requests against your service.
The REST client gives you the response of your service and you see immediately if the request was successful.

Curious what the OData queries, disabled by the ‘#’, do? Not all of them work right now, they are relevant later in this tutorial. Nevertheless, you can try it out, remove the ‘#’ one line at a time and send the request. More learning content about OData is available in Learn about OData Fundamentals.
Those requests all work, just using the generic handlers CAP provides. So the need to add custom handlers is minimized.
If you want to know more about custom handlers, our Getting Started in a Nutshell is a good starting point.
- Step 3
CAP comes with a set of reuse content that we recommend to use. You benefit from several features by using
@sap/cds/common:- Concise and comprehensible models
- Foster interoperability between all applications
- Proven best practices captured from real applications
- Streamlined data models with minimal entry barriers
- Optimized implementations and runtime performance
- Automatic support for localized code lists and value helps
- Extensibility using Aspects
Conceptual modeling: Aspects
Aspects give you shortcuts, for concise and comprehensible models, interoperability and out-of-the-box runtime features connected to them.
The aspect managed is defined in
@sap/cds/commonas follows:
Use
managed, to add four elements to capturecreated by/atand latestmodified by/atmanagement information for records.The following examples are equivalent:
CDSCopyentity Foo : managed {...}CDSCopyentity Foo { createdAt : Timestamp @cds.on.insert : $now; createdBy : User @cds.on.insert : $user; modifiedAt : Timestamp @cds.on.insert : $now @cds.on.update : $now; modifiedBy : User @cds.on.insert : $user @cds.on.update : $user; ... }modifiedAtandmodifiedByare set whenever the respective row was modified, that means, also duringCREATEoperations.The annotations
@cds.on.insert/updateare handled in generic service providers to fill-in those fields automatically.Let’s see it in action.
This aspect is also used in your project and you’ve seen the effect, for example, when you fetched all books. The response contained those fields, even though they are not explicitly part of your entity definition in the
data-model.cdsfile.
There are other common reuse aspects. Have a look at the documentation for
cuidand fortemporal.Conceptual modeling: Types
Types are standard definitions of often needed entities. Using and reusing them fosters interoperability between applications but lets you enhance those definitions at the same time.
The reuse type
Currencyis defined in@sap/cds/commonas a simple managed association to the entitysap.common.Currenciesas follows:CDSCopytype Currency : Association to sap.common.Currencies;The entity
sap.common.Currenciesuses the aspectCodeListdefined in@sap/cds/commonand adds the fieldscodeandsymbolto the ones already defined inCodelist.

Here’s an example of how you used that reuse type in your project already:
CDSCopyusing { Currency } from '@sap/cds/common'; entity Books : managed { key ID : Integer; title : localized String(111); descr : localized String(1111); stock : Integer; price : Decimal(9,2); currency : Currency; //> using the reuse type author : Association to one Authors; }The element
currencyfollows the recommended rule for writing regular elements in camel case. The typeCurrency, on the other hand, is defined in pascal case.To see the effect in your application add sample data to your project.
Create the file
sap.common-Currencies.csvin yourdb/datafolder and add the following data:CSVCopycode;symbol;name;descr USD;$;US Dollar;United States Dollar GBP;£;British Pound;Great Britain Pound JPY;¥;Yen;Japanese YenThe naming of the file is related to the name of the entity
Currenciesand not to the reuse typeCurrencyused in your data model.Use the
GETrequest on the catalog service you’ve included previously in yourtests.httpfile. Enable the expand part of the query:
See the effect:

There are also the reuse types
CountryandLanguagethat follow the same principle asCurrency.You can adapt aspects and types to your needs. Learn more in the CAP documentation
- Step 4
Associations help you capture your intent when modeling your data. As associations in CAP act like forward-declared JOINs, you can focus on what you want to express, instead of capturing relationships using foreign keys and the respective JOINs in each query. Queries just use them much like forward-declared table aliases. There’s no need to repeat the respective JOINs and ON conditions all over the place.
Let’s see it in action.
You’ve already used it in your project and defined a simple managed association from the
Booksentity to theAuthorsentity in yourdata-model.cdsfile:CDSCopyentity Books : managed { ... author : Association to Authors; }Now add an association from the
Authorsentity to theBooksentity and use again the graphical modeler to do so.Open the
data-model.cdsfile in the graphical modeler and add a new relationship to the Authors entity.Stick with the defaults, which means using
booksas property name,my.bookshop.Booksas target entity andauthorsas backlink property.
This is how your data model looks now in the graphical modeler.

This is a one-to-many association. Such an association always needs
onconditions (backlink property) referring to some reverse association on the target side. Basically this expresses, that in your model one book has exactly one author and at the same time one author can have many books. If you defined your service accordingly, as in theAdminService, you can find all books of an author if you navigate theAuthorentity (/admin/Authors?$expand=books). UseAlicewithout a password to access the service. You’ll learn more about it later in this tutorial.You can even deep read associated entities:
/admin/Authors?$expand=books($expand=currency) - Step 5
Compositions are used to model document structures through “contained-in” relationships.
Compositions get a special treatment and runtime support out-of-the-box. This is done using our generic service providers. If you don’t have special needs, no custom coding is necessary.
Let’s see it in action.
Assume that you want to enable customers to buy books from your bookshop. For this add a new entity
Ordersand a new serviceBuyServiceto your project.Open the
db/data-model.cdsfile and add the following definitions of yourOrdersandOrderItemsentity.CDSCopyentity Orders : cuid, managed { OrderNo : String @title:'Order Number'; //> readable key Items : Composition of many OrderItems on Items.parent=$self; } entity OrderItems { key parent : Association to Orders; key book : Association to Books; amount : Integer; }Previously aspects were introduced. Here the aspects
cuidandmanagedare used.An order consists of many order items. The order items on the other hand, are fully dependent on the order, they can’t exist without an order.
Create the file
srv/buy-service.cdsfile and add theBuyServiceas follows:CDSCopyusing my.bookshop as my from '../db/data-model'; service BuyService { entity Orders as projection on my.Orders; }This service exposes your
Ordersentity and you can place orders using this service.Using a new file for that service follows the recommendation to have services built per use case.
To test this, restart your application from the debug panel and add a new request to your
tests.httpfile.HTTPCopy### # Submit Order # POST http://localhost:4004/odata/v4/buy/Orders Content-Type: application/json;IEEE754Compatible=true { "Items":[{"book_ID":201, "amount":5}] }To keep it simple in this tutorial, we kept the payload of the request to a minimum.
Execute the request and you see a success message.

With the
POSTrequest, you sent an order that contained the items. Those can bemanyorder items, and each order item consists ofbook_IDandamount.book_IDis the foreign key, as we use an association to theBooksentity in theOrderItemsentity’s keybookand theBookskey isID.If you wonder where
book_IDoriginates: It’s created on the persistence layer, implicitly defined by the managed association used in theOrderItemsentity in the key elementsbooks.CDSCopyentity Books : managed { key ID : Integer; ... } [...] entity OrderItems { ... key book : Association to Books; ... } - Step 6
For a use case like authentication and authorization, you just need to enrich models with additional metadata. Use Annotations, it’s as simple as that. In CAP annotations can serve several purposes. Those can be general purposes like defining the title or description, or more specific purposes like input validation, persistence, UIs, or authentication and authorization.
For the
AdminServiceyou need to be a user with the admin role. That restriction is introduced by the annotation@(requires:'admin'). This requires you to authenticate and have the proper authorization (admin). In the following request, you add the authentication to the request header.aliceis an admin user delivered with our default configuration for authentication, so you can just use it here.Create an entry for a new book, using the
AdminService. Copy the request into yourtests.httpfile and send the request.HTTPCopy### ------------------------------------------------------------------------ # Create book POST http://localhost:4004/odata/v4/admin/Books Content-Type: application/json;IEEE754Compatible=true Authorization: Basic alice: { "ID": 2, "title": "Poems : Pocket Poets", "descr": "The Everyman's Library Pocket Poets hardcover series is popular for its compact size and reasonable price which does not compromise content. Poems: Bronte contains poems that demonstrate a sensibility elemental in its force with an imaginative discipline and flexibility of the highest order. Also included are an Editor's Note and an index of first lines.", "author": { "ID": 101 }, "stock": 5, "price": "12.05", "currency_code": "USD" }You get a success message. You’ve successfully used
aliceas an admin persona to create a book.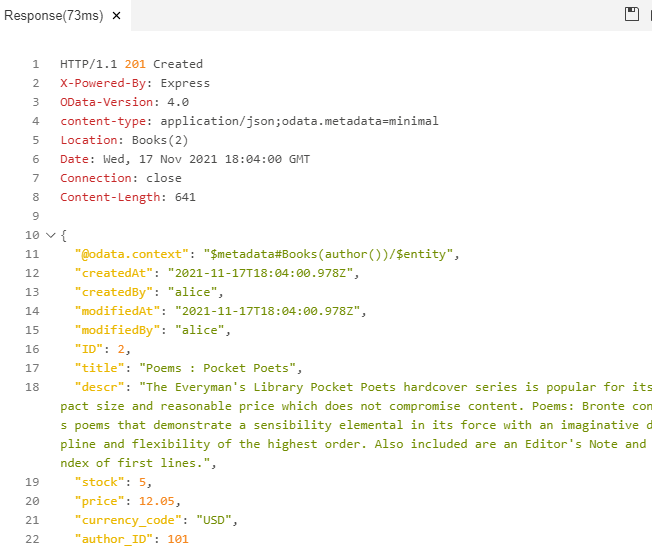
Now try to get exactly the book you’ve just created.
HTTPCopy### ------------------------------------------------------------------------- # Browse Books as any user GET http://localhost:4004/odata/v4/catalog/Books? &$filter=ID eq 2
For diving deeper into security topics, read our Cookbook Authorization
Now you have access to a service exposing all books that are available and for everyone open to read (
CatalogService). And you have a service for administrators, who can do all the basic Create Read Update Delete (CRUD) operations on theAuthorsas well as theBooksentity (AdminService). - Step 7
CAP offers convenient workflows for localized texts (i18n) and localized data.
i18n
When you plan to internationalize your application and provide translation for your target markets, you can either externalize your texts into
.propertiesfiles or into CSV-based text bundles. There are default locations for your text bundles. If you stick to these defaults, CAP saves you some efforts and does the routing for you.Text bundles can be placed in and are fetched from folders named
_i18n,i18n, orassets/i18n. These folders are placed next to the model files or in a parent folder.How different layers of texts in your application or coming from reuse bundles are merged, is described in the CAP documentation. This deep dive into this topic is not covered here.
Localized data
To offer localized data you have prepared the localized data as described in the “i18n” chapter.
To model entities and define what is localized, you use the
localizedmodifier.CDSCopy... entity Books : managed { key ID : Integer; title : localized String(111); descr : localized String(1111); ... } ...During the build process the corresponding files are generated for you. Generic handlers make sure your users see the data in their preferred language.
Let’s see it in action.
Create the file
db/data/my.bookshop-Books_texts.csvand add the following content:CSVCopyID;locale;title;descr 201;de;Sturmhöhe;Sturmhöhe (Originaltitel: Wuthering Heights) ist der einzige Roman der englischen Schriftstellerin Emily Brontë (1818–1848). Der 1847 unter dem Pseudonym Ellis Bell veröffentlichte Roman wurde vom viktorianischen Publikum weitgehend abgelehnt, heute gilt er als ein Klassiker der britischen Romanliteratur des 19. Jahrhunderts. 201;fr;Les Hauts de Hurlevent;Les Hauts de Hurlevent (titre original : Wuthering Heights), parfois orthographié Les Hauts de Hurle-Vent, est l'unique roman d'Emily Brontë, publié pour la première fois en 1847 sous le pseudonyme d'Ellis Bell. Loin d'être un récit moralisateur, Emily Brontë achève néanmoins le roman dans une atmosphère sereine, suggérant le triomphe de la paix et du Bien sur la vengeance et le Mal. 207;de;Jane Eyre;Jane Eyre. Eine Autobiographie (Originaltitel: Jane Eyre. An Autobiography), erstmals erschienen im Jahr 1847 unter dem Pseudonym Currer Bell, ist der erste veröffentlichte Roman der britischen Autorin Charlotte Brontë und ein Klassiker der viktorianischen Romanliteratur des 19. Jahrhunderts. Der Roman erzählt in Form einer Ich-Erzählung die Lebensgeschichte von Jane Eyre (ausgesprochen /ˌdʒeɪn ˈɛə/), die nach einer schweren Kindheit eine Stelle als Gouvernante annimmt und sich in ihren Arbeitgeber verliebt, jedoch immer wieder um ihre Freiheit und Selbstbestimmung kämpfen muss. Als klein, dünn, blass, stets schlicht dunkel gekleidet und mit strengem Mittelscheitel beschrieben, gilt die Heldin des Romans Jane Eyre nicht zuletzt aufgrund der Kino- und Fernsehversionen der melodramatischen Romanvorlage als die bekannteste englische Gouvernante der Literaturgeschichte 252;de;Eleonora;Eleonora ist eine Erzählung von Edgar Allan Poe. Sie wurde 1841 erstveröffentlicht. In ihr geht es um das Paradox der Treue in der Treulosigkeit.Deploy the localized data from the terminal:
cds deploy --to sqliteRestart your application from the debug panel.
Open the
tests.httpfile and uncomment thesap-localepart of the GET request on thecatalogservice:HTTPCopy# Browse Books as any user GET http://localhost:4004/odata/v4/catalog/Books? # &$select=title,stock # &$expand=currency &sap-locale=deExecute the request and see the localized data for title and description:

If you’d like to learn more about serving localized data, have a look at our Cookbook | Localized Data
What are associations made for?
- Step 8
When deploying to databases, be it SQLite or SAP HANA, there are some defaults that you can stick to.
Use the
dbfolderIf you keep all your database related artifacts in the
dbfolder, the build process, that generates the database-specific artifacts out of your data model, doesn’t need additional configuration.Initial or sample data is picked up automatically if you comply with the following convention. The folder is one of
db/data,db/csv, ordb/src/csvand the filename follows the pattern<namespace>-<entity>.csv.Use configuration profiles
There are two profiles available out of the box: development and production. By default all tasks are performed for the development profile. This means with regard to our database, that we are targeting SQLite, to have results quickly. The production profile in the default case targets SAP HANA. You can also create your custom profiles and configure them according to your needs.
Let’s switch from our SQLite to the SAP HANA Cloud database.
-
Add SAP HANA configuration to your project from the terminal:
cds add hana --for productionWhat’s going on?
In the project template, you had the option to add SAP HANA configuration. We skipped that, as CAP promotes a grow as you go paradigm, allowing you to add facets when you need them. This reduces complexity right from the start and just gets you going.
This creates everything you need to connect to your SAP HANA Cloud instance from the studio. It also adapts your project, so you can use the profiles that we will introduce in the next step. When you started to deploy to SQLite, the
cds.requiressection in yourpackage.jsonwas modified accordingly. See what’s been added/changed now:
What’s going on?
You’ve added the configuration to use SAP HANA Cloud under the
[production]profile. Using the development profile,db.kind=sqlevaluates tosqlite. This is a default when using configuration profiles, so the development profile is not mentioned here explicitly. You can also set both configurations explicitly, if you wish to deviate from or enhance the defaults. -
From the terminal execute
npm install.This installs all dependencies from your
package.json. -
Press F1 and type
loginto login to your Cloud Foundry space.
-
Deploy to SAP HANA Cloud:
cds deploy --to hana --productionBesides all necessary steps around the deployment, this also creates a service key and saves it into the
.cdsrc-private.jsonfile for hybrid testing. -
Create a run configuration for the production profile and name it
bookshop-hybrid.
The name hybrid describes that you are using SAP HANA Cloud on SAP BTP and at the same time have your services running in the application studio without deployment to SAP BTP.
-
Open the context menu on
Run bookshop-hybridand select Show in File. -
In the
argssection of theRun bookshop-hybridconfiguration add"--port"and"4005".What’s going on?
This is to avoid clashes with other running applications. Your other run configuration (
Run bookshop-local) uses port4004.
Now you have a run configuration for the development profile, using the SQLite file-based database and one for the production profile connecting to SAP HANA Cloud. At the same , with both run configurations, your services run in the application studio.
-
Again, open the context menu on
Run bookshop-hybridand select Configure Environment. -
Add the following line to the
.envfile and save the file:INICopycds_requires_auth_kind=mocked-authWhat’s going on?
As you’re using the production profile in your run configuration, this automatically requests the JWT authentication strategy. To become not too complex at this point, this environment configuration here, overrides the default (JWT) strategy and uses again mocked authentication strategy.
-
Enable the binding to your SAP HANA service instance from the run configurations panel.

-
Run your project with the
Run bookshop-hybridconfiguration.You see in the console log, that your SAP HANA Cloud instance is used.
Shell/BashCopy... [cds] - model loaded from 4 file(s): db/data-model.cds srv/admin-service.cds srv/cat-service.cds node_modules/@sap/cds/common.cds : [cds] - connect to db > hana {certificate: '...', driver: 'com.sap.db.jdbc.Driver', hdi_password: '...', hdi_user: '...', host: '...', …} [cds] - launched in: 1208.56298828125ms [cds] - launched in: 1.209s : [cds] - serving AdminService {at: '/admin'} ...
What you achieved
Congratulations! You’ve finished an introduction to CAP and some important defaults. You also broadened your knowledge of the SAP Business Application Studio with it’s run configuration which you configured for the development profile and the production profile.
Enjoy your next steps with CAP and leave us your feedback.
What annotation is used to enforce authentication and an admin user?
-