Create a UI Using Freestyle SAPUI5
- How to create a Freestyle SAPUI5 app on top of your CAP application
- How to start the application


Prerequisites
- Before you start with this tutorial, you have two options:
- Follow the instructions in Step 16: Start from an example branch of Prepare Your Development Environment for CAP to checkout the
cap-business-logicbranch. - Complete the previous tutorial Add Business Logic to Your Application with all its prerequisites.
- Follow the instructions in Step 16: Start from an example branch of Prepare Your Development Environment for CAP to checkout the
This tutorial will soon be phased out.
For more tutorials about how to develop and deploy a full stack CAP application on SAP BTP, see:
- Develop a Full-Stack CAP Application Following SAP BTP Developer’s Guide
- Deploy a Full-Stack CAP Application in SAP BTP, Cloud Foundry Runtime Following SAP BTP Developer’s Guide
- Deploy a Full-Stack CAP Application in SAP BTP, Kyma Runtime Following SAP BTP Developer’s Guide
To continue learning how to implement business applications on SAP BTP, see:
- Step 2
-
In VS Code, invoke the Command Palette ( View → Command Palette or ⇧⌘P for macOS / Ctrl + Shift + P for Windows) and choose Fiori: Open Application Generator.
In case you get an error launching the SAP Fiori application generator, refer to the FAQ to find a solution.
-
Choose template type Deprecated Templates and template SAP Fiori Worklist Application.

-
Choose Next.
-
In the next dialog, choose Use a Local CAP Project and choose your current
cpappproject.In case you get the error:
Node module @sap/cds isn't found. Please install it and try again.This is an issue with the SAP Fiori application generator not finding the corresponding CAP modules, due to different repositories. This should be a temporary issue. For the meantime you can work around it by opening a command line and running the following command:
bashCopynpm install --global @sap/cds-dk --@sap:registry=https://npmjs.org/See the CAP Troubleshooting guide for more details.
-
Select the
RiskService (Node.js)as the OData service and choose Next.
-
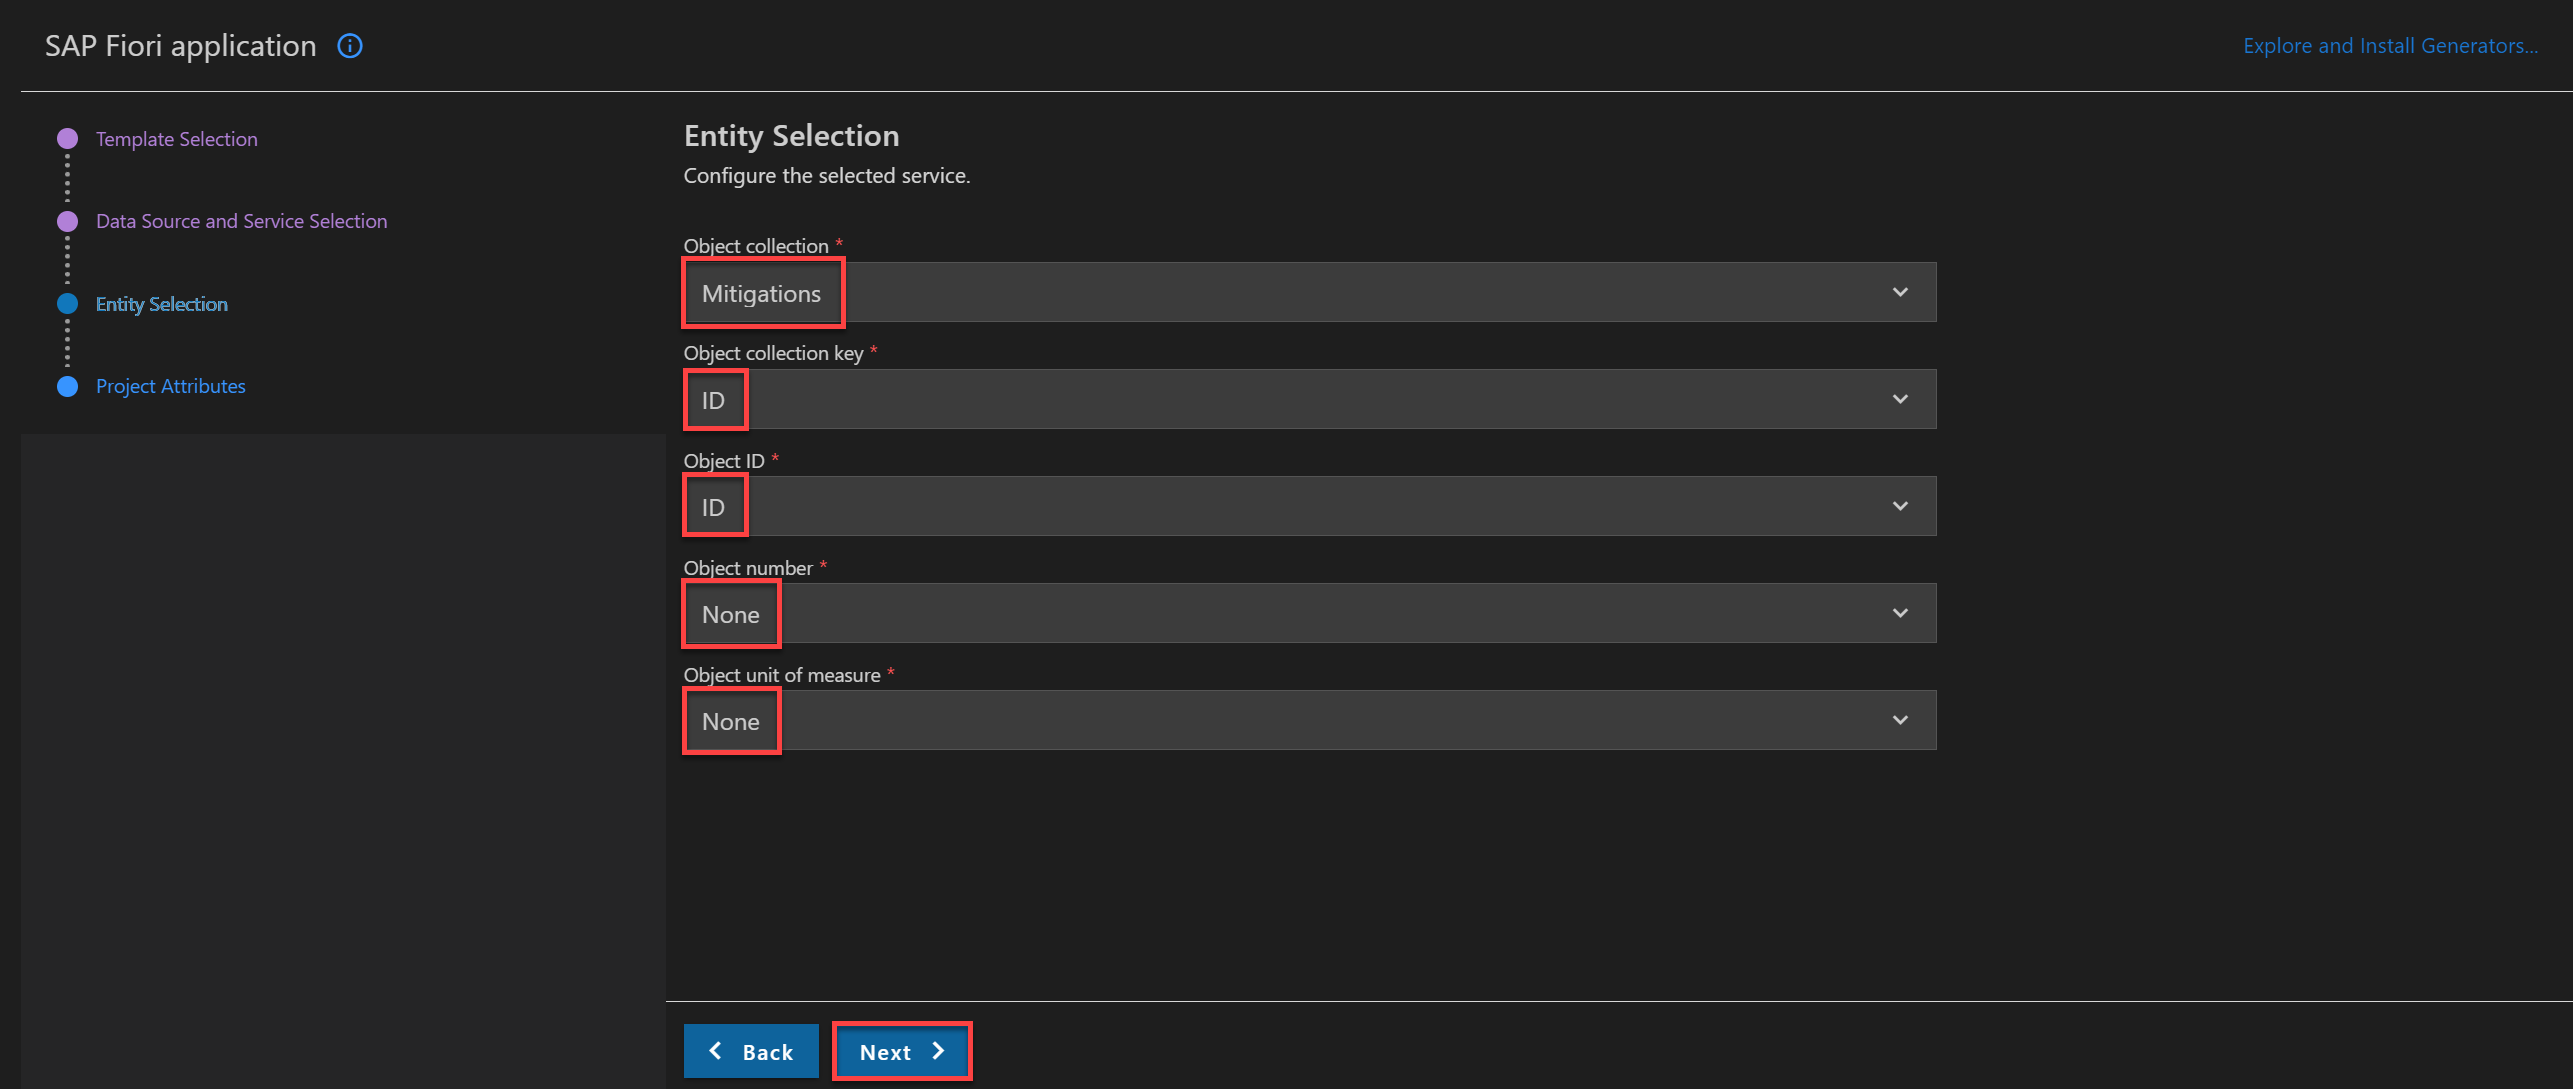
On the Entity Selection screen, select the following values and choose Next.
-
Enter
mitigationsas the module name andMitigationsas the application title. -
Enter
nsas the namespace andMitigationsas the description for the application. -
Leave the default values for all other settings.
-
Choose Finish to generate the application.

-
- Step 3
-
Make sure
cds watchis still running in the project root folder:Shell/BashCopycds watch -
Open the URL http://localhost:4004/.
You now see a new HTML page.

-
Choose the
/mitigations/webapp/index.htmlentry.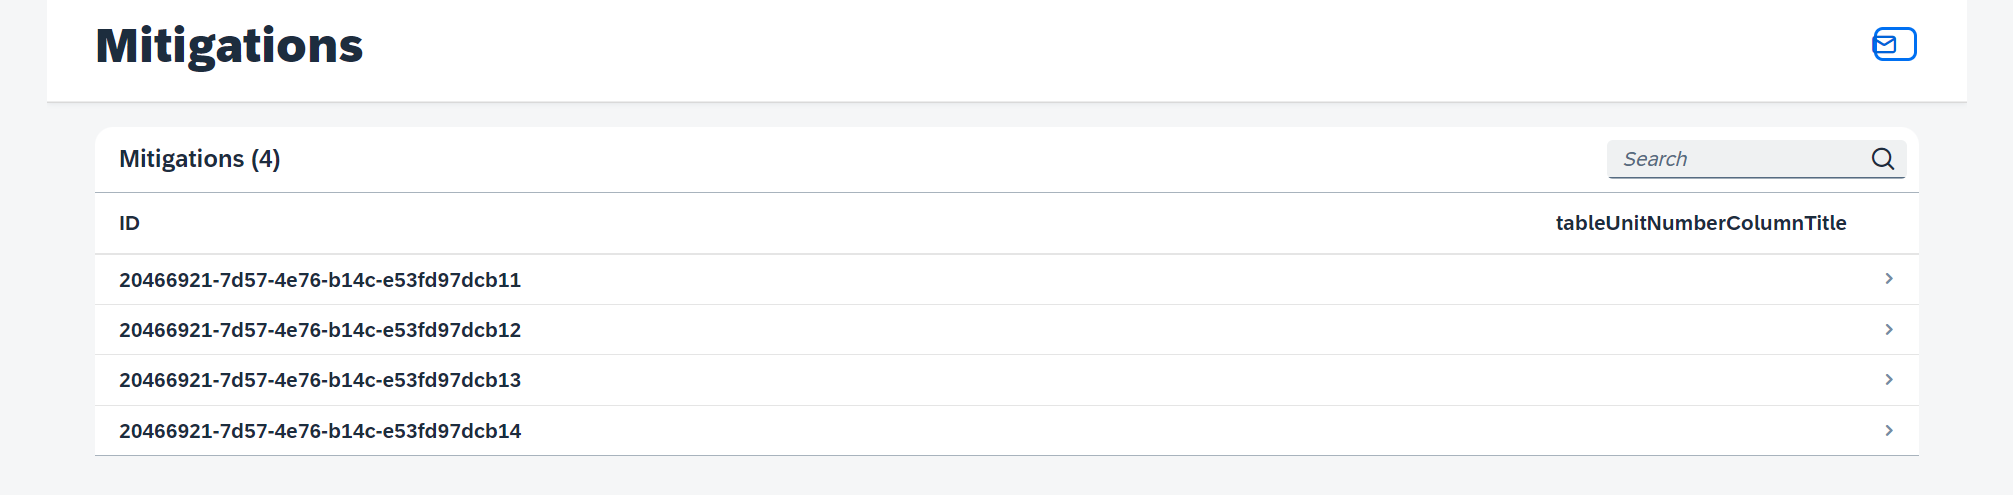
As a result, you can see a list but you can only see the IDs of the mitigations both in the list view and on the detail page. This is because the freestyle template only got the information from you that the
Object Collection IDis theIDproperty of themitigationsservice. You now need to add additional SAPUI5 controls that are bound to additional properties of themitigationsservice. -
Open the view of the work list
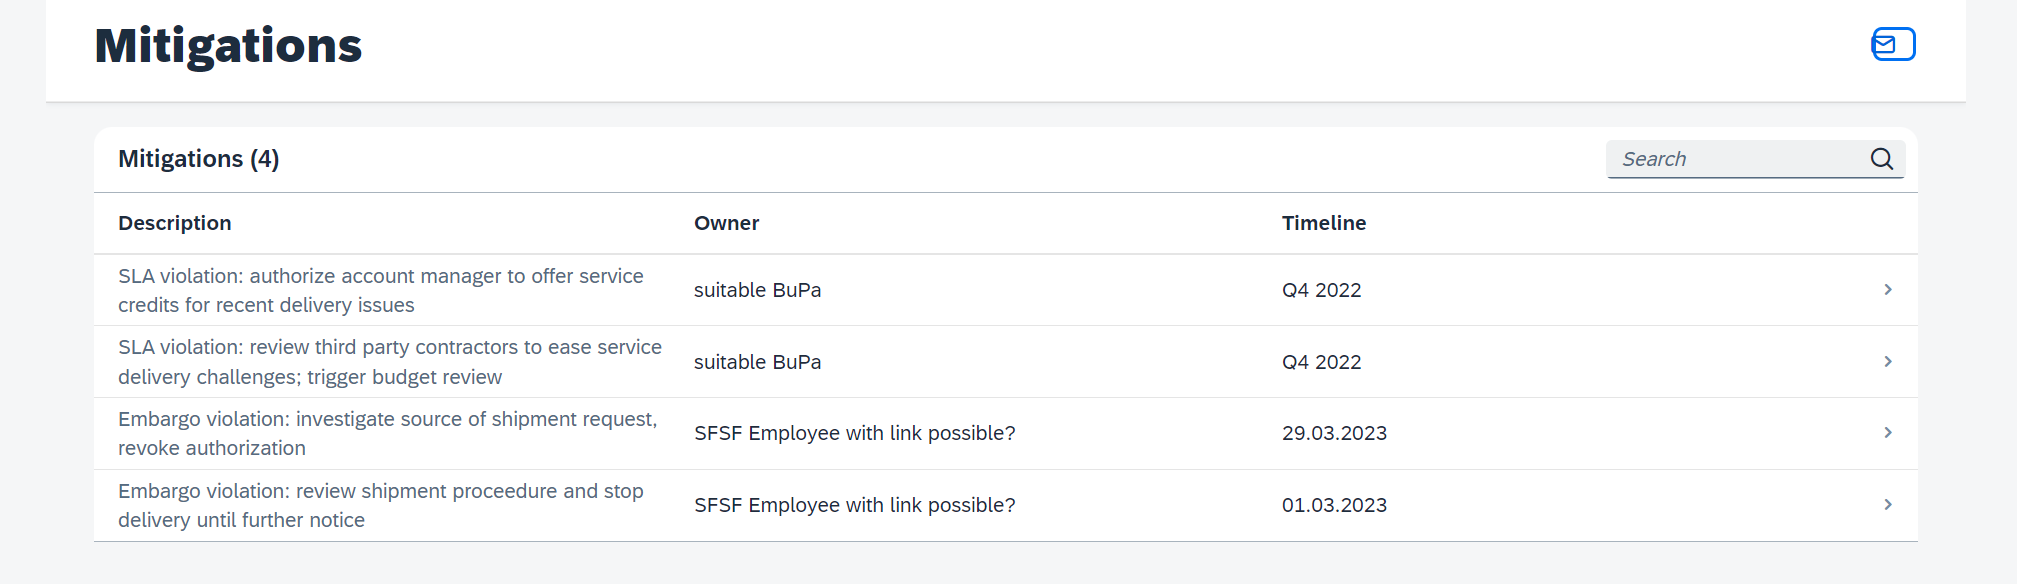
app/mitigations/webapp/view/Worklist.view.xmland add the following code, removing theIDandtableUnitNumberColumnTitlecolumns and instead addingDescription,OwnerandTimelinecolumns:XMLCopy<columns> <Column id="DescriptionColumn"> <Text text="Description" id="DescriptionColumnTitle"/> </Column> <Column id="OwnerColumn"> <Text text="Owner" id="OwnerColumnTitle"/> </Column> <Column id="TimelineColumn"> <Text text="Timeline" id="TimelineColumnTitle"/> </Column> </columns> <items> <ColumnListItem type="Navigation" press=".onPress"> <cells> <ObjectIdentifier text="{description}" /> <Text text="{owner}" /> <Text text="{timeline}" /> </cells> </ColumnListItem> </items> -
Open the view of the object
app/mitigations/webapp/view/Object.view.xmland also replaceIDand addDescription,Owner, andTimelineusing SAPUI5 controls likeObjectStatus(you can copy the whole code and replace the existing code in the file):XMLCopy<mvc:View controllerName="ns.mitigations.controller.Object" xmlns="sap.m" xmlns:l="sap.ui.layout" xmlns:mvc="sap.ui.core.mvc" xmlns:semantic="sap.f.semantic"> <semantic:SemanticPage id="page" headerPinnable="false" toggleHeaderOnTitleClick="false" busy="{objectView>/busy}" busyIndicatorDelay="{objectView>/delay}"> <semantic:titleHeading> <Title text="{description}" /> </semantic:titleHeading> <semantic:headerContent> <ObjectNumber /> </semantic:headerContent> <semantic:sendEmailAction> <semantic:SendEmailAction id="shareEmail" press=".onShareEmailPress"/> </semantic:sendEmailAction> <semantic:content> <l:VerticalLayout> <ObjectStatus title="Description" text="{description}"/> <ObjectStatus title="Owner" text="{owner}"/> <ObjectStatus title="Timeline" text="{timeline}"/> </l:VerticalLayout> </semantic:content> </semantic:SemanticPage> </mvc:View> -
Refresh the
mitigationsapplication in your browser.You can now see the new content in the work list …
… as well as in the detail object page.

The result of this tutorial can be found in the
create-ui-freestyle-sapui5branch. -