Create a Simple RFC Interface
- How to create a simple RFC interface
- How to set up monitoring of an RFC interface in SAP Application Interface Framework

Prerequisites
- You’ve set up SAP Application Interface Framework
- SAP S/4HANA 1909 or later
- You’ve set up background RFC (Background Remote Function Call) and created an RFC-enabled function module (see bgRFC Configuration on SAP Help Portal)
In this tutorial, you’ll learn how to create a simple RFC interface that enables you to monitor messages that you exchange via Remote Function Call (RFC).
- Step 1
If you’ve completed other tutorials for SAP Application Interface Framework, you might already have created a package and a function group. In this case, you can skip this step.
Create a package that serves as the destination for your newly created objects.
- Open your system and navigate to the Object Navigator (transaction code
SE80). - From the drop-down menu, choose Package and enter the name
ZDEMO. Press Enter or choose Display or Create Object. - Confirm the dialogue window, enter a meaningful short description for your new package, and select Confirm. If prompted, enter a workbench request and confirm again.
- Repeating the same directions, also create a new function group by selecting Function Group from the drop-down menu and entering the name
ZDEMO.

You have successfully created a new package named
ZDEMOand a new function group namedZDEMO. - Open your system and navigate to the Object Navigator (transaction code
- Step 2
In preparation for the next step, in which you create a function module and a message in case of an application error, you need to create a new message class and a message.
-
Go to the Message Maintenance (transaction code
SE91), enter message classZDEMO_MSG_CLASS, and choose Create. -
Enter the previously created package
ZDEMOand a workbench request. -
Add a new message with number
000and message short textError in creating a flight booking.
-
Save your changes.
-
- Step 3
Run the Function Builder (transaction code
SE37) and create a new remote-enabled function moduleZBAPI_FLBOOKING_CREATEFROMDATAas a wrapper of the standard demo function moduleBAPI_FLBOOKING_CREATEFROMDATA.- Enter the name
ZBAPI_FLBOOKING_CREATEFROMDATAand choose Create. - On the upcoming dialog, enter the previously created function group
ZDEMOand maintain a short text. Click Save. - In the Attributes tab, select the
Remote-Enabled Moduleflag.
-
Switch to tab Import, and enter the following import parameters:
Parameter Name Typing Associated Type RESERVE_ONLYTYPE BAPISBODAT-RESERVEDBOOKING_DATATYPE BAPISBONEWTEST_RUNTYPE BAPISFLAUX-TESTRUNSwitch to tab Export, and enter the following export parameters:
Parameter Name Typing Associated Type AIRLINEIDTYPE BAPISBOKEY-AIRLINEIDBOOKINGNUMBERTYPE BAPISBOKEY-BOOKINGIDTICKET_PRICETYPE BAPISBOPRISwitch to tab Tables, and enter the following table parameters:
Parameter Name Typing Associated Type EXTENSION_INTYPE BAPIPAREXRETURNTYPE BAPIRET2Switch to tab Source code, and maintain the source code by copying and pasting the following:
ABAPCopyFUNCTION zbapi_flbooking_createfromdata. CALL FUNCTION 'BAPI_FLBOOKING_CREATEFROMDATA' EXPORTING reserve_only = reserve_only booking_data = booking_data test_run = test_run IMPORTING airlineid = airlineid bookingnumber = bookingnumber ticket_price = ticket_price TABLES extension_in = extension_in return = return. /aif/cl_xrfc_temp_storage=>store_bapiret_tab( it_bapiret = return[] ). IF line_exists( return[ type = 'A' ] ) OR line_exists( return[ type = 'E' ] ). MESSAGE e000(zdemo_msg_class). ENDIF. ENDFUNCTION.By default, successful messages are not displayed in the message monitor. To add additional log messages to the log, the method
/aif/cl_xrfc_temp_storage=>store_bapiret_tabneeds to be called. Also, the flagUse temp. msg. storeneeds to be selected in step Define RFC Settings.Save and activate your changes.
- Enter the name
- Step 4
Run the ABAP Dictionary (transaction code
SE11), and create a new structureZDEMO_RFC_FLBOOKING_CREATEcorresponding to the signature of your function module. The DDIC structure needs to contain one component for each parameter of your function module.-
Enter the Data type name
ZDEMO_RFC_FLBOOKING_CREATEand choose Create. -
In the upcoming dialog, select the
Structureradio button. Choose Continue. -
Enter a short description.
-
Switch to the Components tab and maintain the following structure:
Component Typing Method Component Type RESERVE_ONLYTypes S_RESERVBOOKING_DATATypes BAPISBONEWTEST_RUNTypes TESTRUNAIRLINEIDTypes S_CARR_IDBOOKINGNUMBERTypes S_BOOK_IDTICKET_PRICETypes BAPISBOPRIEXTENSION_INTypes BAPIPAREXTABRETURNTypes BAPIRET2_T
-
Save and activate your changes.
-
- Step 5
As interfaces in SAP Application Interface Framework are grouped using namespaces, you must create a namespace.
Go to Customizing for SAP Application Interface Framework (transaction code
/n/AIF/CUST) and navigate to Interface Development > Define Namespace.Select New Entries and enter the following name and description for your new namespace:
Namespace Namespace Description DEMO_3Namespace for AIF RFC tutorials
- Step 8
Next, you need to assign the RFC function module to the interface.
-
While still in Customizing (transaction code
/n/AIF/CUST), navigate to Interface Development > Additional Interface Properties > Define RFC Settings. -
Select New Entries and enter the following parameters:
Parameter Value Function Module ZBAPI_FLBOOKING_CREATEFROMDATANamespace DEMO_3Interface Name FLBOOKInterface Version 1Deactivated Deselected Use temporary message store Selected 
-
Save your changes.
-
- Step 9
It’s recommended to implement an interface-specific single index table to ensure full flexibility, especially if you expect a high load of messages or if you plan to define key fields for your interface (now or later).
You can also switch the single index table later, but when you do, all processed messages stored in the old single index table will no longer be visible in the Interface Monitor. The information for the newly incoming messages is stored in the new single index table of the interface.
-
Create a table via transaction
SE11. You can use table/AIF/XRFC_S_IDXas a template by entering/AIF/XRFC_S_IDXin the field Database table, right-clicking it and selecting Copy…. Enter the nameZFLBOOK_RFC_IDXfor the new table and select Continue. When prompted, enter packageZDEMO, which you created earlier. -
After creating the single index table, activate it by selecting Display and then Activate.
-
Go to Customizing (transaction code
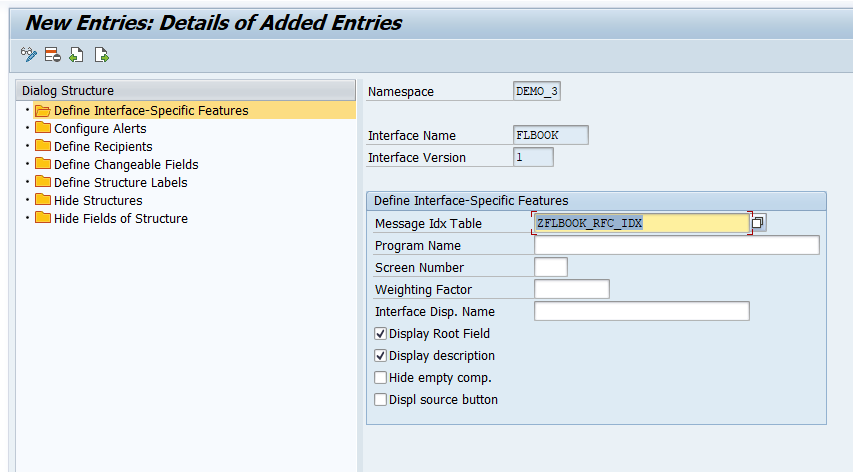
/n/AIF/CUST) and navigate to SAP Application Interface Framework > Error Handling > Define Namespace-Specific Features. Enter your namespaceDEMO_3and select Continue. -
Select New Entries to create a new entry in Define Interface-Specific Features. Enter your interface name
FLBOOKand version1and enter the name of the newly created single index tableZFLBOOK_RFC_IDXin the field Message Index Table. -
Select both flags Display Root Field and Display description.
-
Save your changes.
-
- Step 10
If you want to monitor the newly created interface in the Interface Monitor of the Message Dashboard app, you require a recipient for the interface.
-
While still in Customizing (transaction code
/n/AIF/CUST), navigate to SAP Application Interface Framework > Error Handling > Define Namespace-Specific Features. Enter or select your namespaceDEMO_3and choose Continue. -
In the menu on the left, navigate to Define Recipients by double-clicking it. Choose New Entries, enter the name
ZRFC_TEST_RECIPIENTfor your new recipient, and add a meaningful description.
-
Save your changes.
-
- Step 11
To be able to see any data in the Interface Monitor or the Message Dashboard, a recipient must be assigned to the interface they want to monitor.
-
While still in Customizing (transaction code
/n/AIF/CUST), navigate to SAP Application Interface Framework > Error Handling > Define Interface-Specific Features. Enter or select your namespaceDEMO_3, as well as your interface nameFLBOOKand interface version1. Select Continue. -
In the menu on the left, double-click Assign Recipients Without Key Fields and create a new entry. Enter or select the namespace and the recipient you created before.

-
Save your changes.
-
- Step 12
Now the users in charge of monitoring the RFC must be assigned to the recipient.
Run transaction
/AIF/MYRECIPIENTSand create a new entry. Select the namespaceDEMO_3and recipientZRFC_TEST_RECIPIENTyou created in the steps before. Check the boxes for Overview and Technical User.
Save the new entry.
- Step 13
Before you can create flight bookings, you need to generate test data.
Run transaction
BC_DATA_GEN, select the standard data record, and execute the report.
Open the Data Browser (transaction code
SE16), select the table SFLIGHTS, and choose Execute. The generated flight data entries are displayed.If you run the requests in step 16 Send sample request, select existing flights from this table. Ensure that the flight date is in the future, or your requests will fail.

- Step 14
Create a new inbound destination for your bgRFC configuration.
- Run the bgRFC Configuration (transaction code
SBGRFCCONF) and switch to tab Define Inbound Destination. - Choose Create.
- In the upcoming dialog, maintain the Inbound Destination Name
AIF_INBOUND. - Enter a new Queue Prefix
AIF_and click Add. - Save your changes.

- Run the bgRFC Configuration (transaction code
- Step 16
To send in a sample request, you have to run the previously created program and call the RFC interface via bgRFC.
Run program
ZDEMO_FLBOOK_VIA_BGRFC. In the selection screen, enter existing flight data from tableSFLIGHTSin the input parameters of your program, and select Execute.
You have successfully sent in a sample request via bgRFC that you can monitor in the next step.
- Step 17
Finally, you should test your settings and verify that the RFC monitoring is working as planned.
If you’re using SAP GUI, check the results of your test in the Interface Monitor (transaction code
/n/AIF/IFMON).If you don’t see the new interface, check that your user is correctly assigned to the recipient as described in step Assign users to recipient.

Select the summary line for your interface. You’re forwarded to Monitoring and Error Handling, which shows your selected test message(s).

Alternatively, if you’ve set up Message Monitoring in the SAP Fiori launchpad, you can check the test results there. See How to configure the SAP Fiori Apps for SAP Application Interface Framework.

Congratulations! You’ve created a simple RFC interface and set up monitoring for it in SAP Application Interface Framework.