Customize a Proxy Interface with Runtime and Monitoring
- How to create a proxy interface
- How to implement a value mapping in SAP Application Interface Framework
- How to create an action to call the actual application

Prerequisites
- You have set up SAP Application Interface Framework
- SAP S/4HANA 1709 or later, AIF 4.0
- Optional: You have completed Create a Simple Proxy Interface
- Optional: You’re familiar with a test client of your choice, like SoapUI or Postman
In this tutorial, you’ll learn how to create and customize a proxy interface in SAP Application Interface Framework.
As a prerequisite, you first need to create a proxy service interface. Like in Create a Simple Proxy Interface, you create a proxy in the Backend Metadata Repository by leveraging the same structures as the standard demo flight booking scenario. However, we choose a different name as not to collide with the previous tutorial. After these preparatory steps, you will get started with the SAP Application Interface Framework-specific settings at step six.
If you’ve already completed Create a Simple Proxy Interface, you can skip some of the steps.
- Step 1
If you’ve completed Create a Simple Proxy Interface, you can skip this step.
Create a package that serves as the destination for your newly created objects.
Open your system. Go to the Object Navigator (transaction code
SE80). From the drop-down menu, select Package, enter the nameZDEMO, and select Display or Create Object. If the package exists, it will be displayed. Otherwise, create it.Additionally, create a new function group by selecting Function Group from the drop-down menu and enter the name
ZDEMO.
You have successfully created a new package named
ZDEMOand a new function group namedZDEMO. - Step 3
To create a new service interface, run the proxy editor (transaction code
SPROXY_START).In Enterprise Services: Initial Screen, select Create with Wizard and carry out the following configuration steps:
- As Object Type, select Service Provider. Click Continue.
- As Kind of Service Provider, select Backend. Click Continue.
- As Name, enter
FlightBooking_02_Inand namespacehttp://tutorial.com/aif. Click Continue. - For the transport options, enter your package
ZDEMO, select a workbench request, and enter the prefixZAIF_. Click Continue. - Select Complete to finish the wizard.
You can now see an overview of your service provider.

- Step 4
Next, add an operation and a fault message type in the proxy editor. As mentioned before, you will be using objects from a standard demo flight booking scenario.
-
Switch to the Internal View tab. Right-click your service provider and select Add Operation. Enter the operation name
PostBookings_02. With the new operation selected, switch the Pattern of the operation to Not Reliable to simplify testing.
-
Next, right-click the operation and select Set Request > Select Existing Message Type from the context menu. In the upcoming Restrict Value Range dialog, remove all filters. Enter the message type
SXIDAL_FBO_REQUEST_MTin the ABAP Name search filter, and the namespacehttp://sap.com/xi/XI/Demo/Airlinein the Namespace search filter, then press Enter. In the search result, select the found entry, and select Copy. -
Right-click the operation and select Add Fault > Select Existing Fault Message Type. Similar to the message type search, remove all filters. Then search for the fault message type
CX_SXIDAL_TECHNICAL_PROBLEMS. -
Save and activate the proxy.

-
- Step 6
If you’ve completed Create a Simple Proxy Interface, you can skip this step.
As interfaces in SAP Application Interface Framework are grouped using namespaces, you must create a namespace.
Go to Customizing for SAP Application Interface Framework (transaction code
/n/AIF/CUST) and navigate to Interface Development > Define Namespace.Select New Entries and enter the following name and description for your new namespace:
Namespace Namespace Description DEMO_2NS for AIF Proxy tutorials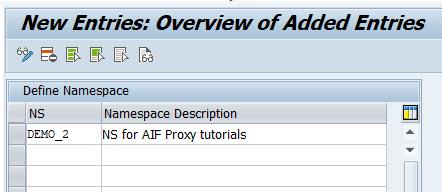
- Step 9
-
Go to Customizing for SAP Application Interface Framework (transaction code
/n/AIF/CUST) and navigate to Interface Development > Define Structure Mappings. -
In the upcoming dialog, enter your previously created namespace
DEMO_2, interface nameFLBOOK2, and interface version1. Select Continue. -
Select New Entries, and enter the root node of your interface structure, here
SXIDAL_FBO_REQUEST.
-
Select the new entry and double-click Assign Destination Structure in the menu on the left.
-
Select New Entries, and enter the Number of Structure Mapping
10. As Destination Structure, enter the structureBAPISBONEWof the BAPI you will call to post the booking. -
Double-click the node Define Field Mappings. Create a new entry and define the field mapping for each line of the following table:
Field in Destination Structure Field Name 1 AIRLINEIDFLIGHT_ID-AIRLINE_IDAGENCYNUMAGENCY_DATA-AGENCY_IDCONNECTIDFLIGHT_ID-CONNECTION_IDFLIGHTDATEFLIGHT_ID-FLIGHT_DATEPASSBIRTHPASSENGER_BIRTHDATEPASSNAMEPASSENGER_NAME -
Select Next Entry. For the Field in Destination Structure
CLASS, enter the following information:Field Value Field Name 1 CLASS_CODENamespace DEMO_2Value Mapping VM_CLASSSince the value mapping doesn’t exist yet, you are asked to create it. Confirm the dialog.
-
Navigate to the reusable value mapping by double-clicking
VM_CLASSand define it with the following information:Field Value Value mapping description Map class IDData Element for EXT1 FLIGHT_BOOKING_CLASSData Element for INT S_CLASSSingle or Multiple Value Mapping SingleCustomizing or Master Data Master DataSave the value mapping and navigate back to Define Field Mappings.
Your field mappings should look like this:

Save your changes.
-
- Step 11
As the function module refers to a message with number 003 of message class
ZDEMO_MESSAGE, you now need to enhance message classZDEMO_MESSAGE. If you haven’t gone through Create a Simple Proxy Interface and created that message class, first create a new message classZDEMO_MESSAGE.In Message Maintenance (transaction code
SE91) for message classZDEMO_MESSAGE, add a new message with number003and message short textFlight booking &1 created (airline &2).
Save your changes.
- Step 12
In the mapping, you created a value mapping for the flight class. Before you run the scenario, maintain the value mapping table entries.
-
In Maintenance of value mappings (transaction code
/AIF/VMAP), enter namespaceDEMO_2and your value mapping nameVM_CLASS. Press Enter and select Execute.
-
Select Append and add the following two new entries:
Index Flight Booking Codes Class 11F22C -
Save your changes.
-
- Step 13
It’s recommended to implement an interface-specific single index table to ensure full flexibility, especially if you expect a high load of messages or if you plan to define key fields for your interface (now or later).
You can also switch the single index table later, but when you do, all processed messages stored in the old single index table will no longer be visible in the Interface Monitor. The information for the newly incoming messages is stored in the new single index table of the interface.
-
Create a table via transaction
SE11. You can use table/AIF/STD_IDX_TBLas a template by entering/AIF/STD_IDX_TBLin the field Database table, right-clicking it and selecting Copy…. Enter the nameZFLBOOK_RT_IDXfor the new table and select Continue. When prompted, enter the packageZDEMO, which you created earlier.
-
After creating the single index table, activate it by selecting Display and then Activate.

-
Go to Customizing (transaction
/n/AIF/CUST) and navigate to SAP Application Interface Framework > Error Handling > Define Namespace-Specific Features. Enter your namespaceDEMO_2and select Continue. -
Select New Entries to create a new entry in Define Interface-Specific Features. Enter your interface name
FLBOOK2and version1and enter the name of the newly created single index tableZFLBOOK_RT_IDXin the field Message Index Table.
-
Save your changes.
-
- Step 14
If you’ve completed Create a Simple Proxy Interface, you can skip this step.
Go to Customizing (transaction code
/n/AIF/CUST) and navigate to SAP Application Interface Framework > Error Handling > Define Namespace-Specific Features. Enter or select your namespaceDEMO_2and select Continue.In the menu on the left, navigate to Define Recipients by double-clicking it. Select New Entries, enter a meaningful name for your new recipient, here
ZPROXY_TEST_RECIPIENT, and add a description.
Save your changes.
- Step 15
To be able to see any data in the Interface Monitor or the Message Dashboard, a recipient must be assigned to the interface you want to monitor.
Go to Customizing (transaction code
/n/AIF/CUST) and navigate to SAP Application Interface Framework > Error Handling > Define Interface-Specific Features. Enter or select your namespaceDEMO_2, as well as your interface nameFLBOOK2and interface version1. Select Continue.In the menu on the left, double-click Assign Recipients Without Key Fields and create a new entry. Enter or select the namespace and the recipient you created before.

Save your changes.
- Step 16
If you’ve completed Create a Simple Proxy Interface, you can skip this step.
The users in charge of monitoring the proxy must be assigned to the recipient.
Go to transaction
/AIF/MYRECIPIENTSand create a new entry. Select the namespaceDEMO_2and recipientZPROXY_TEST_RECIPIENTyou created in the steps before. Check the boxes for Overview and Technical User.
Save the new entry.
- Step 17
If you’ve completed Create a Simple Proxy Interface, you can skip this step.
Before you can create flight bookings, you need to generate test data.
To do so, run transaction code
BC_DATA_GEN, select the standard data record, and execute the report.
Open the Data Browser (transaction code
SE16), select the table SFLIGHTS, and choose Execute. The generated flight data entries are displayed.If you run the requests in step 19, select existing flights from this table. Ensure that the flight date is in the future, otherwise your requests will fail.

- Step 18
In order to send booking requests to the proxy interface, you need to define a service and a service binding in the SOA Management.
Open the SOA Management in your browser by running transaction code
SOAMANAGER. In the tab Service Administration, select Web Service Configuration. Search for your service definitionFlightBooking_02_Inand click it to open its details.On the Configurations tab, create a new service as follows:
-
Maintain a Service Name and a New Binding Name, then click Next.
-
In step Provider Security, go to Authentication Settings > Authentication Method > Transport Channel Authentication and select the User ID/Password flag, then click Next.
-
On the next screen, click Finish. A new service and binding are displayed.
-
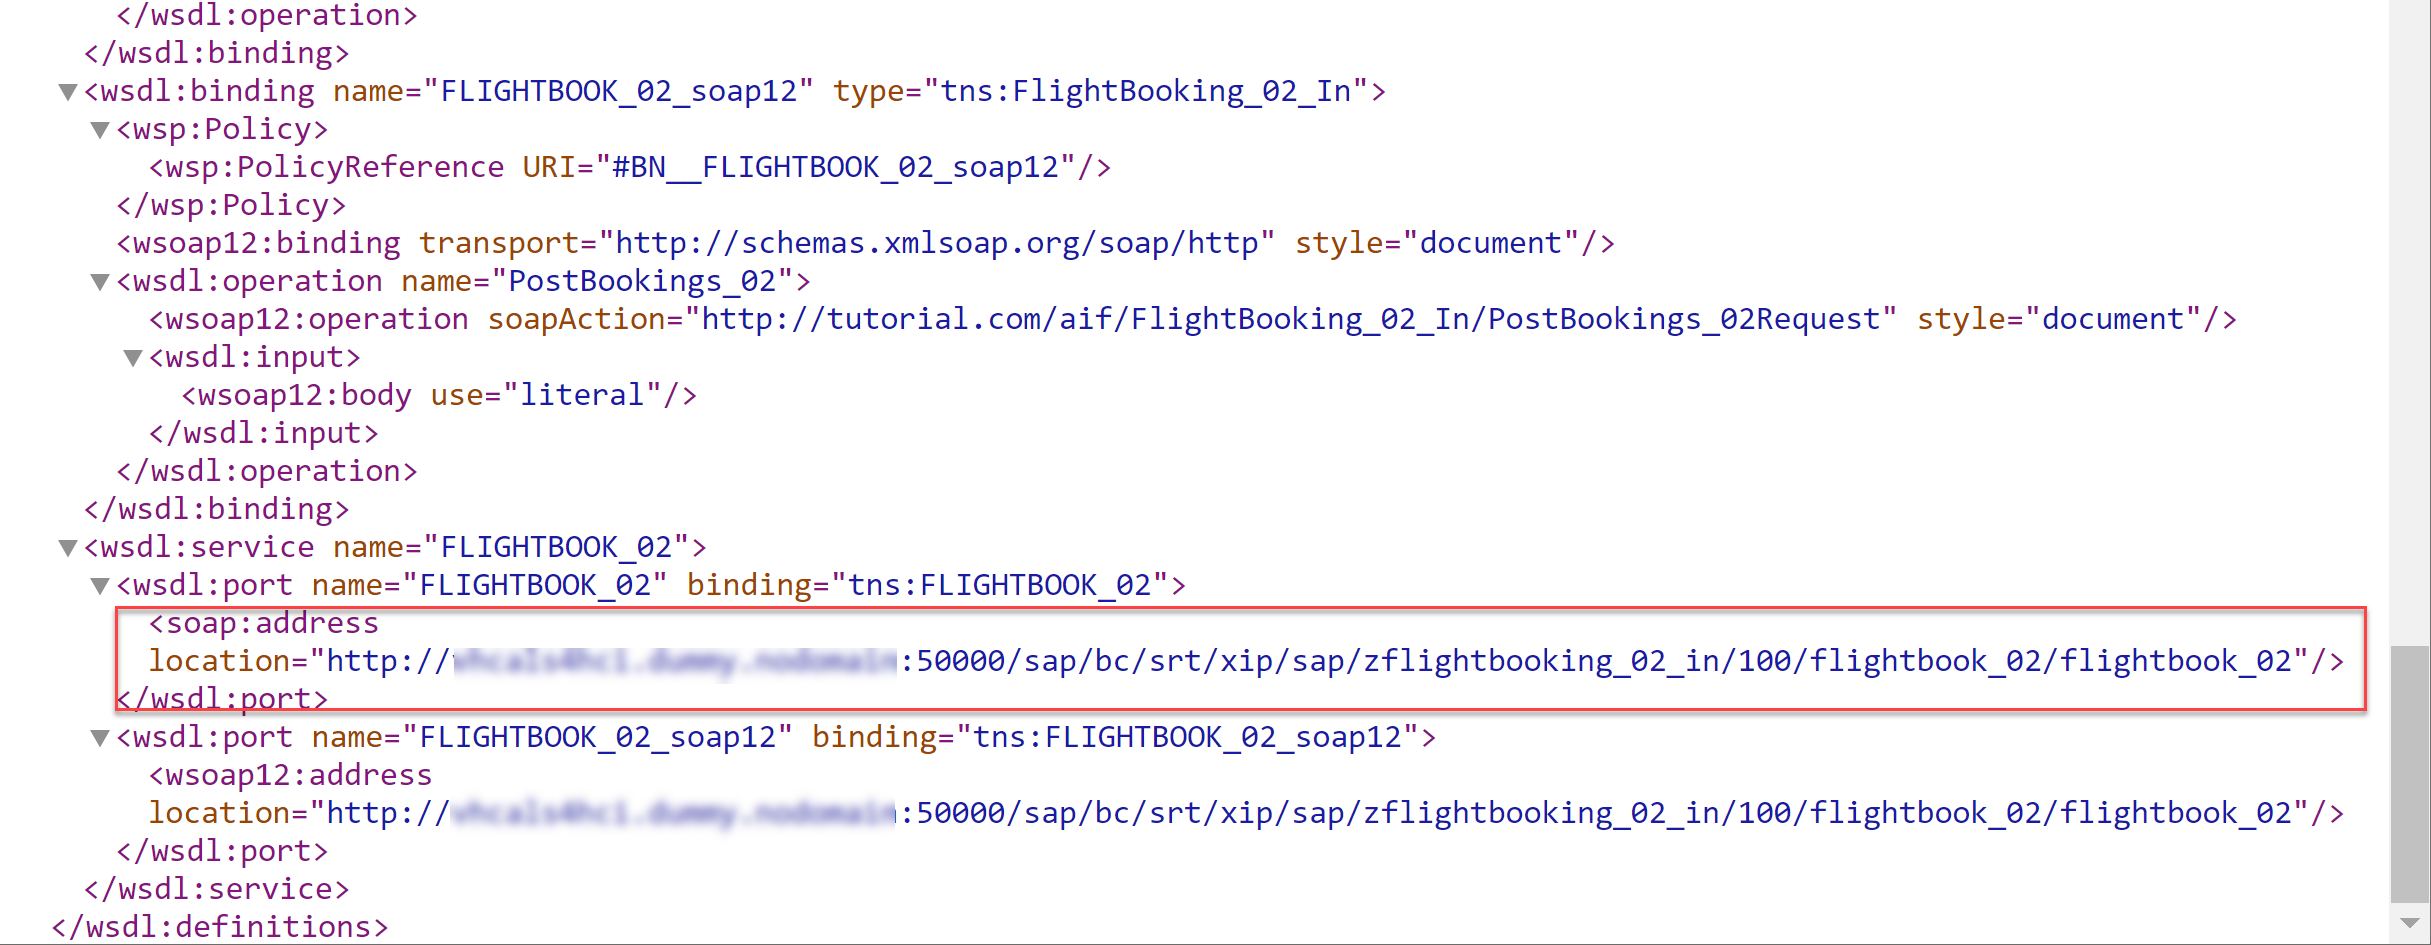
In the Actions column, select the Open Binding WSDL Generation icon to access the Binding WSDL URL that you may need to setup your test client. Copy it for later use.

You can find the WSDL URL for binding on the bottom of the upcoming dialog.

If you open the WSDL URL for binding in your internet browser, scroll down to find the end point URL of your service interface.
-
- Step 19
Use a test client of your choice to send a sample request to the proxy interface. This tutorial uses Postman.
-
In Postman, create a new POST request, and enter the end point URL of your service interface into the address field.
-
In the Authorization tab, enter the user credentials to log on to your backend system.
-
In the Headers tab, enter the key
content-typewith valuetext/xml.
-
Switch to the Body tab and select raw and the type XML. Paste the XML sample request (see below) including the SOAP envelope into the Postman request body. Maintain existing flight data from table
SFLIGHTS, and select Send to send the request.For the class code, enter
1for first class or2for business class.XMLCopy
<soapenv:Envelope xmlns:soapenv="http://schemas.xmlsoap.org/soap/envelope/" xmlns:air="http://sap.com/xi/XI/Demo/Airline"> <soapenv:Header/> <soapenv:Body> <air:FlightBookingOrderRequest> <AgencyData> <AgencyID>109</AgencyID> <OrderNumber>1</OrderNumber> <ItemNumber>1</ItemNumber> <OrderType>Single</OrderType> </AgencyData> <FlightID> <AirlineID>LH</AirlineID> <ConnectionID>0402</ConnectionID> <FlightDate>2022-05-30</FlightDate> </FlightID> <ClassCode>1</ClassCode> <PassengerName>John</PassengerName> <PassengerBirthdate>1988-01-17</PassengerBirthdate> <!--Optional:--> <PassengerFormOfAddress></PassengerFormOfAddress> </air:FlightBookingOrderRequest> </soapenv:Body> </soapenv:Envelope> -
Send the request.

You have successfully sent in a sample request you can monitor in the next step.
-
- Step 20
Finally, you should test your settings and verify that the proxy interface implementation and the monitoring are working as planned.
-
In the SAP GUI, check the results of your test in the Interface Monitor (transaction code
/n/AIF/IFMON). You’ll only be able to see the new interface if you correctly assigned your user to the recipient.
-
When you select the summary line for your recipient, you’re forwarded to Monitoring and Error Handling, where you can see your selected test message. It should be in status
Successfulwith the message text confirming that the flight booking has been created. In brackets you should see the airline code that you have provided in the booking request.
-
Resend a test message, this time entering the value
3for the class code. -
In Monitoring and Error Handling, select Refresh. You should see a new message in status
Errorbecause the value3doesn’t exist in the value mapping. To fix the error, select Value Mapping on top of the Log Messages window to maintain the value mapping.
-
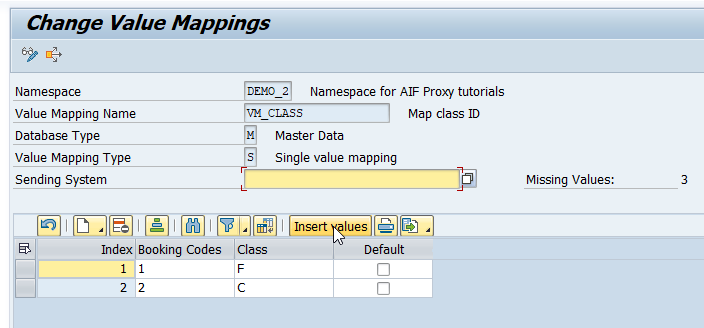
In the Change Value Mappings screen, insert the missing value.
-
Map the missing value 3 to the
Economy Classwith class codeY.
-
Save your changes and return to the message monitor. Here, select Restart. The message is now processed successfully.

-