RFC: Get Data from an On-Premise System Using a Custom Entity
- How to create a suitable custom entity to get data from a remote system
- How to implement a query provider class to get the data, using a BAPI (Business Application Programming Interface)
- How to expose the custom entity as a service definition
- How to display the data in a Fiori Elements Preview, using a service binding


Prerequisites
- You have done one of the following:
- Created an instance of SAP Business Technology Platform, ABAP Environment, Trial Version
- Created an entitlement to SAP Business Technology Platform, ABAP Environment, customer licensed version
- IMPORTANT: If you are using the licensed version, then this tutorial is part of the mission Connect Your On-Premise System with SAP BTP, ABAP Environment. Please work through the previous tutorials in the mission first; otherwise this tutorial may not work. If you are using the trial version, we have provided mock data inside the class.
Note that, if you are using the trial version, currently you cannot access an on-premise system using RFC. In that case, you will test the class using mock data.
A BAPI is a standard interface to a business object model, implemented as a function module.
Custom entities are used for data models for which you do not run a SELECT statement from an existing data source in the database. Rather, you:
1. Define the elements and their types in the custom entity
2. Implement the data retrieval logic manually in an ABAP class
3. Reference this class in an entity annotation.
Custom entities allow you to get data using an OData service or, as here, using RFC.
Throughout this tutorial, replace ### or 000 with your initials or group number.
- Step 1
First, you create the class that implements the data retrieval logic.
-
In ADT, open your ABAP package and choose New > Class.

-
Enter the following, then choose Next:
- Name:
zcl_product_via_rfc_### - Description: Read product data via
RFC - Interfaces:
if_rap_query_provider
- Name:
-
Choose the transport request, then choose Finish.
The signature of the method
IF_RAP_QUERY_PROVIDER~SELECTcontains the import parameterio_request. This parameter represents the OData query options that are delegated from the UI and used as input for the SELECT method. Whenever the OData client requests data, the query implementation class must return the data that matches the request, or throw an exception if the request cannot be fulfilled. Later in this tutorial, you will implement the SELECT method of the interface. -
- Step 2
-
Now choose New > Other… > Core Data Services > Data Definition.
-
Enter a name and description:
zce_product_###- Read product data via
RFC - Referenced Object: Leave blank
-
Choose the transport request, then choose Next. Do not choose Finish, yet!
-
Choose Define Custom Entity with Parameters, then choose Finish. Ignore the errors for now.

-
- Step 11
Now that you have defined your view, and retrieved the data using the class, you can expose the view as a Business Service. A Business Service consists of a Service Definition and a Service Binding.
You use a Service Definition to define which data is to be exposed (with the required granularity) as a Business Service.
You then use the Service Binding to bind a service definition to a client-server communication protocol such as OData. This allows you to provide several bindings for the same definition, e.g. to expose the service to a UI, and to an
A2Xprovider.Start with the Service Definition:
-
From your package, select your custom entity,
zce_product_###, then choose New > Service Definition from the context menu, then choose Next.
-
Enter the following and choose Next:
- Name:
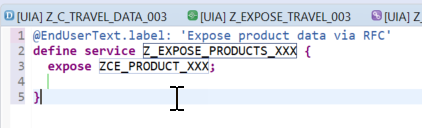
ZCE_PRODUCT_### - Description: Expose product data via RFC
- Source Type: Definition
- Referenced Object:
ZCE_PRODUCT_###

- Name:
-
Choose the transport request; choose Next.
-
Use the selected template; choose Finish. The name of your custom entity is inserted automatically.
-
Optional: For readability, add an alias, such as Products:
CDSCopyexpose zce_product_### as Products; -
Save and activate (
Ctrl+S, Ctrl+F3) the service definition.
-
- Step 12
-
Select your service definition, then choose Service Binding from the context menu, then choose Next.
-
Enter the following, then choose Next:
- Name =
ZUI_CE_PRODUCT_### - Description = Bind product data via RFC
- Binding Type = ODATA V2 (UI…)
- Service Definition =
ZCE_PRODUCT_###

- Name =
-
Choose the transport request; choose Finish.
The service binding automatically references the service definition and thus the exposed custom entity.
The names of the service definition and binding comply with the Naming Conventions for Development Objects in SAP Help Portal.
-
- Step 13
-
In the editor that appears, choose Activate.

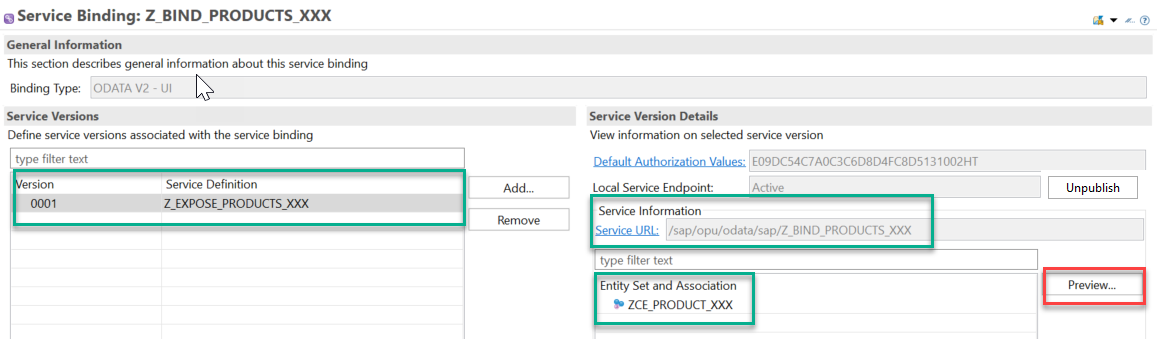
-
Then choose Publish. You can now see the Service URL and Entity Set.
-
You can open the Service Document (
XML) in your browser, by choosing Service URL.
-
In the browser, you can also see the Metadata Document of the Business Service by adding the suffix
$metadatato the URL:sap/opu/odata/sap/Z_BIND_PRODUCT_TEST_001/$metadata.
-
- Step 14
-
Select the entity set and choose Preview.

-
Log in using your ABAP Environment user and password; the Fiori Elements preview appears.
-
Display the data by choosing Go.

-
- Step 16
If the data does not display (and you are using the licensed version), check that the BAPI is retrieving the data, as follows:
-
Open the class you created in Test the Connection to the Remote System.
-
Replace the type
ty_bapi_epm_product_header:ABAPCopy
DATA lt_product TYPE STANDARD TABLE OF  ty_bapi_epm_product_header.
DATA ls_product TYPE ty_bapi_epm_product_header.
with the type of your custom entity:
```ABAP

DATA lt_product TYPE STANDARD TABLE OF zce_product_via_rfc_###.
DATA ls_product TYPE zce_product_via_rfc_###.

```
The console output should look like this:

More Information
-
SAP Help Portal: BAPI
-
SAP Help Portal: Using a CDS Custom Entity to Define the Data Model for an OData Service
-
SAP Help Portal: Service Definition
-
Implement a custom entity in the ABAP RESTful Programming Model using RFC - includes handling a single record, filtering, and ordering
-
Call a remote OData service from the trial version of SAP BTP ABAP environment
-
Find out more about SAP Business Technology Platform ABAP Environment on SAP Community: SAP Business Technology Platform ABAP Environment
-