Using ODBC driver for SQL Service
- How to create a service definition and an SQL-typed service binding
- How to create a communication scenario with object privileges
- Install the ODBC driver on Windows
- Create an ODBC data source
- Open an ODBC connection in Microsoft Excel and access data


Prerequisites
- You need the standard developer authorization profile to create ABAP development objects.
- A 64bit Excel version since the ODBC driver for ABAP is a 64bit driver.
This tutorial was written for SAP BTP ABAP Environment. However, you should also be able to use it in SAP S/4HANA Cloud Environment in the same way.
Always replace #### with your initials or group number.
You will learn how you can access CDS view entities in an ABAP system using SQL via ODBC. Open Database Connectivity (ODBC) is a standard API for accessing databases.
- Step 2
-
To install the ODBC driver for ABAP, you need to visit the SAP Support Portal https://support.sap.com/en/index.html
-
After this you may need to log on and then you can search for components ODBC DRIVER FOR ABAP 1.0.

-
Open ODBC driver for ABAP: Initial delivery and then click download icon in the next page.


-
Now you need to choose the right option for Windows to download.

-
Now you need to download SAPCRYPTOLIB. Click on this link
open the COMMONCRYPTOLIB 8 and download the last version for Windows.


-
In addition you may need to download SAPCAR on Software Center to be able to unpack the SAP files.
-
Open Command Prompt in your windows start menu and unpack your SAP files with this command, you need to address your downloaded SAPCAR file and then choose a directory as your ODBC driver location and unpack the SAR files there.
C:\Users\D-number\Downloads\sapcar.exe -xvf C:\Users\D-number\Downloads\Your downloaded ODBCforABAP.SAR file
C:\Users\D-number\Downloads\sapcar.exe -xvf C:\Users\D-number\Downloads\Your downloaded SAPCRYPTOLIBP.SAR file
-
After this, you will see at least the following files in your ODBC driver directory:
ODBC_driver_for_ABAP_x64u.msisapcrypto.dll
-
Start the Windows installer file to install the ODBC driver for ABAP

Click Next and accept the license agreement. On the next screen, you can choose Typical as installation type and complete the installation.
-
The installed files are in
<SystemDrive>:\Program Files\SAP\ODBC driver for ABAP.The ODBC driver is now ready to be used in ODBC data sources.
-
- Step 3
You need first to create and fill two demo tables ZORDERS and ZORDERITEMS in ADT:
-
Open ADT and login to your ABAP System.
If you do not have a package, create a new one likeZ_PACKAGE_SQL_####. -
Right-click your package and choose New > Other ABAP Repository Object.

-
Choose Dictionary > Database Table and click Next.

-
Enter the following name and description:
- Name:
ZORDERS_#### - Description:
orders table
and click Next.

- Name:
-
Select a transport request and click Next. Your created Table will be opened.

-
To define the structure of the table copy the code below in your table definition.
ZORDERS_####Copydefine table zorders_#### { key id : abap.numc(10) not null; creationdate : abap.datn; }
-
Save and activate your changes.

-
Create another database table with following name and description:
- Name:
ZORDERITEMS_#### - Description:
order items

- Name:
-
Define the second table with this code:
ZORDERITEMS_####Copydefine table zorderitems_#### { key orderid : abap.numc(10) not null; key pos : abap.int4 not null; item : abap.char(100) not null; amount : abap.int4 not null; }
-
Save and activate your changes.
-
- Step 4
-
Now you need to fill your test table with some test data.
Right-click your package and choose New > ABAP Class.

-
Enter the following name and description:
- Name:
ZCL_FILL_ORDERS_#### - Description:
fill orders class
Add
IF_OO_ADT_CLASSRUNas an interfaceand click Next.

- Name:
-
Select a transport request and click Next.
-
Copy the method code below in your class to fill both tables with some test data. Do not forget to replace
####with your number.zcl_fill_orders_####Copy
class zcl_fill_orders_#### definition public final create public . public section. interfaces if_oo_adt_classrun . protected section. private section. endclass. class zcl_fill_orders_#### implementation. method if_oo_adt_classrun~main. data: lt_orders type table of zorders_####. delete from zorders_####. lt_orders = value #( ( id = '1' creationdate = '20210801' ) ( id = '2' creationdate = '20210802' ) ( id = '3' creationdate = '20210803' ) ). insert zorders_#### from table @lt_orders. out->write( sy-dbcnt ). data: lt_orderitems type table of zorderitems_####. delete from zorderitems_####. lt_orderitems = value #( ( orderid = '1' pos = '1' item = 'Apple' amount = '5' ) ( orderid = '1' pos = '2' item = 'Banana' amount = '5' ) ( orderid = '1' pos = '3' item = 'Orange Juice' amount = '2' ) ( orderid = '2' pos = '1' item = 'Orange' amount = '10' ) ( orderid = '2' pos = '2' item = 'Apple' amount = '5' ) ( orderid = '3' pos = '1' item = 'Bottle Water' amount = '5' ) ). insert zorderitems_#### from table @lt_orderitems. out->write( sy-dbcnt ). endmethod. endclass. -
Save and activate your class and press F9 to run the class and fill your tables.

-
Go back to your tables and check them with right click each table > Open With > Data Preview


-
- Step 5
-
Right click on the first table and select New Data Definition

-
Enter the following name and description:
- Name:
ZORDERSVIEW_#### - Description:
Orders
click Next.

- Name:
-
Select a transport request and click Next.
-
Choose Define View Entity and click Finish


-
Create another data definition entity for the second table with following name and description:
- Name:
ZORDERITEMSVIEW_#### - Description:
Order Items

- Name:
-
Save and activate your data definitions.
-
- Step 6
Now you need a service definition and a corresponding SQL-typed service binding to define that the new CDS view entities are exposed in a SQL service.
-
Right click one of the
ZORDERSVIEW_####and choose New Service Definition.
-
Enter following values:
- Name:
Z_SERVICE_DEF_SQL_#### - Description:
Service Definition
Click Next.

- Name:
-
Select a transport request and click Finish.
-
The created service definition will be opened. Add the second view and add alias names for both view entities.

-
The newly created service definition can now be used in a service binding. You need a service binding of type SQL - Web API to access the objects using ODBC later.
Right click the service definition and select New Service Binding

-
Enter following values:
- Name:
ZORDERS_#### - Description:
Orders - Binding Type:
SQL - Web API
Click Next.

- Name:
-
Select a transport request and click Finish.
-
As you will see later, the service binding name, in your case
ZORDERS_####, will act as the schema name for external ODBC consumers. Do not forget to activate the service binding.
-
- Step 7
To access the service binding, you need a technical user in the ABAP system.
Therefore, you will now to create a communication scenario and a communication arrangement in the SAP BTP ABAP Environment system.-
Right-click your package and choose New > Other ABAP Repository Object > Communication Scenario

-
Enter following values:
- Name:
Z_COM_SCENARIO_SQL_#### - Description:
Communication Scenario for SQL test

Click Next.
- Name:
-
Select a transport request and click Finish.
-
your communication scenario will be opened. go to the Inbound tab.

Since you want to use user/password authentication in your Windows Excel test case, select Basic as Supported Authentication Methods.
-
In section Inbound Services, choose the Add… button and enter
S_PRIVILEGED_SQL1as Inbound Service ID and click Finish.The
S_PRIVILEGED_SQL1inbound service is a pre-configured service for the privileged access to CDS view entities, that is, no DCL is applied. (DCL stands for Data Control Language. It provides an access control mechanism to restrict the results returned by the CDS view from the database according to conditions)
-
Now you need to add additional authorizations to enable access to your service binding. Go to the tab Authorizations. Below Authorization Objects, press the Insert button.

-
Enter
S_SQL_VIEWin Authorization Object field and click OK.
-
Select the added authorization object and fill out the authorizations in the details:
-
SQL_SCHEMA:ZORDERS_#### -
SQL_VIEW:* -
SQL_VIEWOP:SELECT


SQL_SCHEMAmust contain the name of the service binding that you want to grant access to.- The value * for
SQL_VIEWmeans that you allow access to all views in the service definition that is attached to the service binding ZORDERS. - Since currently only read only access is allowed,
SQL_VIEWOP=SELECTis mandatory.
-
-
Save your entries and press the Publish Locally button to publish it in the current development system.

-
- Step 8
The final preparation tasks in the ABAP system cannot be performed in ADT and need to be done in the administration UI of the system.
-
Right-click your Project, open Properties. In the popup select ABAP Development and select System URL.


-
Log in with your username and password.
-
Open Communication System under Communication Management. Click New.


-
Choose a name for your communication system like SQL_ACCESS_#### and click Create.

-
In communication system, mark it as Inbound Only.

-
Under Users for Inbound Communication choose the + button.

-
A popup will be opened. Choose New User.

-
Create a new user with a name and description, and choose Propose Password to get a password. Note down this user and password for later. Then click Create.

-
In the next step click OK to create the user.

The user is now listed in the section Users for Inbound Communication.
-
Choose Save to finish the creation of the communication system.

-
- Step 9
-
Go back to the administration UI and select Communication Arrangement.

-
Select New.

-
In the popup choose
Z_COM_SCENARIO_SQL_####in Scenario field. Change the Arrangement Name toZRAP_CS_SQL_####and click Create.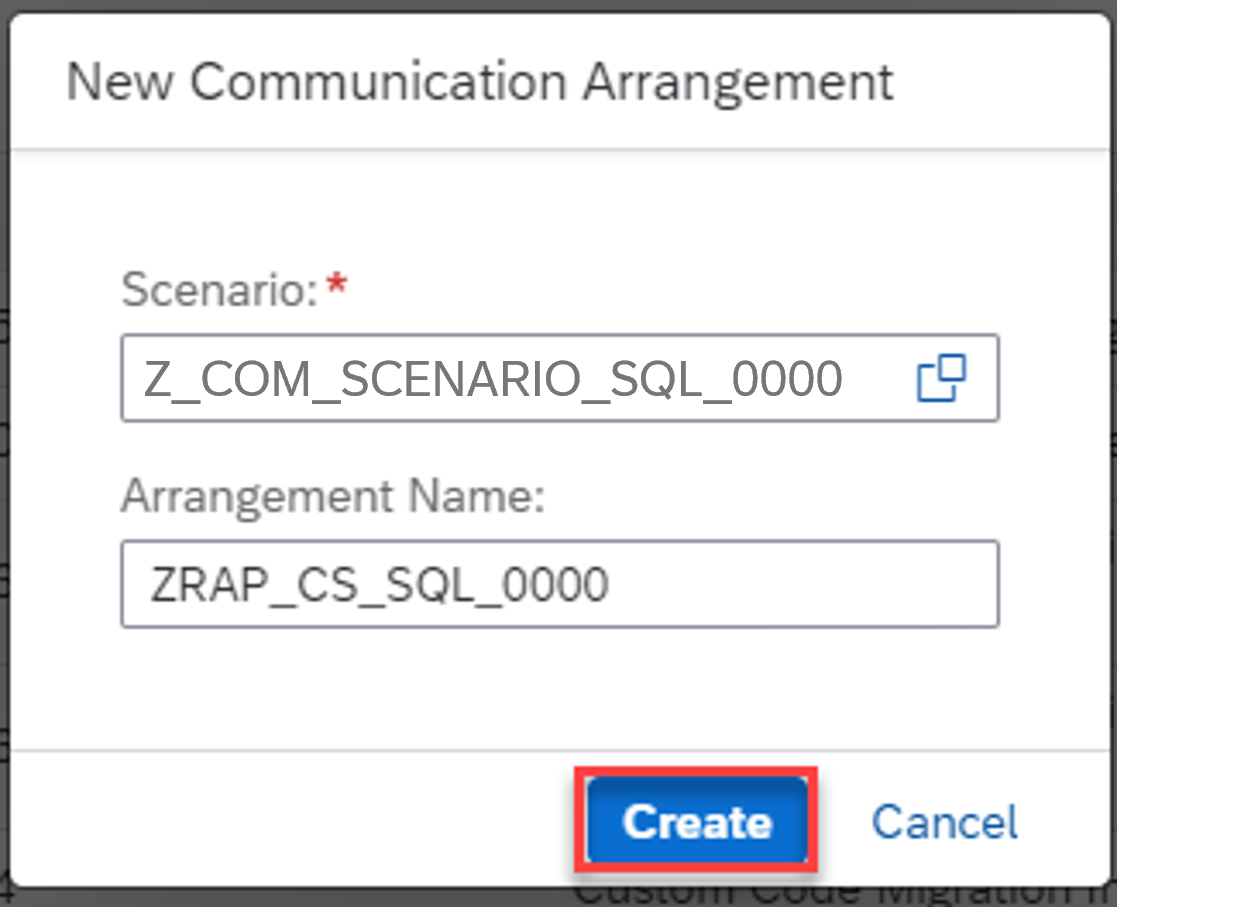
-
To complete the link between communication scenario and communication system, you need to add your communication system SQL_ACCESS_####, and the system will automatically add the user SQL_USER_####. Before Saving your changes, you need to note down the service URL,
https://<hostname>/sap/bc/sql/sql1/sap/S_PRIVILEGED.
-
- Step 10
-
Launch the Windows ODBC data source administrator tool from your Windows Start. The ODBC Data Sources (64bit) tool is part of a standard Windows installation.


-
In this tool, you can create ODBC data sources and assign a data source name (DSN) to a newly created data source. Either choose the User DSN or System DSN tab, choose Add,.

-
Choose the ODBC driver for ABAP as ODBC driver. Choose Finish.

-
This will start the DSN setup dialog of the ODBC driver for ABAP.

In this dialog, choose a DSN and fill in a few driver-specific parameters as following:
Code Explanation Data Source Name SQLTEST_####Hostname The first part of the service URL that you saved from your communication arrangement yourSystemId.abap.eu10.hana.ondemand.comPort Number 443 Client 100 User Type alias Language: EN Service Path The second part of the service URL that you saved from your communication arrangement /sap/bc/sql/sql1/sap/S_PRIVILEGEDType Mapping semantic Crypto Library Full file name incl. path of the SAP Cryptographic Library \sapcrypto.dll (Windows) Additional Attributes TrustAll={true}; Then click OK.


-
- Step 11
After creating a DSN, you can use this in an ODBC client tool of your choice. For simplicity reasons, we have chosen Microsoft Excel as an example for this tutorial.
-
Start Excel and got to Data > Get Data > From Other Sources > From ODBC

-
In the following popup, enter your newly defined DSN and click OK.

-
In the Database section, Excel will now ask for the user and password to log on to the ABAP system. You need to use the user and password that you noted down when creating the communication system. Click Connect

-
The navigator shows all exposed objects in your SQL schema
ZOrders. You can choose one of the CDS entities and Excel will show a preview of the data content.

-
Choose either LOAD to load the data into an Excel sheet or you can choose TRANSFORM DATA to switch to the power query tool. When you load the data into an Excel sheet, you can always refresh the data if needed.

-
As a last step, you can see that it is possible to execute a free style SQL query on the exposed entities.
Choose Data > Get Data > From Other Sources > From ODBC again in Excel, select your DSN and then click Advanced Options. A new control is opened that allows you to enter a SELECT statement directly. In the SELECT statement, you must prefix all view names by your schema name
ZOrders_####. Apart from this, you can use ANSI-like SQL syntax.
 SQL statementCopy
SELECT OI.Item , SUM( OI.Amount ) FROM ZOrders_####.Orders O INNER JOIN ZOrders_####.Orderitems OI ON O.Id = OI.OrderId GROUP BY ITEM -
Click OK. The result set will directly show up in an Excel preview window.

-