
Overview
You will learn
- How to create a service key for UI theme designer on SAP BTP Cloud Foundry (“CF theming service”).
- How to create an OAuth client in
SOAUTH2_CLIENTof your S/4HANA on-prem system (“ABAP system”) with this service key, that can be used for theming. - How to create a destination to the CF theming service in
SM59of your ABAP system. - How to create a customizing in
SPROto use this destination for remote theming of your ABAP system. - How to end-to-end-test the connection: create a theme in the CF theming service, apply it in your ABAP system.


Prerequisites
- In your ABAP system: User with permission to create an OAuth client in
SOAUTH2_CLIENT. - In your ABAP system: User with permission to create a destination in
SM59. - In your ABAP system: User with permission to do customizing in
SPRO. - In SAP BTP Cloud Foundry: Subaccount with UI Theme Designer: Initial Setup of UI Theme Designer successfully carried out.
- In SAP BTP Cloud Foundry: User with permission to create a Service Key.
- In SAP BTP Cloud Foundry: User with the
Workzone_Admin/Workzone_Advanced_ThemingorLaunchpad_Admin/Launchpad_Advanced_Themingrole collection (or role collection of your PaaS setup that includes the theming rolesViewer,Editor,CustomCssEditorandPublisher, as described in UI Theme Designer: Permissions).
Throughout this tutorial, we’ll refer with CF theming service to the UI theme designer service on SAP BTP Cloud Foundry, and with ABAP system to your SAP S/4HANA on-prem system.
Steps
In this tutorial, you’ll configure your ABAP system to use the CF theming service as a destination for “remote theming”. The CF theming service requires authenticated requests. Your ABAP system will use OAuth2 client credentials to authenticate. In this step, you’ll create a service key for the CF theming service in the SAP BTP Cloud Foundry cockpit. Optionally, you can use the cf CLI as an alternative route to get this service key.
In the BTP Cockpit of your subaccount, from the Cloud Foundry space, choose Services > Instances from the left-hand navigation:
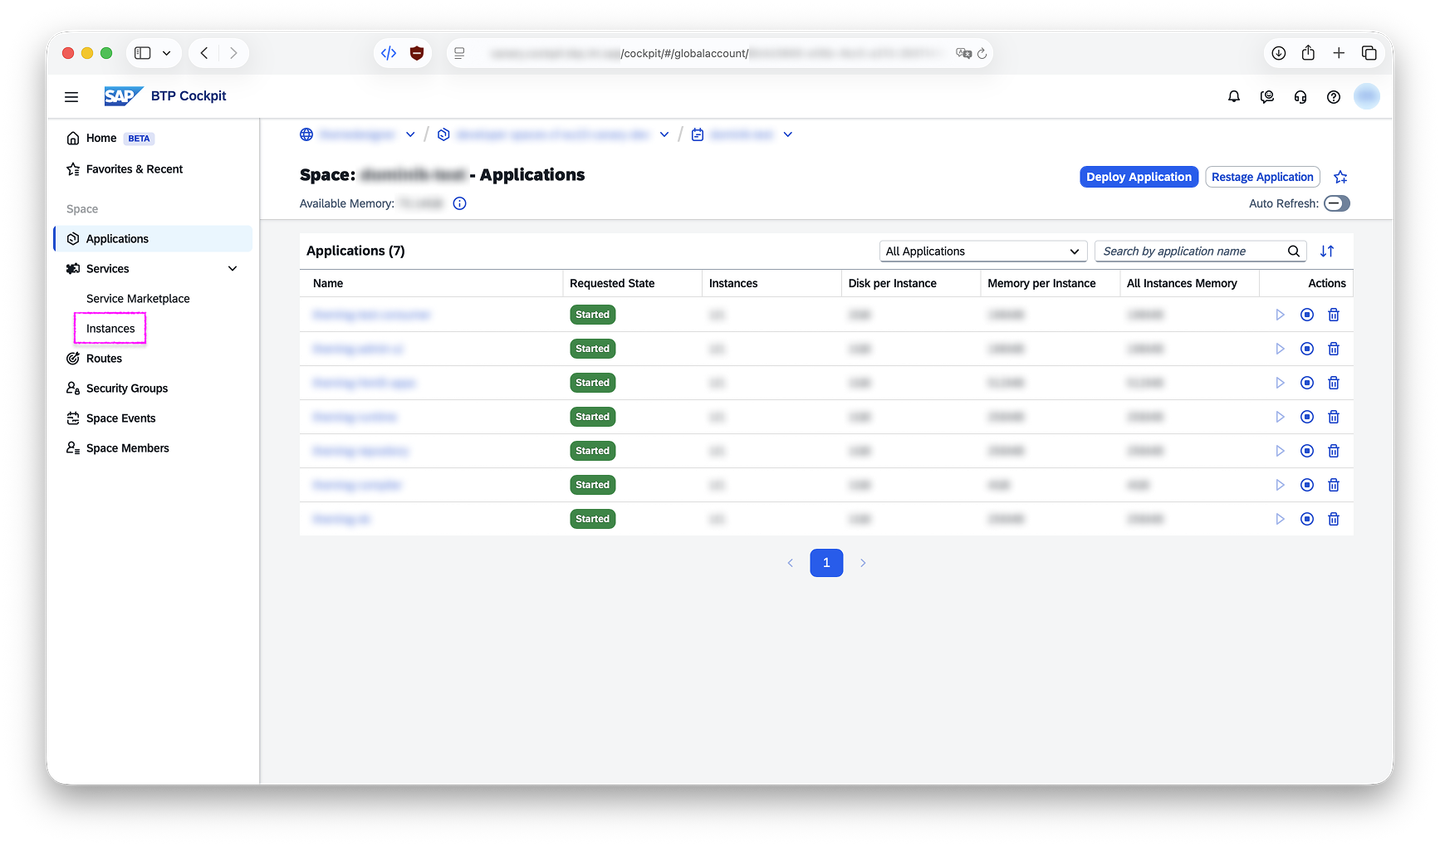
1.1: BTP Cockpit - CF space Select the service with UI Theme Designer in plan standard to view its details:
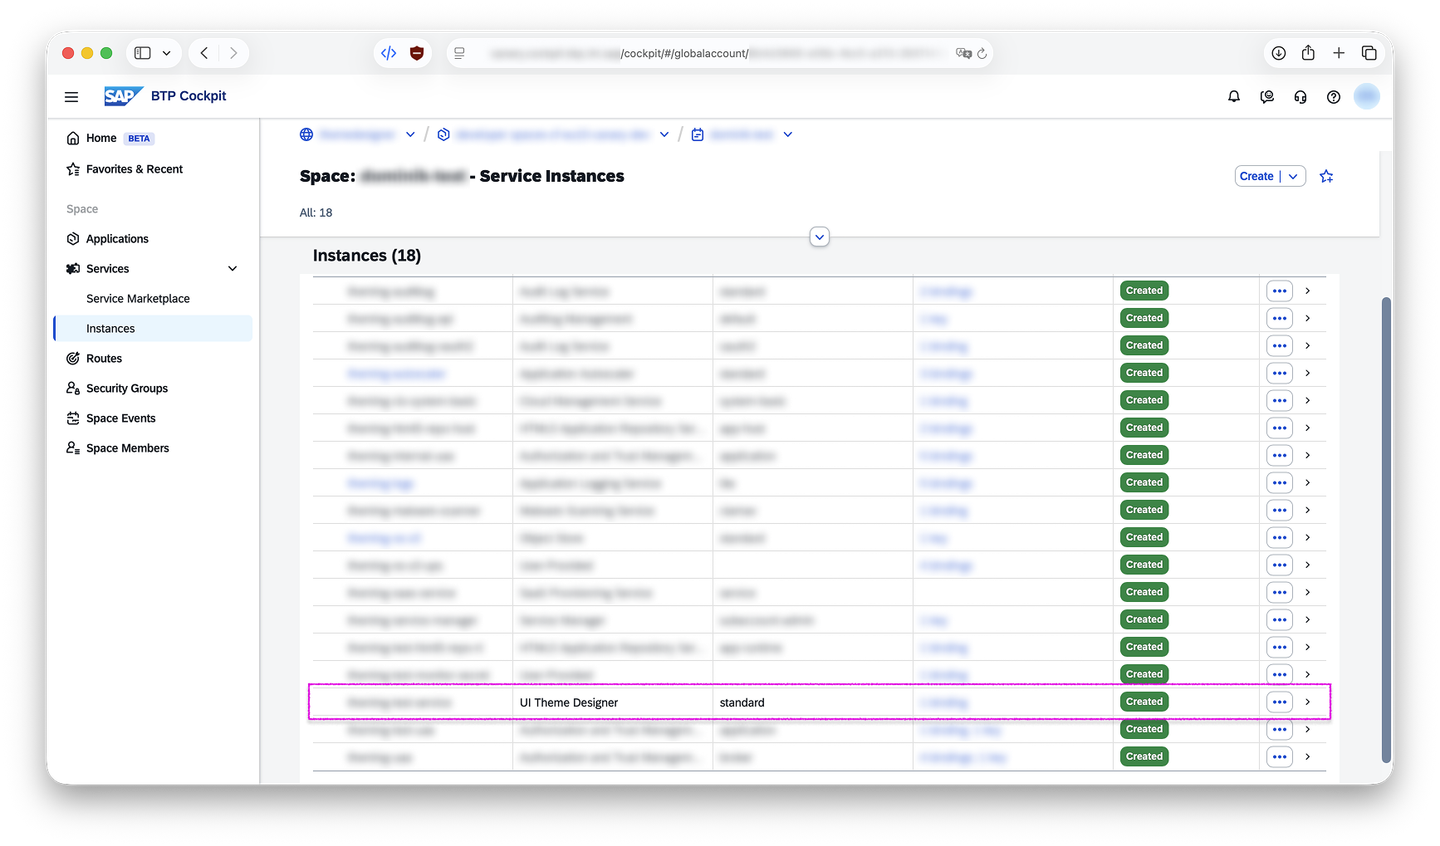
1.2: BTP Cockpit - service instances Under Service Keys choose Create:
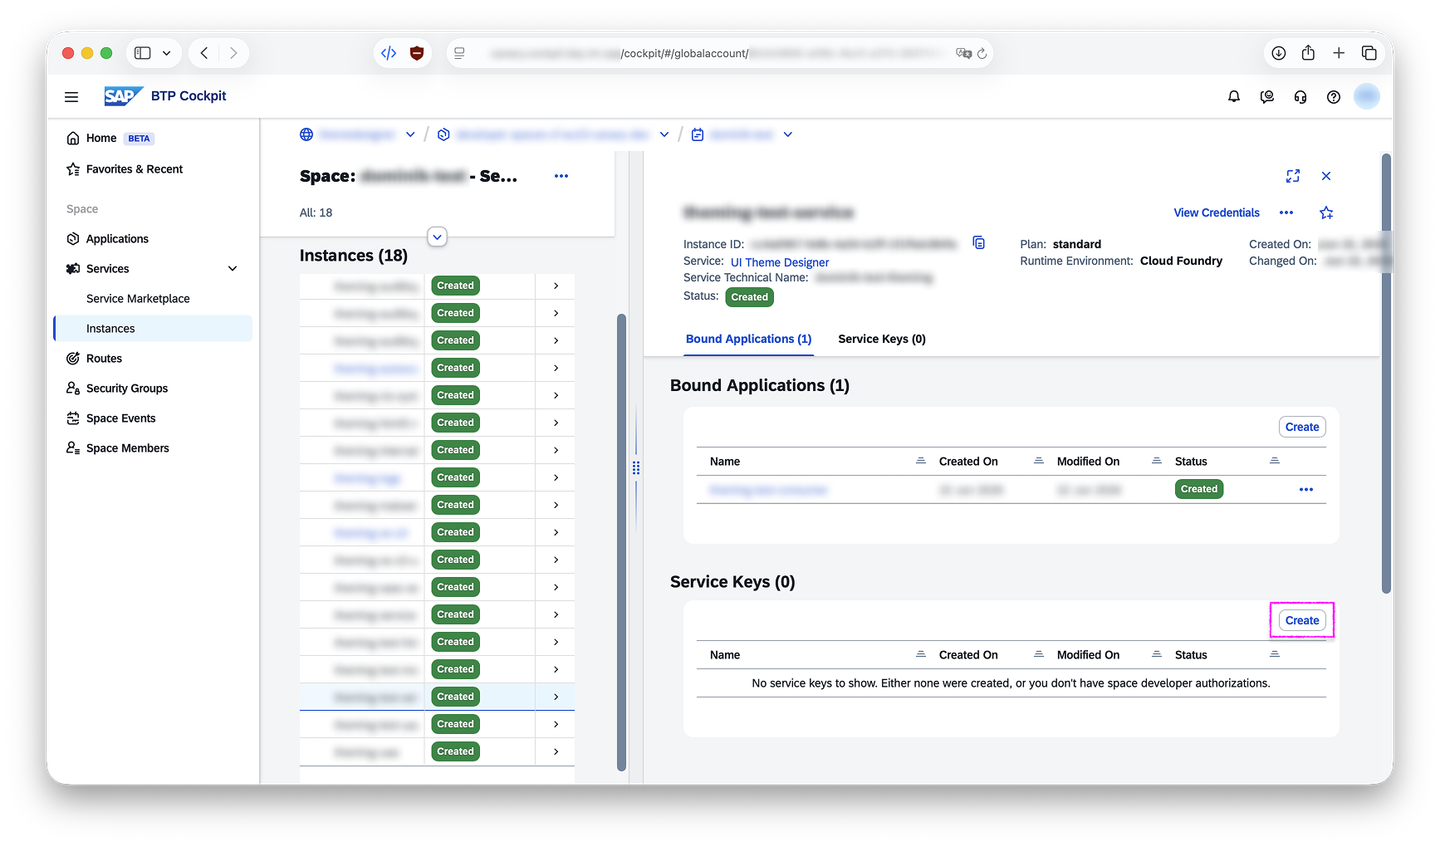
1.3: BTP Cockpit - CF theming service instance In the New Service Key dialog, provide a meaningful machine-friendly Service Key Name like “abap-remote-theming”, leave binding parameters as the default
{}and choose Create: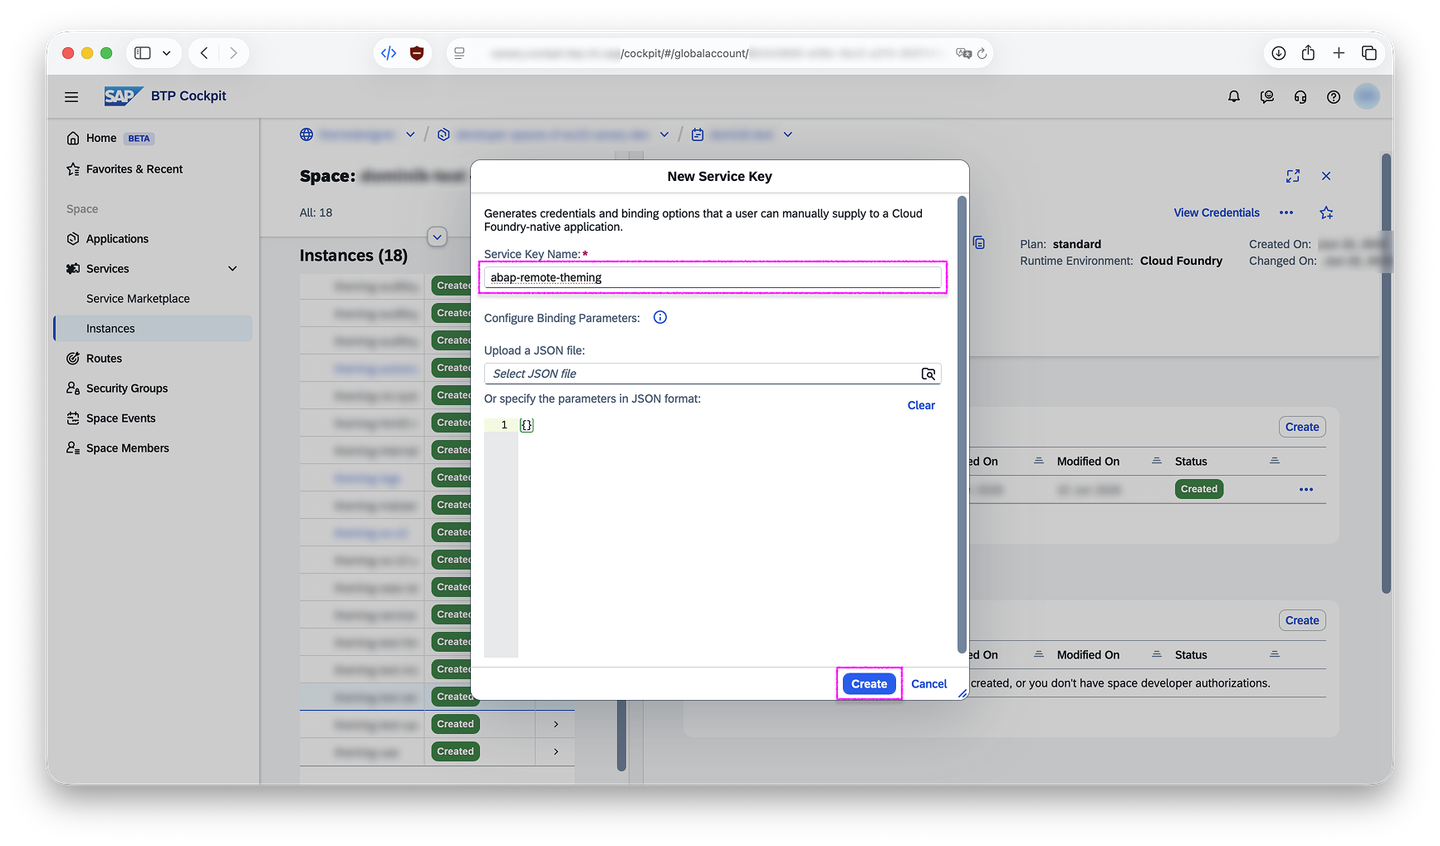
1.4: BTP Cockpit - create service key Under Service Keys select the newly created service key:
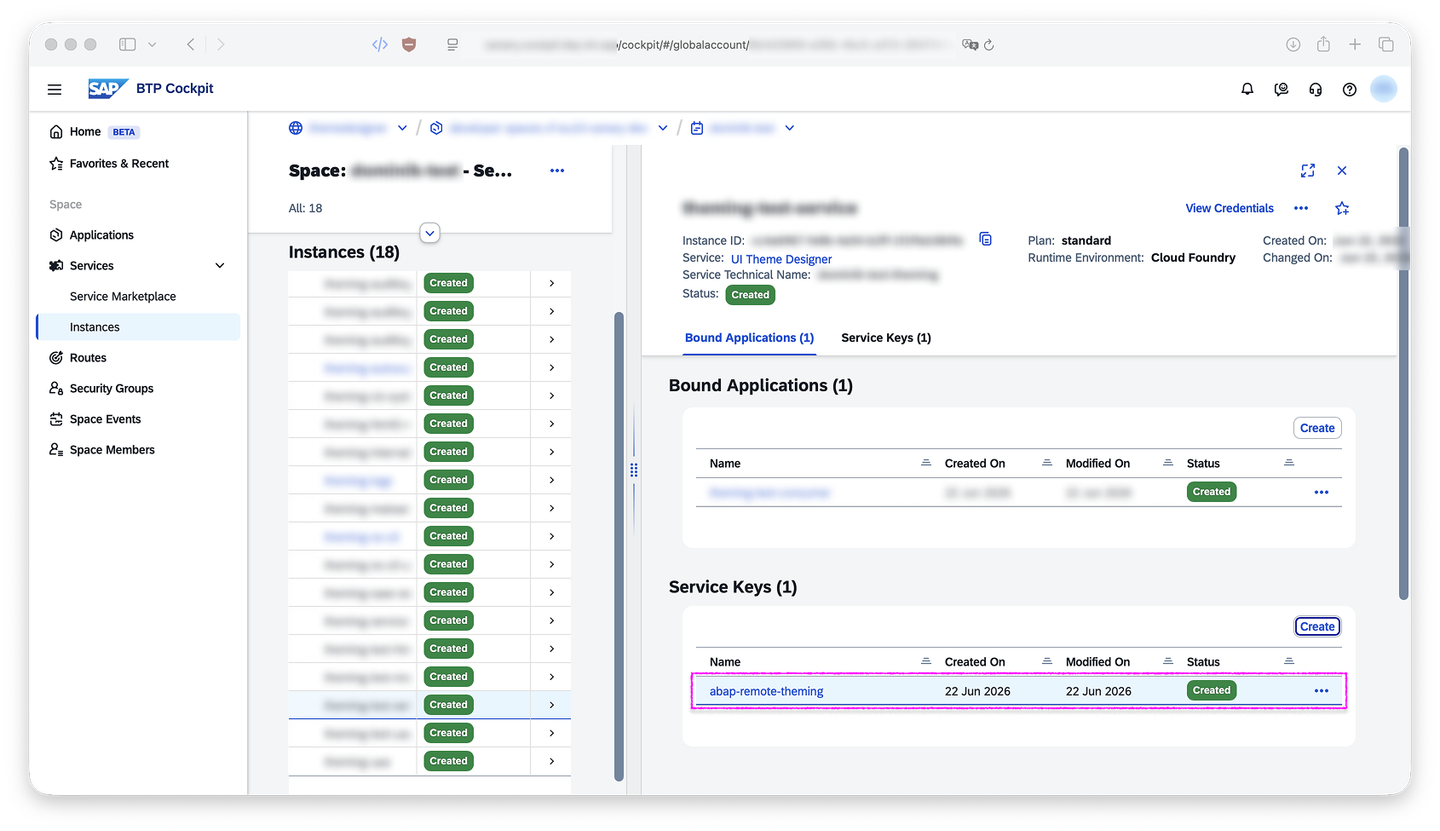
1.5: BTP Cockpit - CF theming service instance with service key From the Credentials dialog, copy
uaa.clientid,uaa.clientsecret,uaa.urlanduri(you will needuaa.clientidin step 2.3,uaa.urlin step 2.4,uaa.clientsecretin step 2.6 anduriin step 3.4):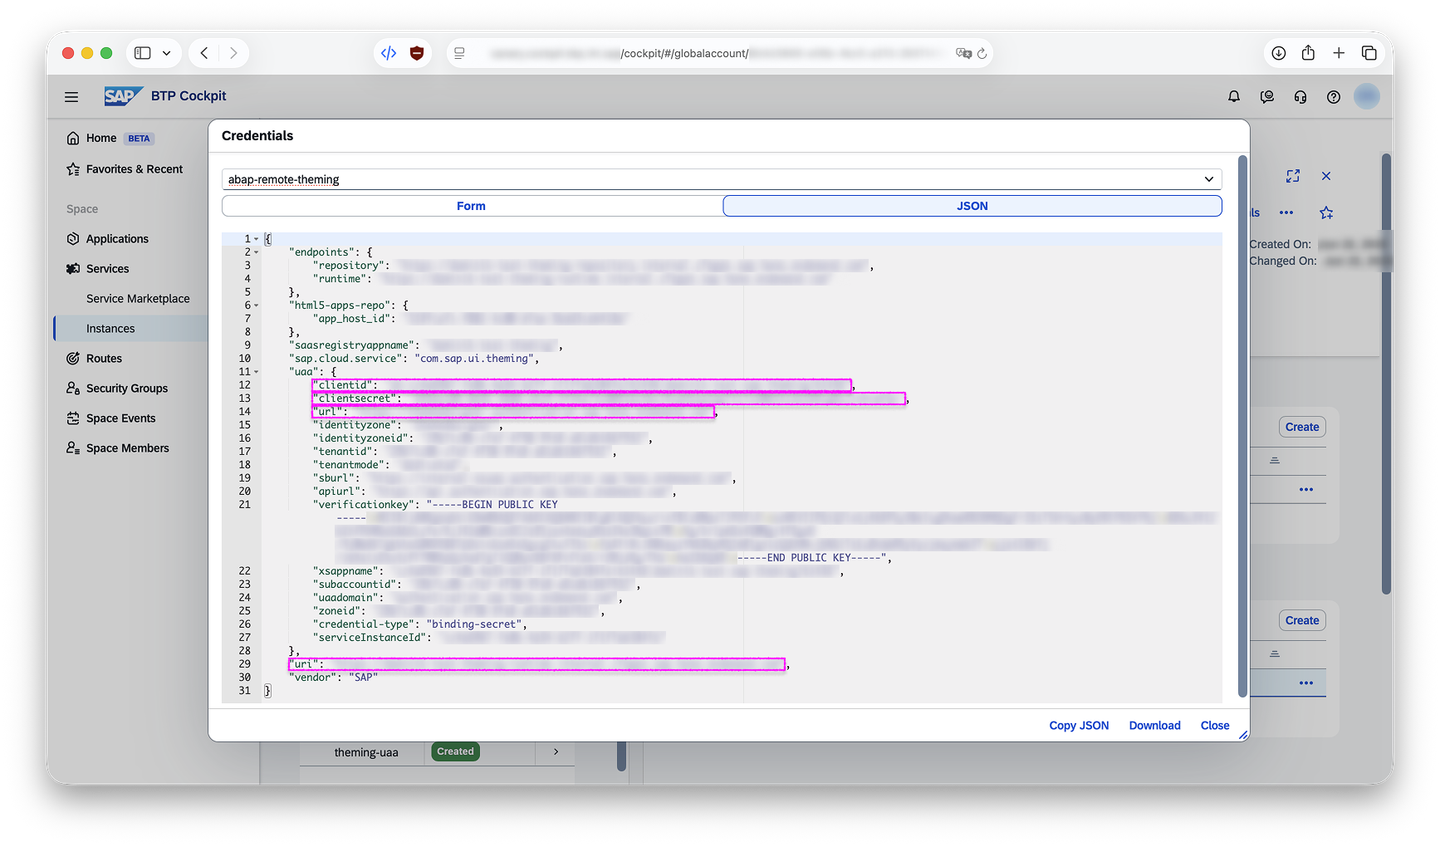
1.6: BTP Cockpit - view service key Alternative: Use the
cfCLI to create the service key. See Cloud Foundry Documentation: Using the Cloud Foundry Command Line Interface (cf CLI) for details on how to interact with thecfCLI.Shell# 1. login to your CF space, given $CF_API_URL, $CF_ORG and $CF_SPACE cf login -a $CF_API_URL -o $CF_ORG -s $CF_SPACE # 2. find the name of the service with offering=theming and plan=standard THEMING_SERVICE=$(cf services | awk '$2 == "theming" && $3 == "standard" {print $1}') # 3. create a service key named "abap-remote-theming" for that service cf create-service-key $THEMING_SERVICE abap-remote-theming --wait # 4. view uaa.clientid, uaa.clientsecret, uaa.url and uri of that service key cf service-key $THEMING_SERVICE abap-remote-theming | tail -n +3 | jq '{clientid: .credentials.uaa.clientid, clientsecret: .credentials.uaa.clientsecret, url: .credentials.uaa.url, uri: .credentials.uri}'
You have just created a service key for your CF theming service. Now you’ll create an OAuth2 client in your ABAP system so that destinations can authenticate against your CF theming service with that service key.
In your ABAP system, start the transaction
SOAUTH2_CLIENT: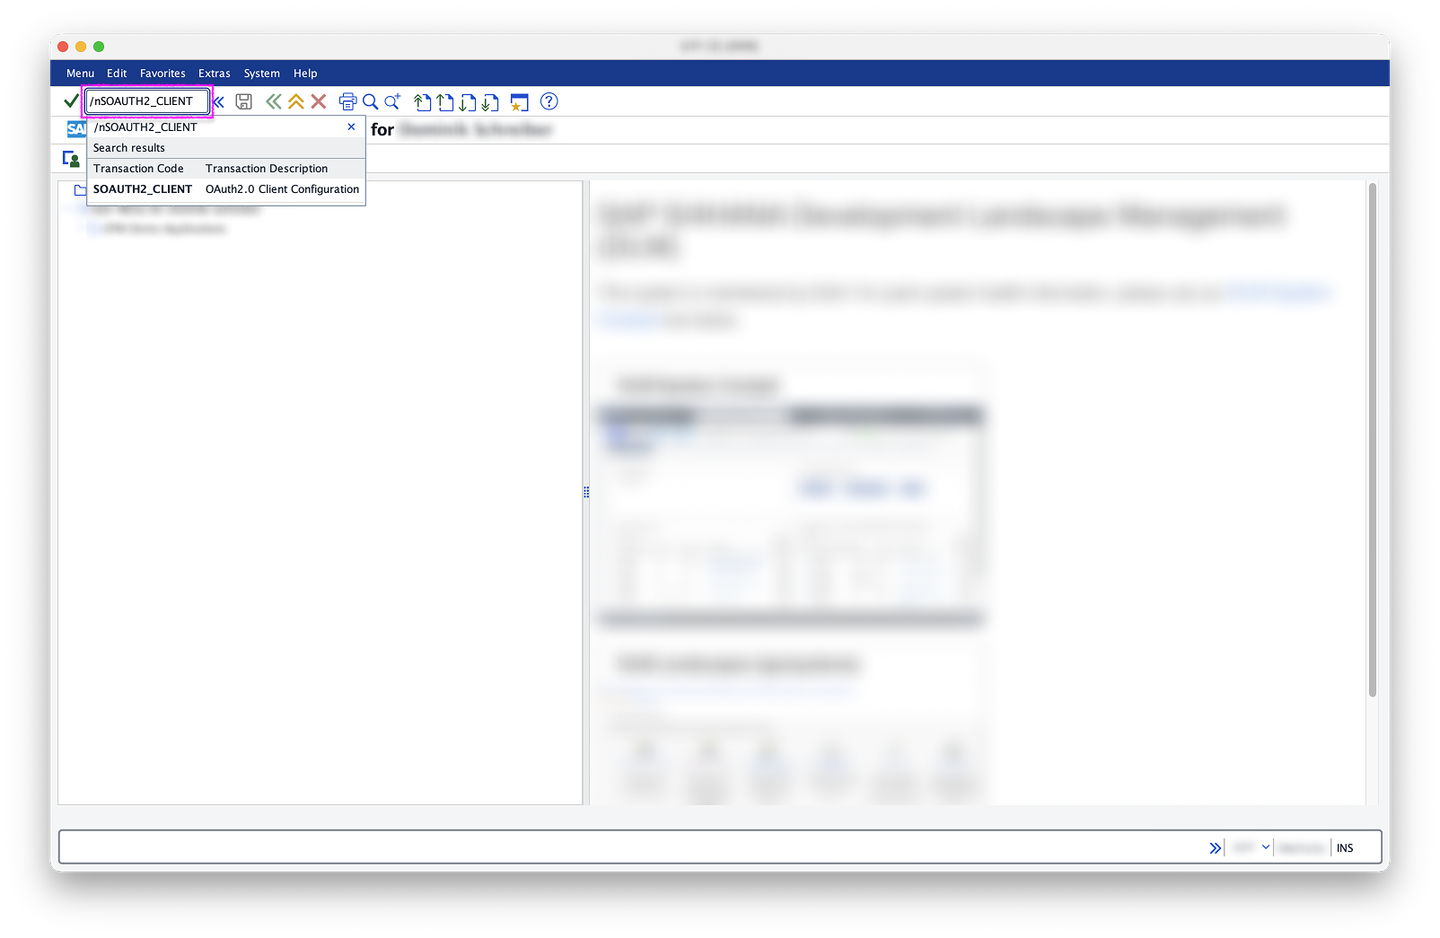
2.1: SAPGUI - easy access with SOAUTH2_CLIENT In transaction
SOAUTH2_CLIENT, select Create: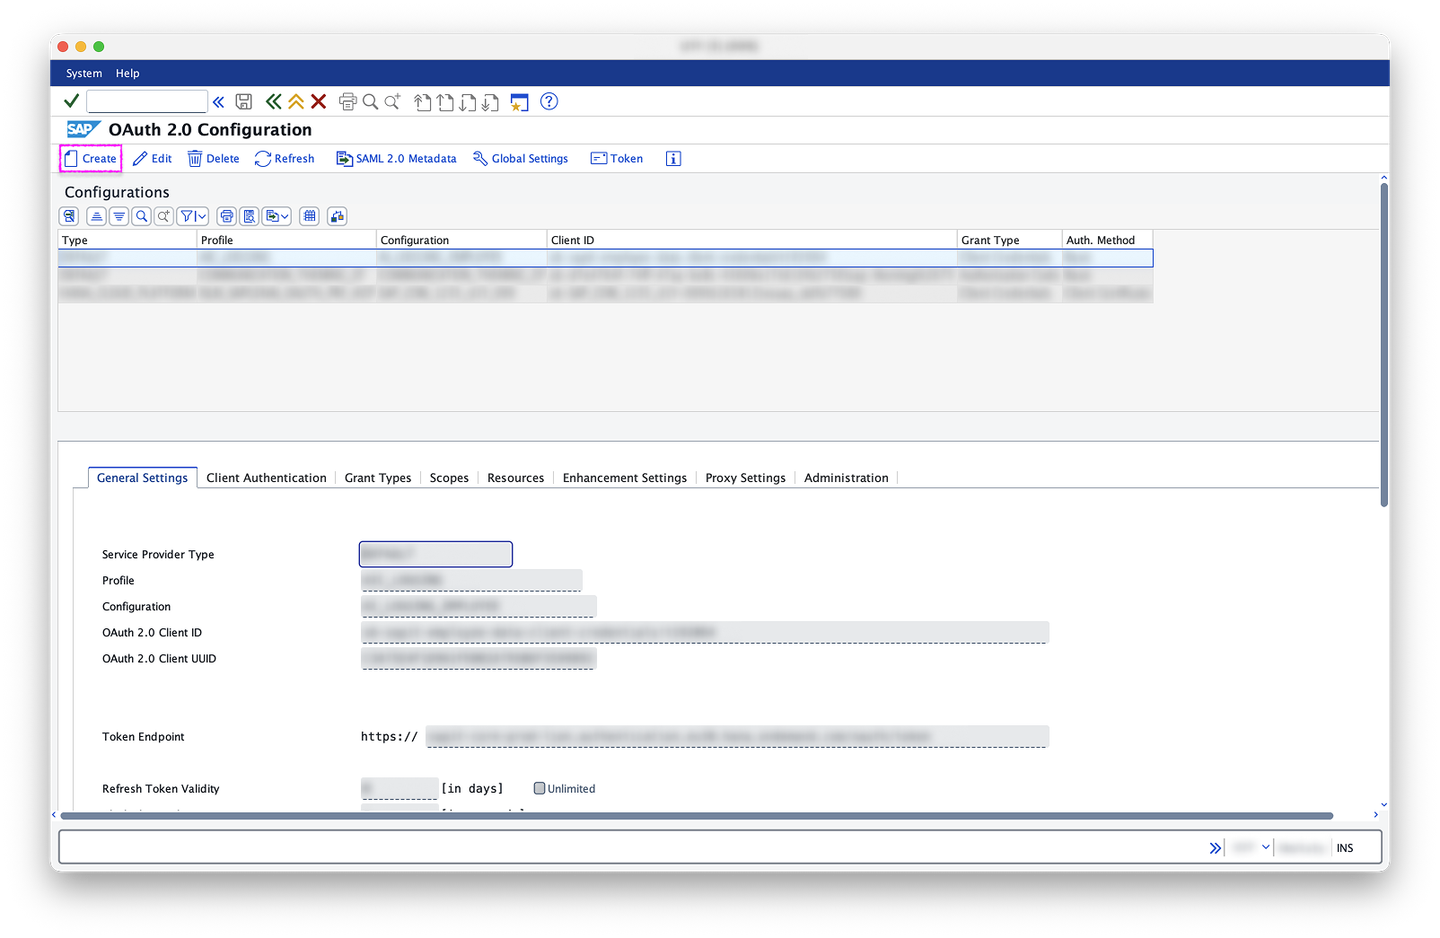
2.2: SOAUTH2_CLIENT entry screen In the Select Profiles dialog, select
/UI5/THEMING_REMOTEas OAuth 2.0 Client Profile, useuaa.clientid(from step 1.6) as OAuth 2.0 Client ID and confirm with OK (the checkmark button in the dialog footer toolbar):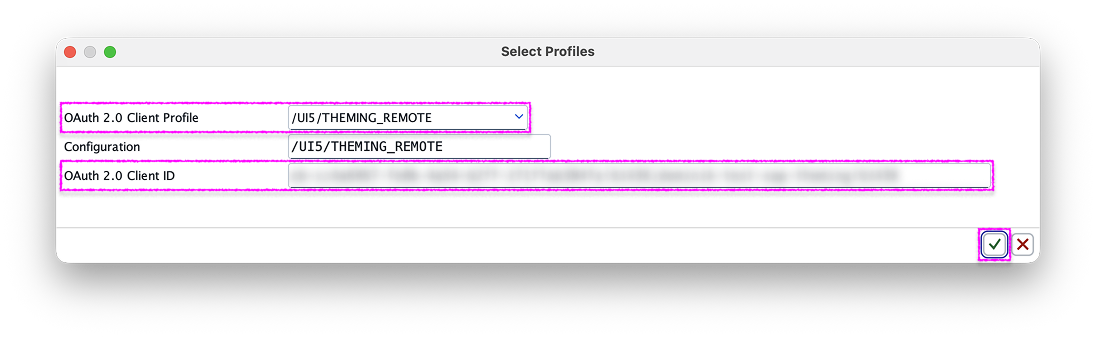
2.3: SOAUTH2_CLIENT - select OAuth 2.0 profiles dialog Back in General Settings, use
uaa.url(from step 1.6), without the leadinghttps://and with an additional trailing/oauth/tokenas Token Endpoint. Example: if youruaa.urlis “https://example.com”, your Token Endpoint is “example.com/oauth/token”: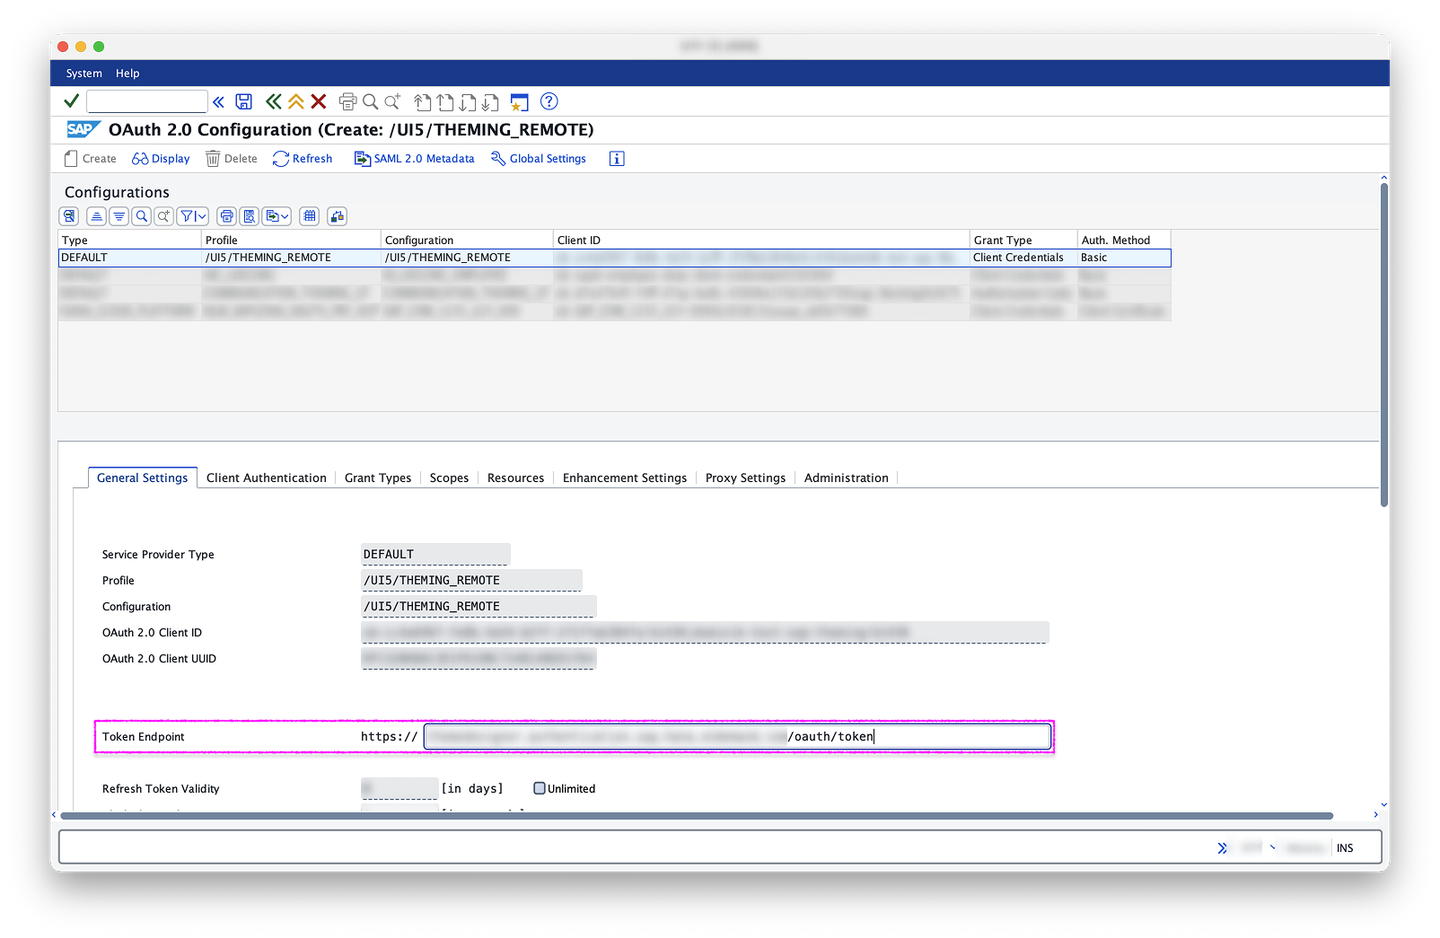
2.4: SOAUTH2_CLIENT with Token Endpoint Select the tab Client Authentication, under Authentication Methods choose Form Fields and select Edit (the pen button next to Client Secret):
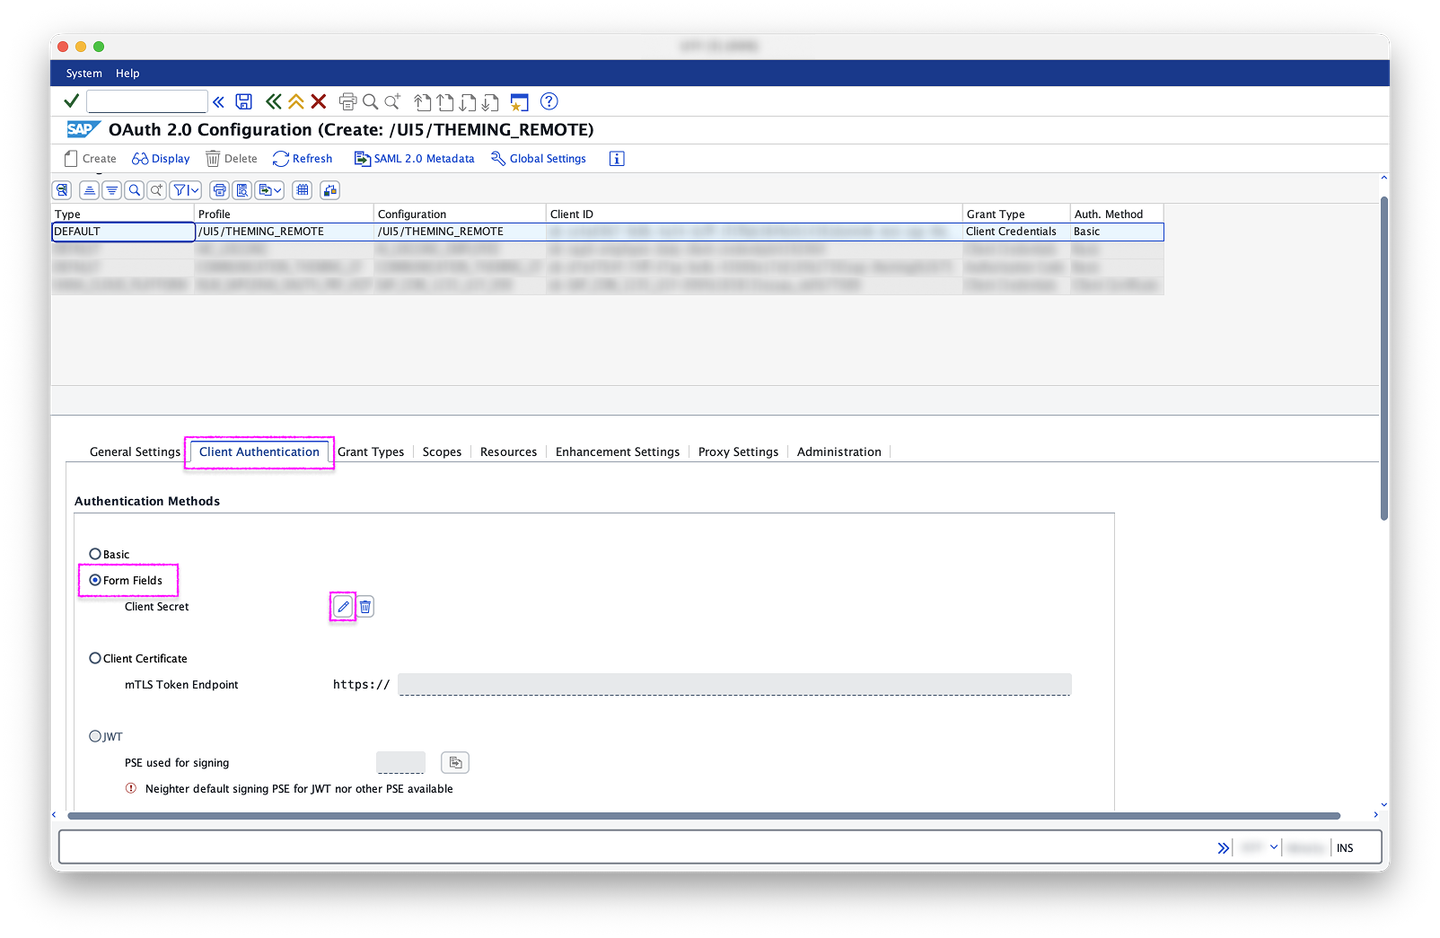
2.5: SOAUTH2_CLIENT - Client Authentication tab, Authentication Methods section In the Client Secret dialog, use
uaa.clientsecret(from step 1.6) as New Client Secret and confirm with OK (the checkmark button in the dialog footer toolbar):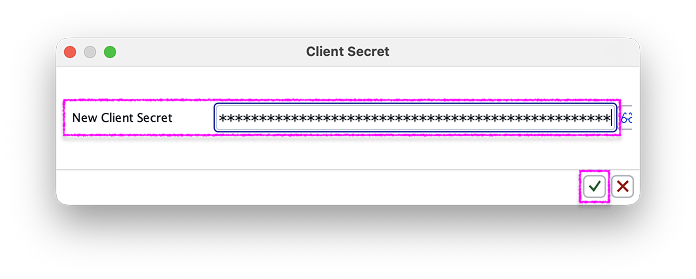
2.6: SOAUTH2_CLIENT - new client secret dialog Back in Client Authentication, under PSE for Https/TLS Communication, set “DFAULT” as SSL Client PSE:
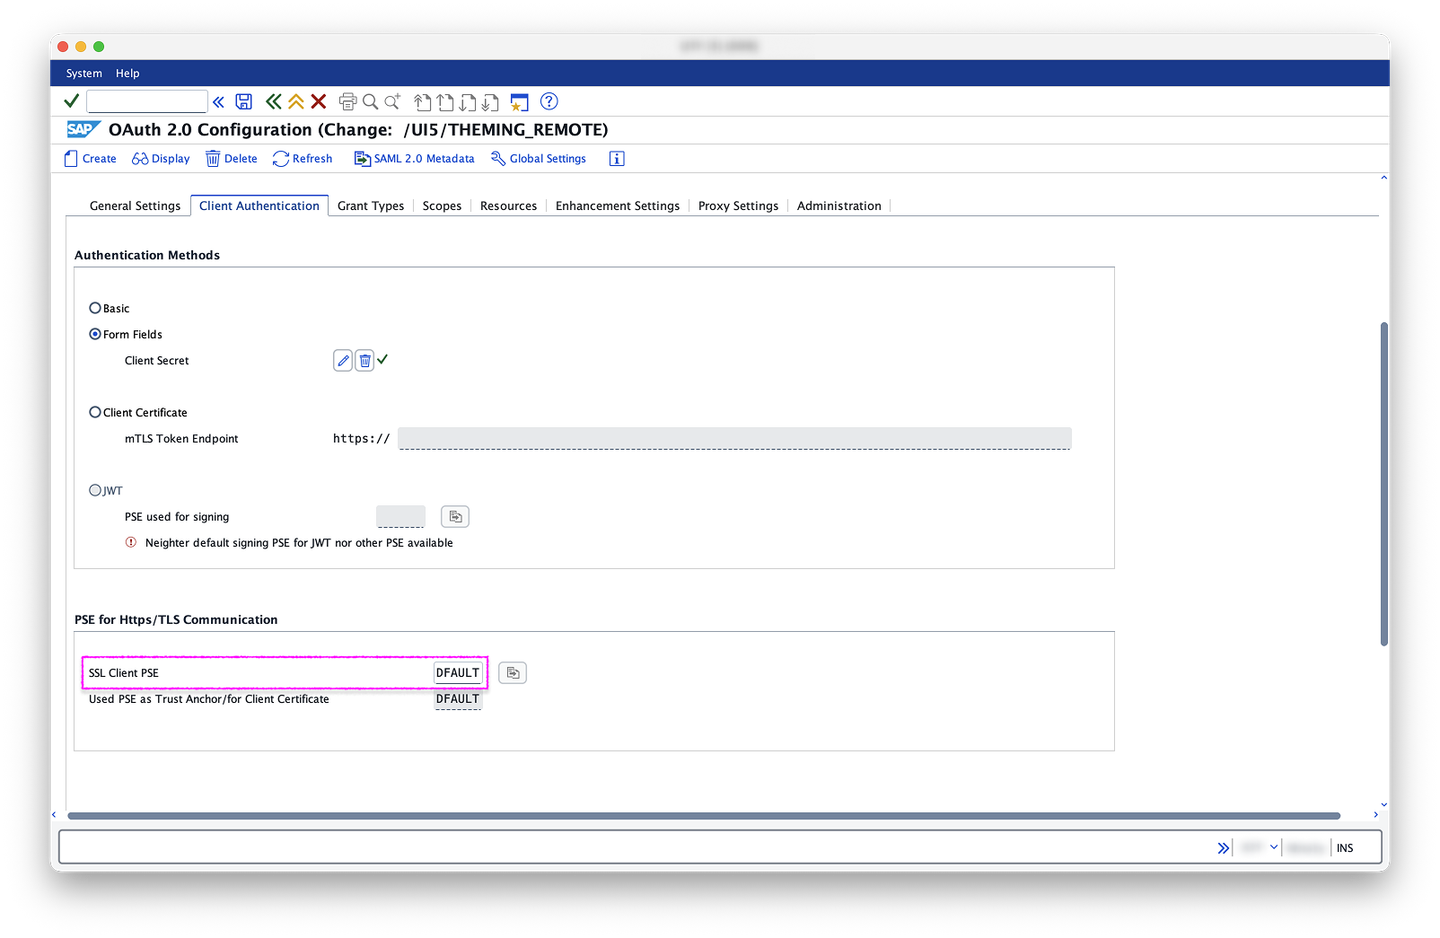
2.7: SOAUTH2_CLIENT Client Authentication tab, PSE for Https/TLS Communication section Select the tab Grant Types, choose Client Credentials, confirm everything with Save (the disk button next to the OKCode field), and switch back to Display mode:
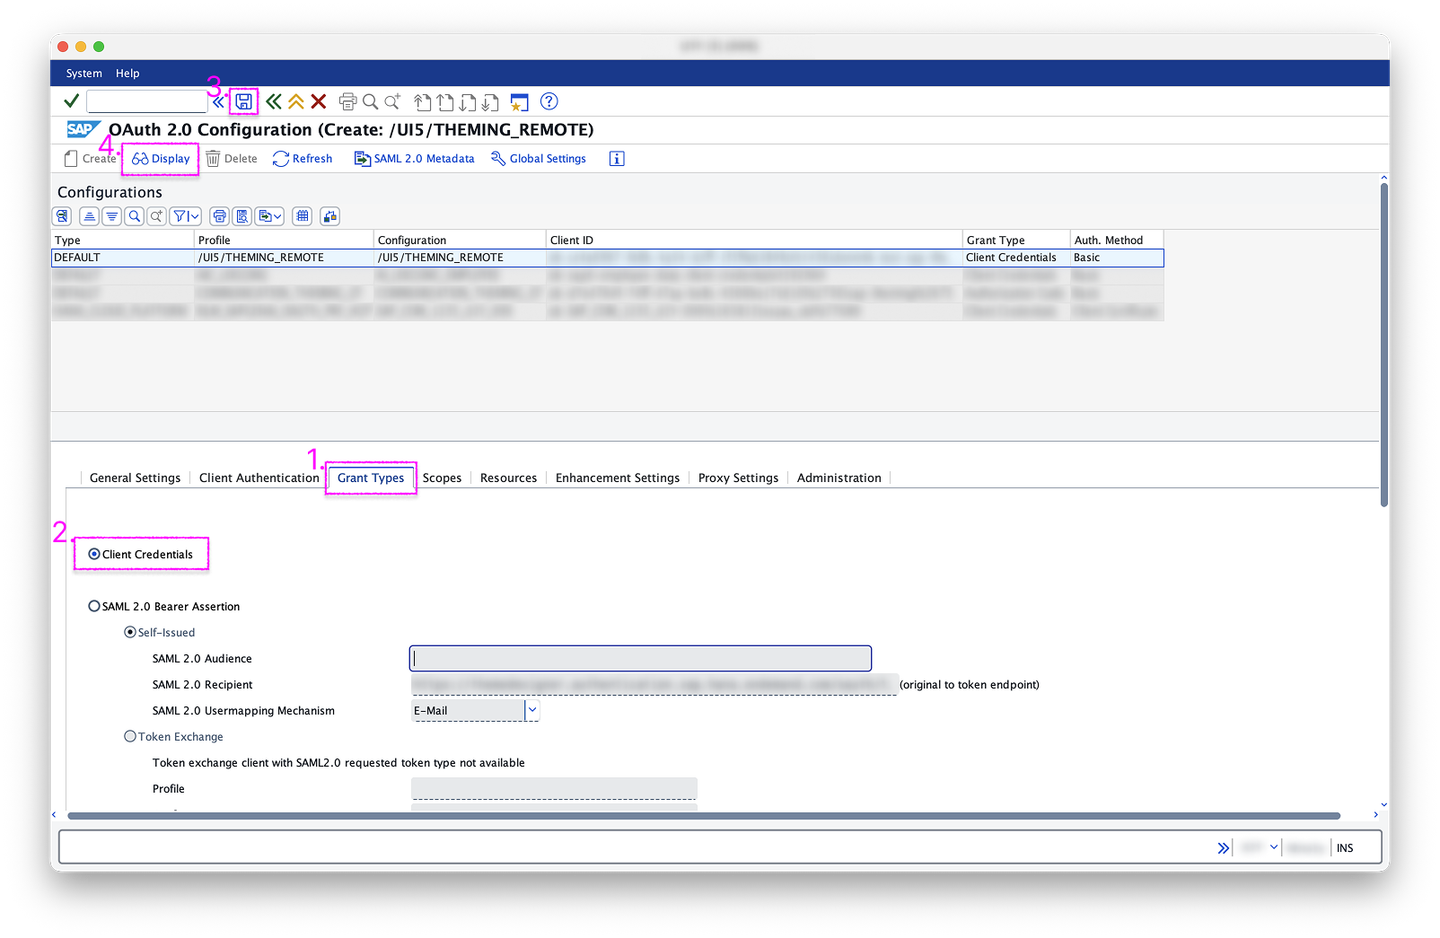
2.8: SOAUTH2_CLIENT Grant Types tab In Display mode, in the header toolbar, select Token:
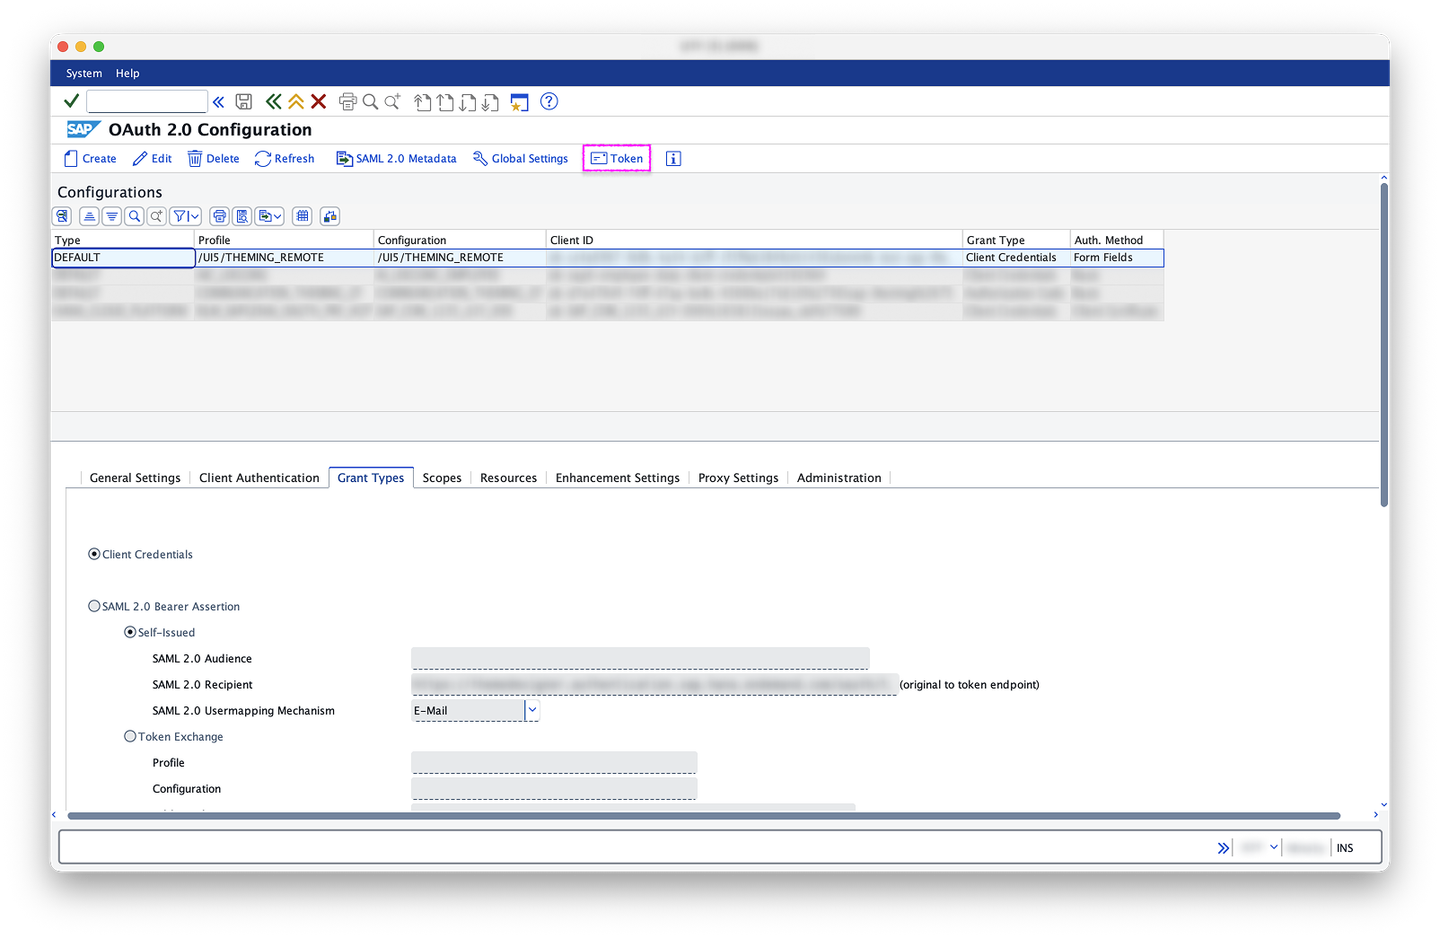
2.9: SOAUTH2_CLIENT in Display mode with Token button In the Token Status dialog, select Request Token in the footer toolbar:
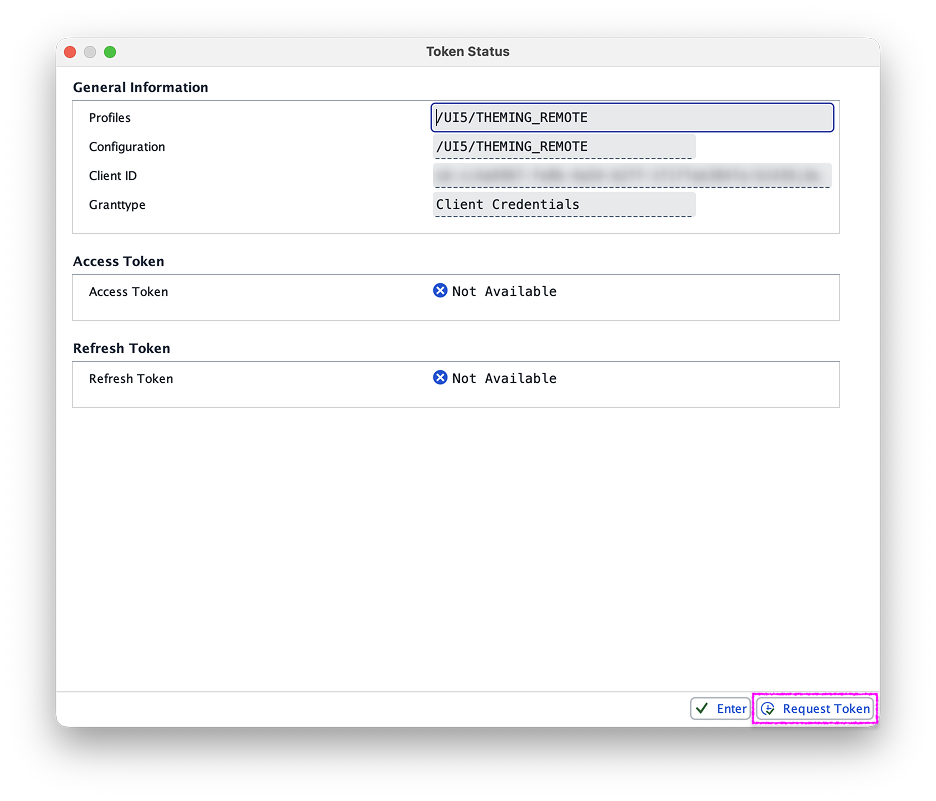
2.10: SOAUTH2_CLIENT - token status dialog If the Token Status dialog has a section Access Token with an entry Valid, expires in 29 minutes, you’ve successfully created an OAuth2 client with the CF theming service client credentials. You can now close the
SOAUTH2_CLIENTtransaction: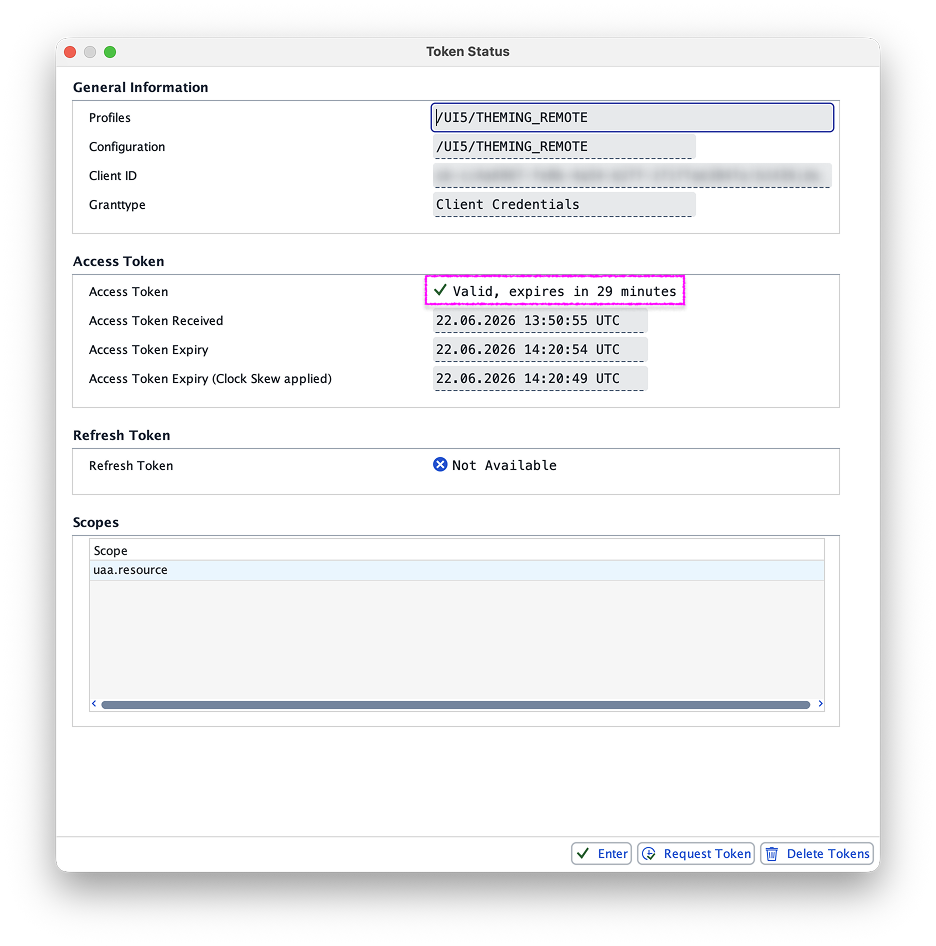
2.11: SOAUTH2_CLIENT - token status dialog with valid access token
You have successfully created a service key for your CF theming service and created an OAuth2 client in your ABAP system that uses the service key to authenticate. Now, you’ll create a destination in the ABAP system that uses the just created OAuth2 client.
In your ABAP system, start the transaction
SM59: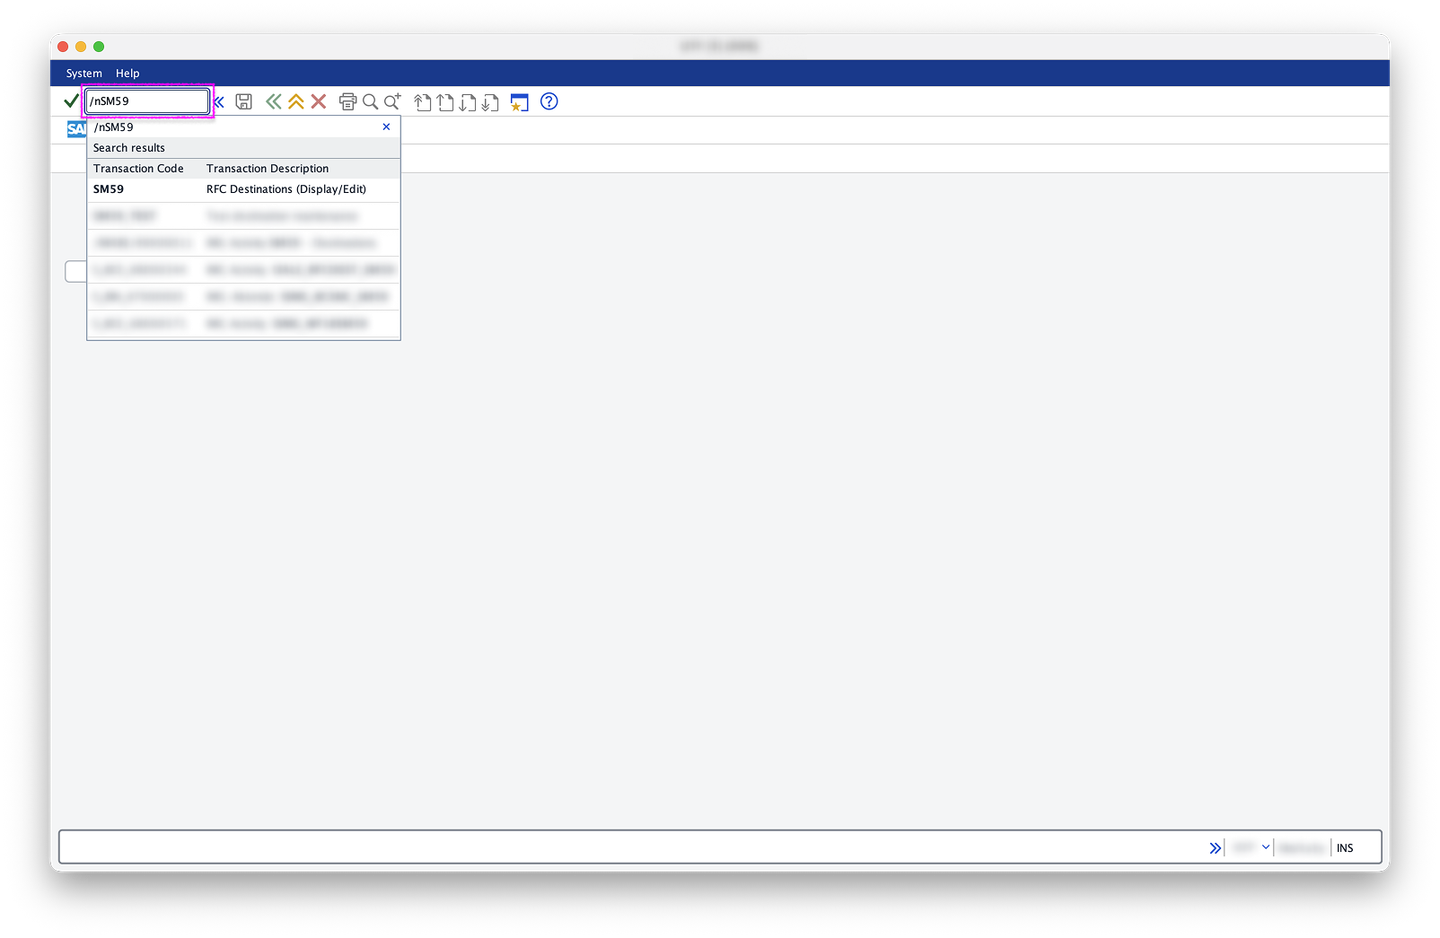
3.1: SAPGUI - easy access with SM59 In
SM59, select Create (the document button in the table header toolbar):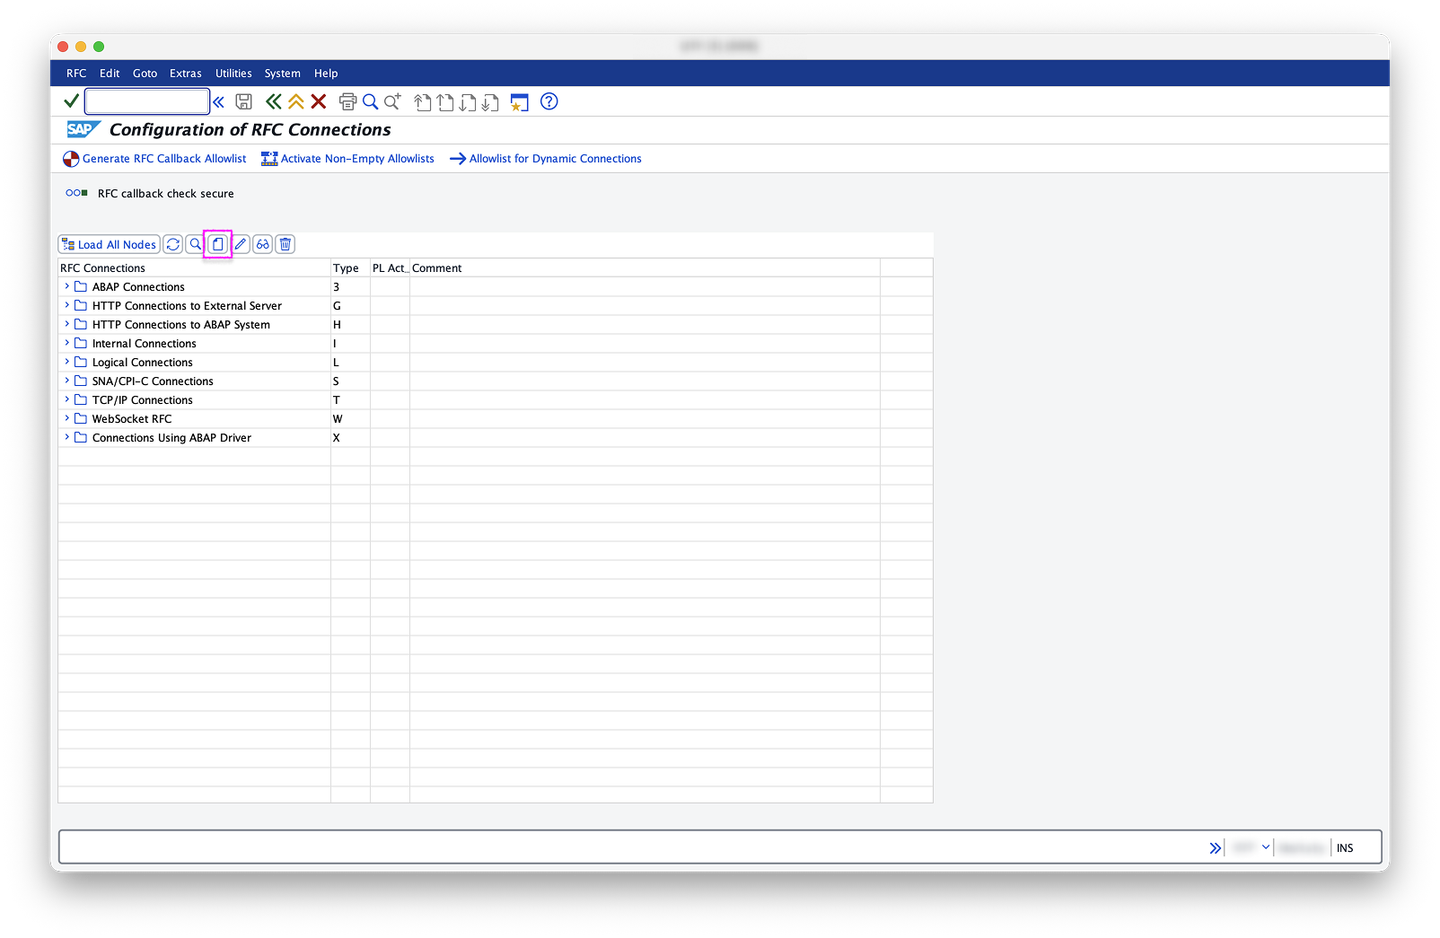
3.2: SM59 - initial view In the Create Destination dialog, pick a machine-friendly name as Destination, for example “abap-remote-theming” (you will need this name in step 4.4), select Connection Type “G HTTP connection to external server” and confirm with OK (the checkmark button in the dialog footer toolbar):
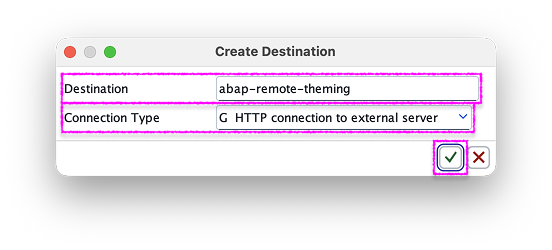
3.3: SM59 - create destination dialog Back in
SM59, select the tab Technical Settings. Under Target System Settings, use the hostname of theuriof your service key (from step 1.6), withouthttps://and any path, as Host and “/themeroot/v1” as Path Prefix. For example, if youruriis “https://example.com/any/path", your Host is “example.com”: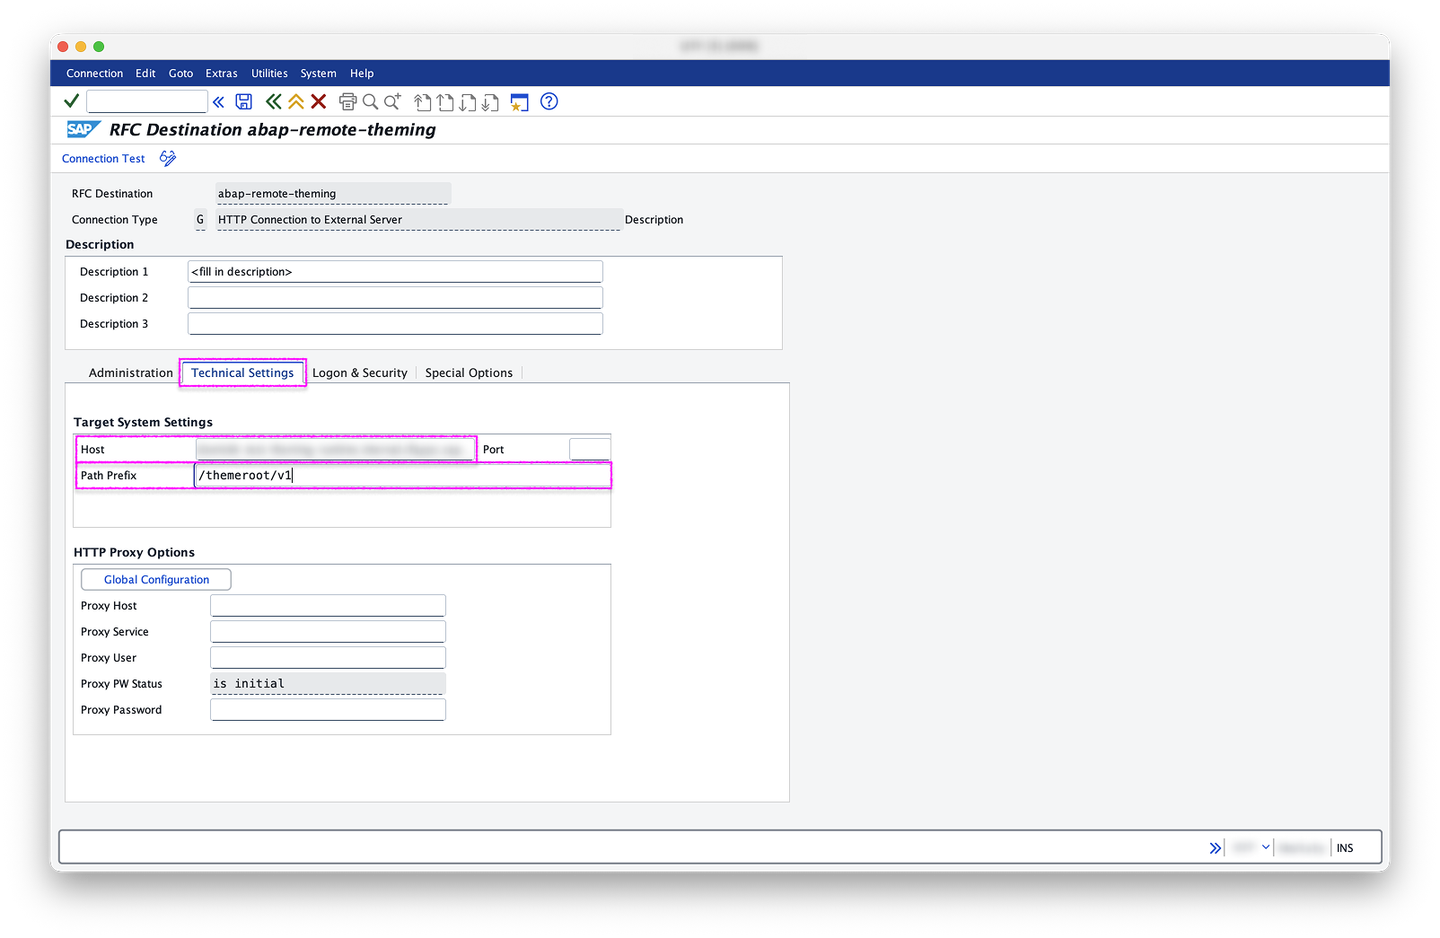
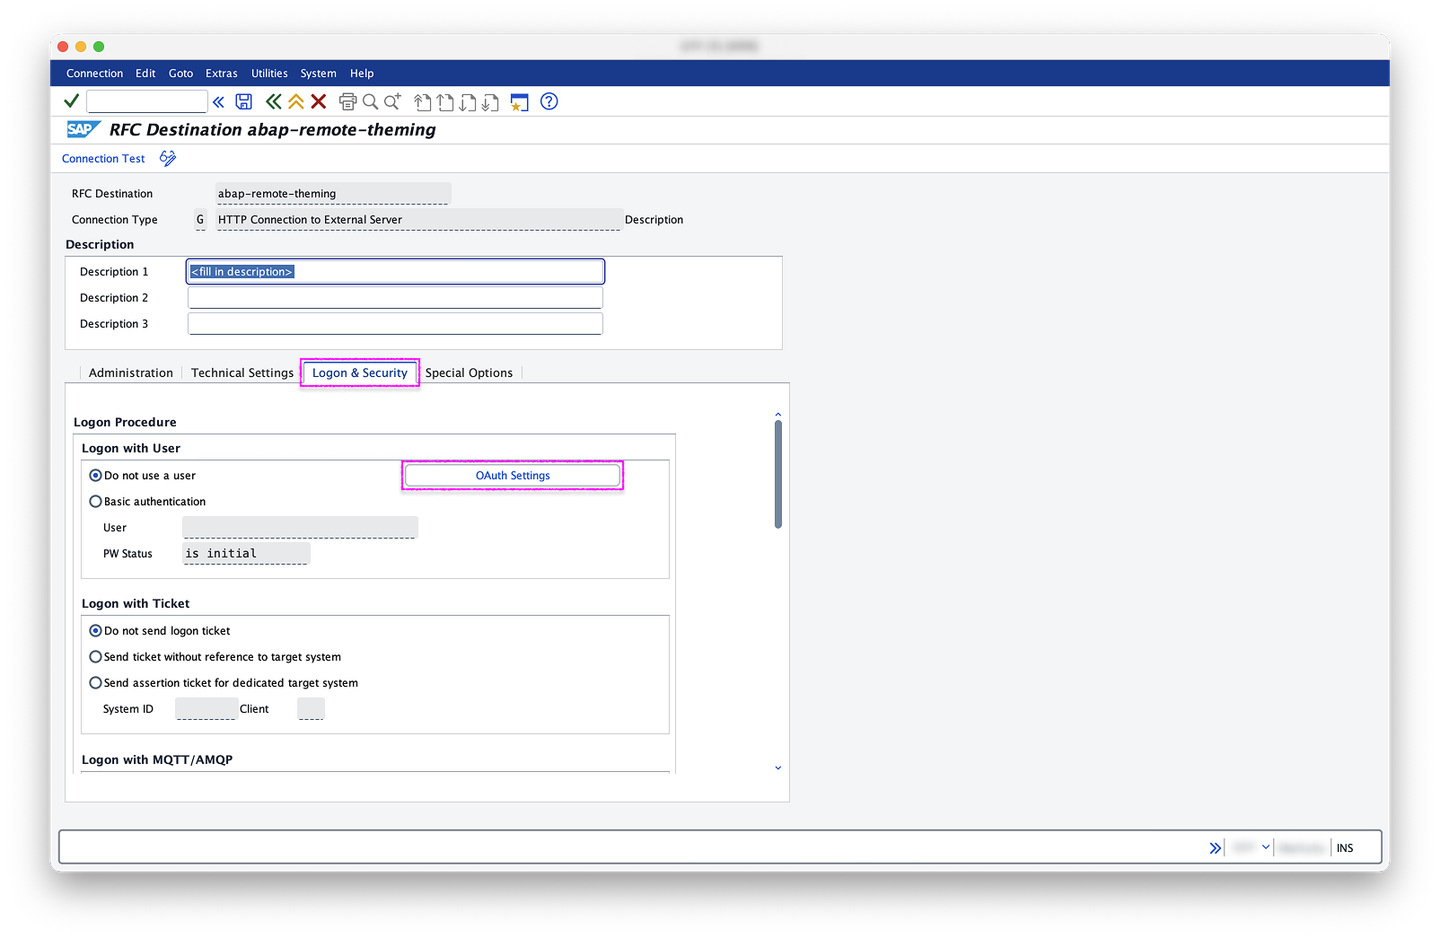
3.4: SM59 - technical settings Select the tab Logon & Security. Under Logon Procedure, section Logon with User, choose OAuth Settings:
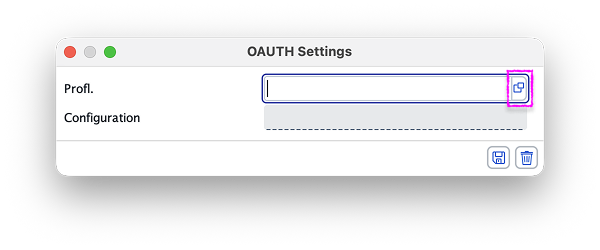
3.5: SM59 - logon & security In the OAUTH Settings dialog, select the Value Help of the Profl. input:
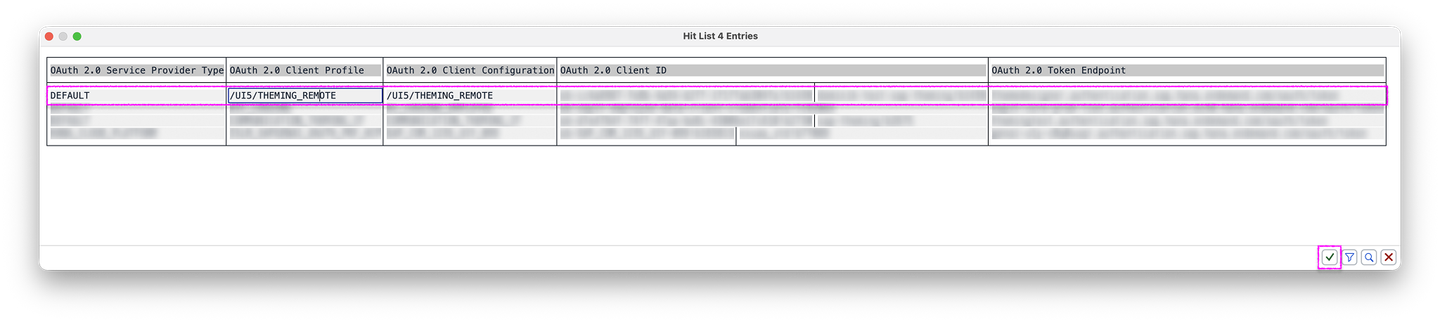
3.6: SM59 - oauth settings In the value help dialog, select the value where OAuth 2.0 Client Profile and OAuth 2.0 Client Configuration are “/UI5/THEMING_REMOTE”. Confirm with OK (the checkmark button in the dialog footer toolbar):
3.7: SM59 - profl value help Back in the OAUTH Settings dialog, confirm the changes with Save (the disk button in the dialog footer toolbar):
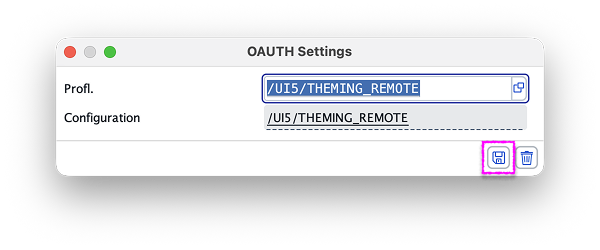
3.8: SM59 - oauth settings filled Back in Logon & Security, under Security Options, subsection Status of Secure Protocol, choose Active for SSL. Confirm the profile creation with Save (the disk button next to the OKCode field). You can now close the
SM59transaction: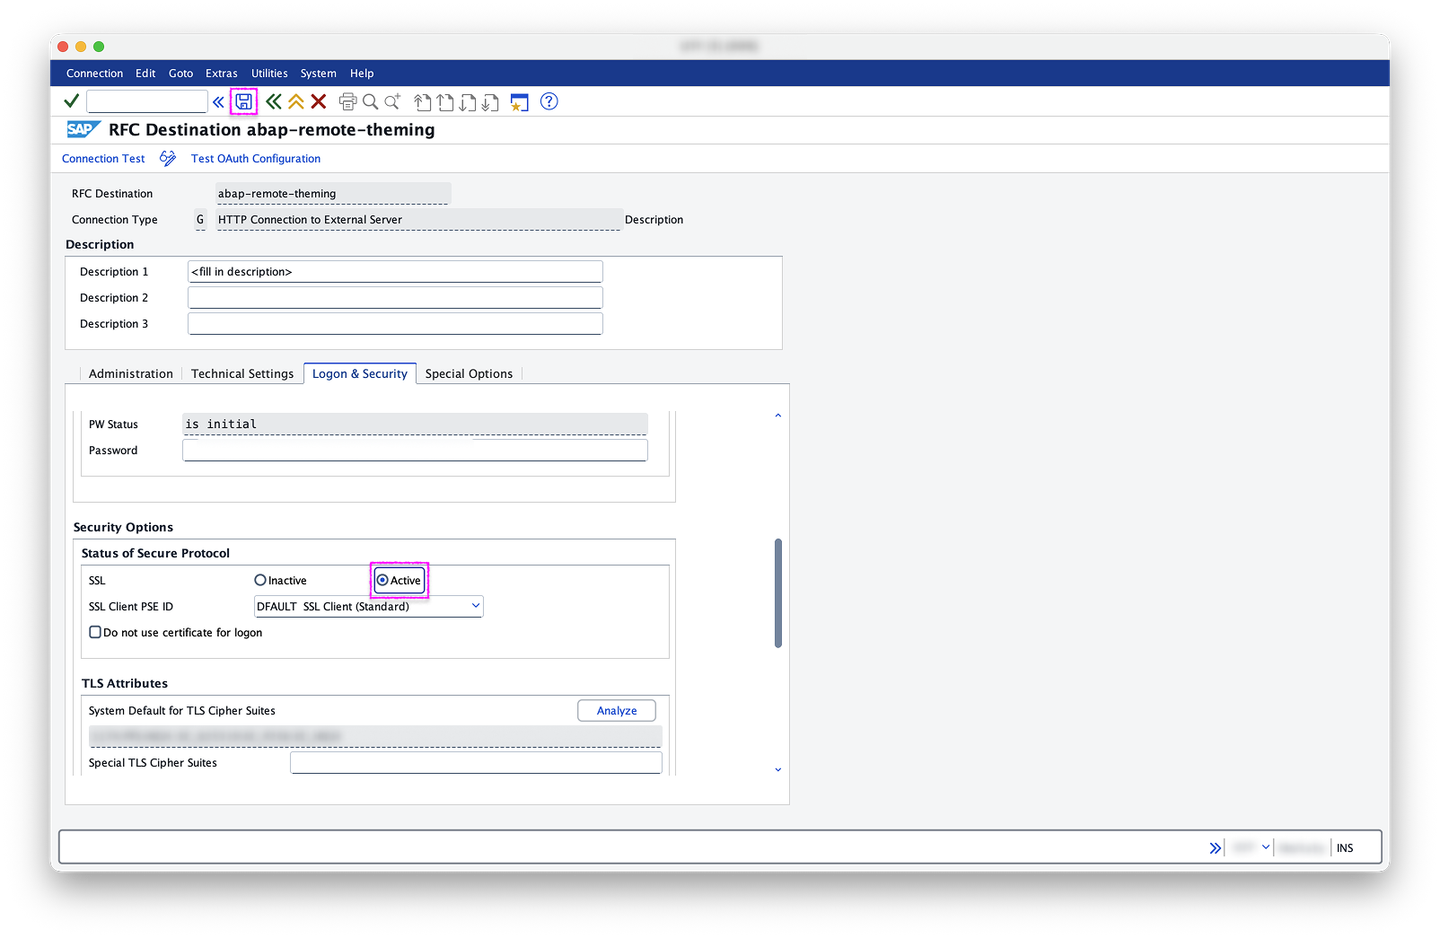
3.9: SM59 - SSL active
You already have a service key for your CF theming service, and in your ABAP system an OAuth2 client that uses the service key, and a destination that uses the OAuth2 client. The last setup step is to create a customizing in the SPRO transaction that tells UI theme designer in the ABAP system to use the remote theming scenario.
In your ABAP system, start the transaction
SPRO: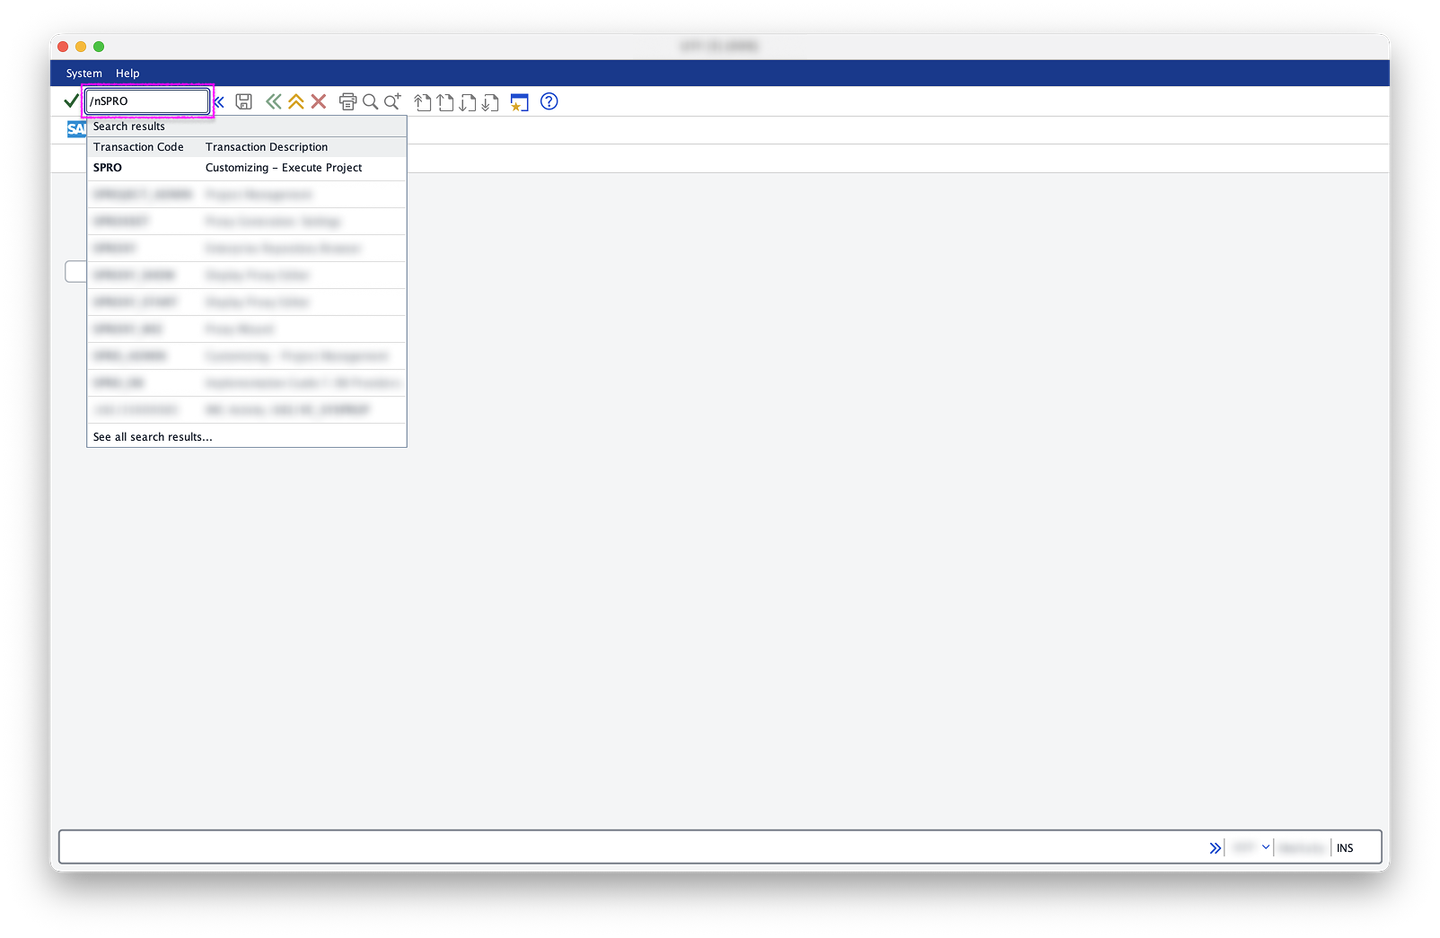
4.1: SAPGUI - easy access with SPRO In
SPRO, select SAP Reference IMG from the header toolbar: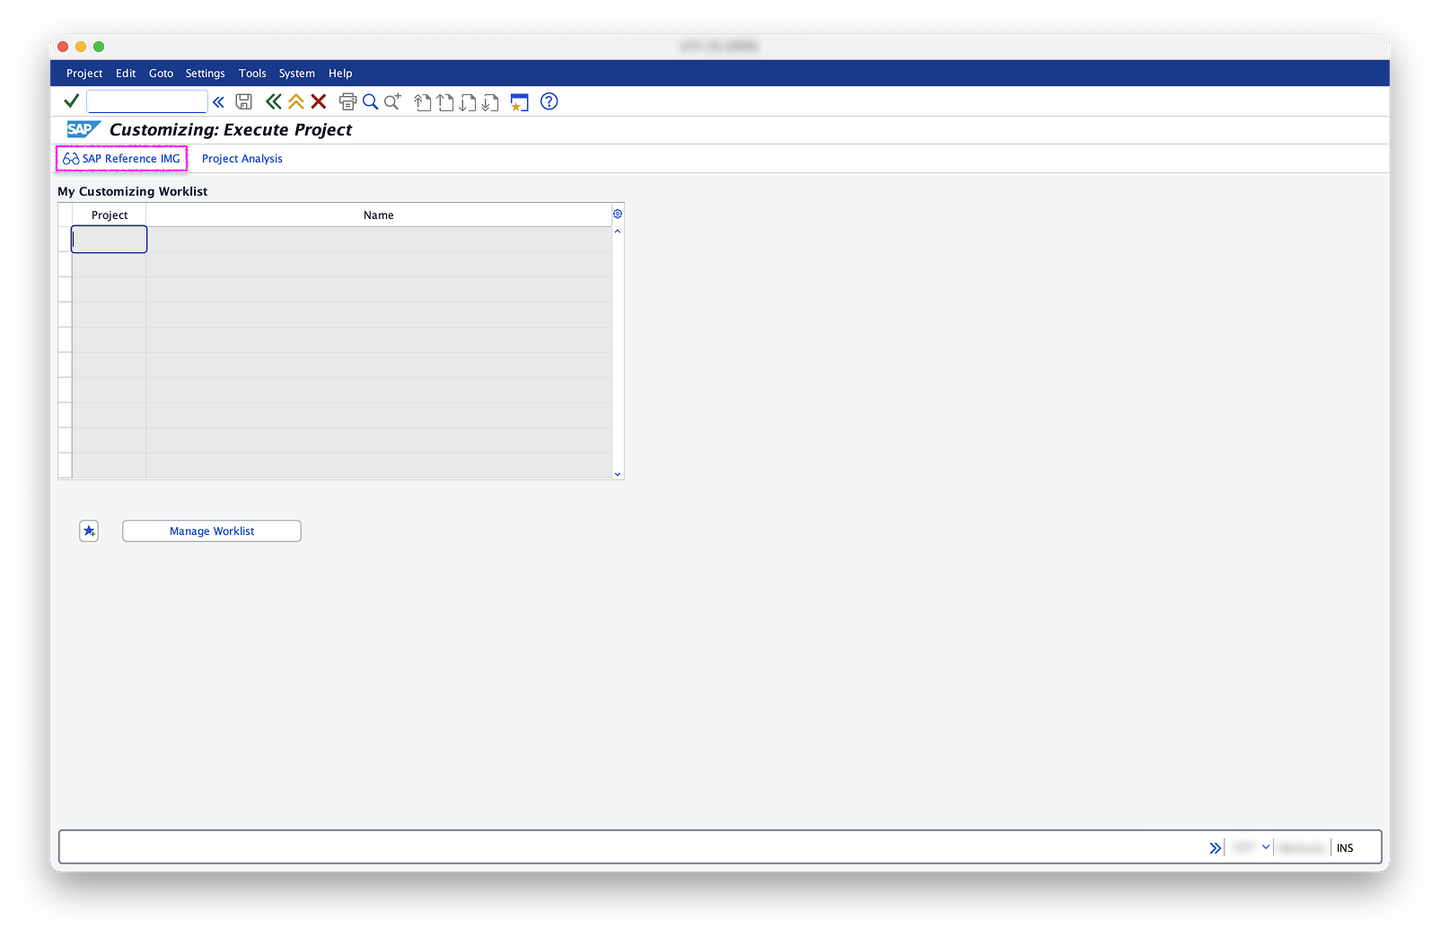
4.2: SPRO - initial view Under SAP Customizing Implementation Guide expand the following hierarchy: ABAP Platform, UI Technologies, UI Theme Designer. Choose Activate (the clock/checkmark button) for Select the Theming Scenario:
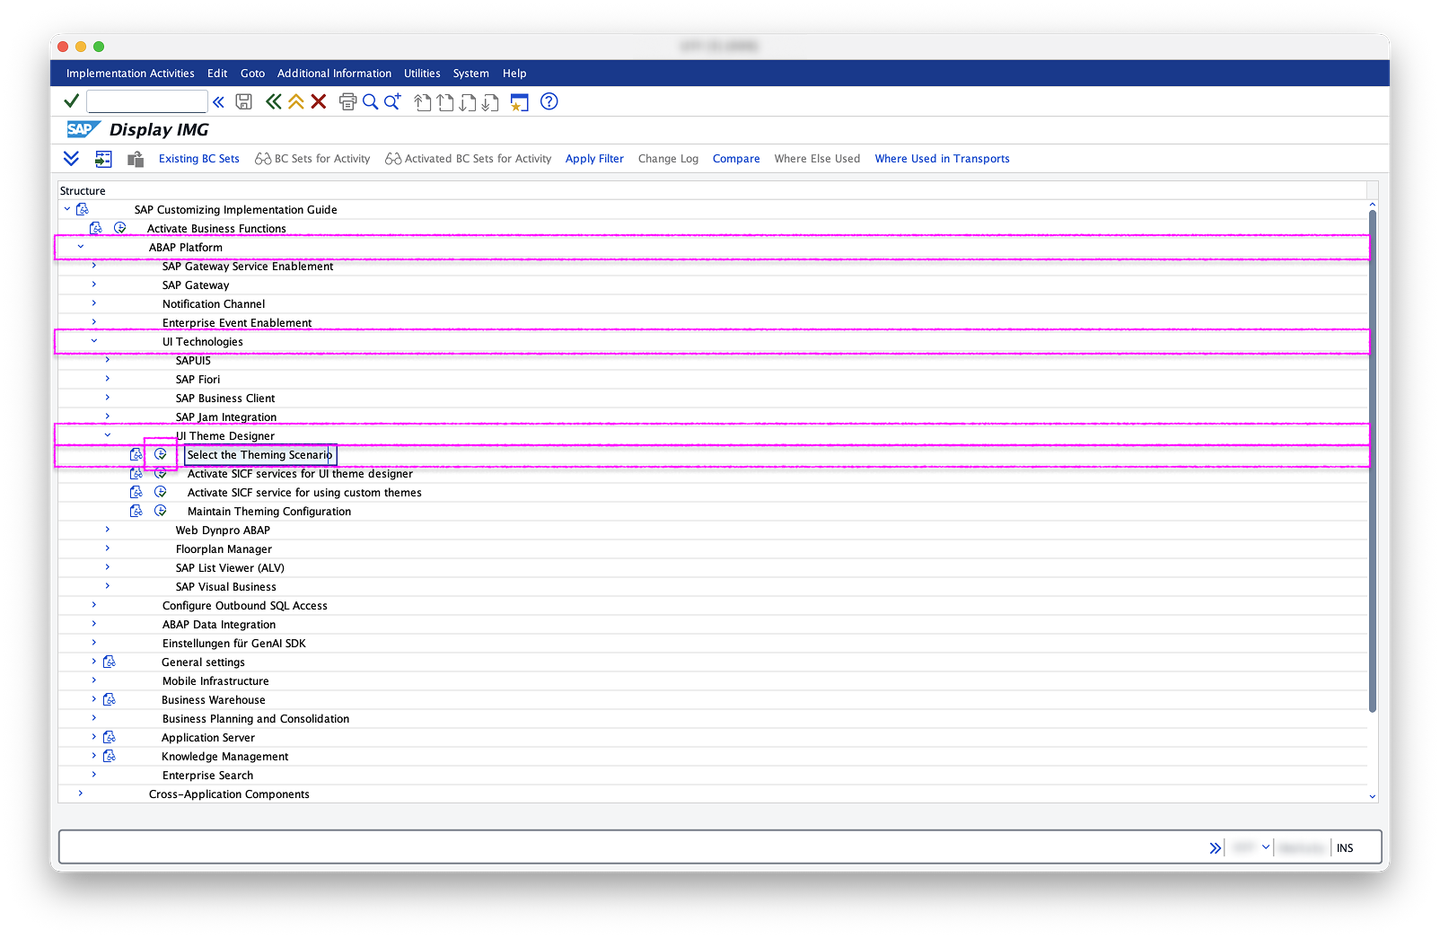
4.3: SPRO - sap reference img In the
/UI5/THEM_CUSTOMIZEcustomization, under Select the theming scenario, select Remote theming scenario. Use the name of the destination you created (in step 2.3) as RFC Destination (Type G). Confirm with Save. You can now close theSPROtransaction: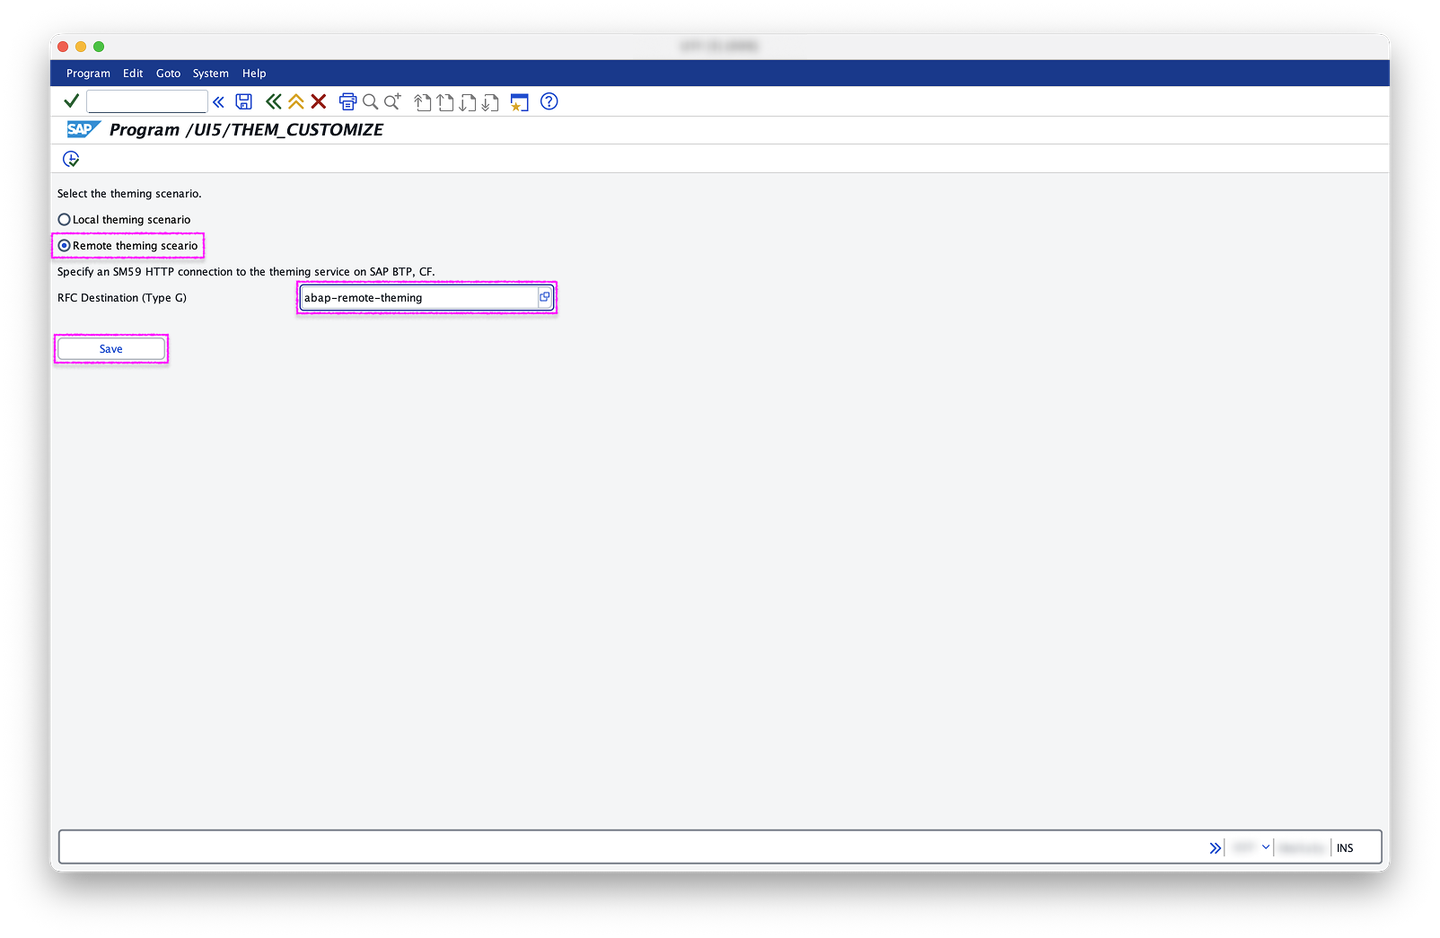
4.4: SPRO - /UI5/THEM_CUSTOMIZE
Congratulations, you have gone through all configuration steps: you have a service key for your CF theming service, and in your ABAP system an OAuth2 client that uses the service key, a destination that uses the OAuth2 client, and a customization that tells UI theme designer to use the remote theming scenario. Now you can verify that this setup works as intended.
In your ABAP system, start the transaction
/UI5/THEME_DESIGNER: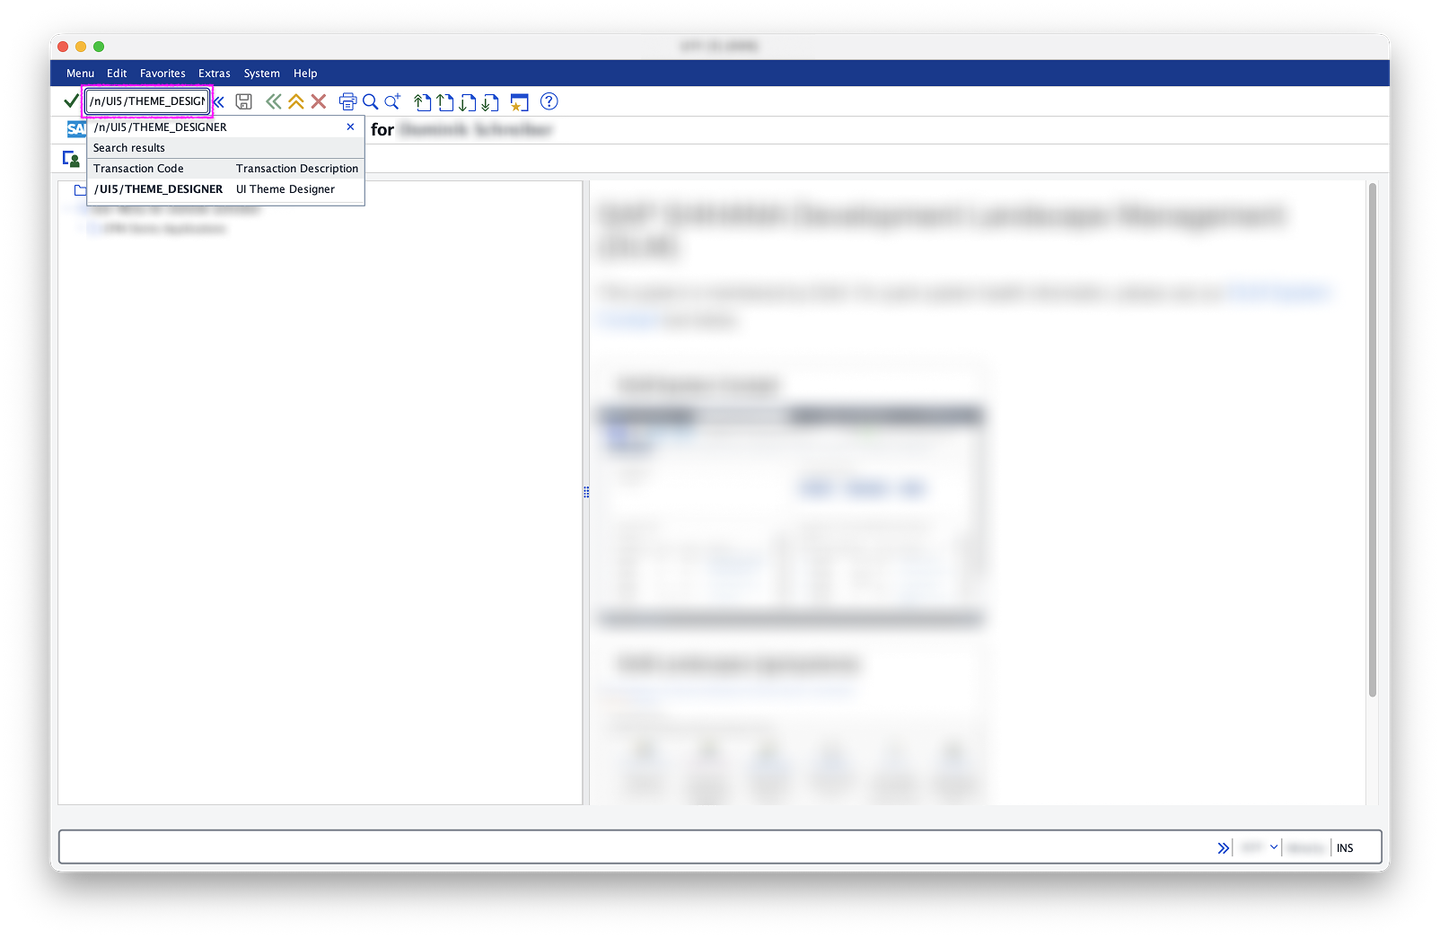
5.1: SAPGUI - easy access with /UI5/THEME_DESIGNER Instead of opening the theme designer web app in the browser, the transaction shows an error: The system is connected to a remote theming infrastructure. You can now close the
/UI5/THEME_DESIGNERtransaction: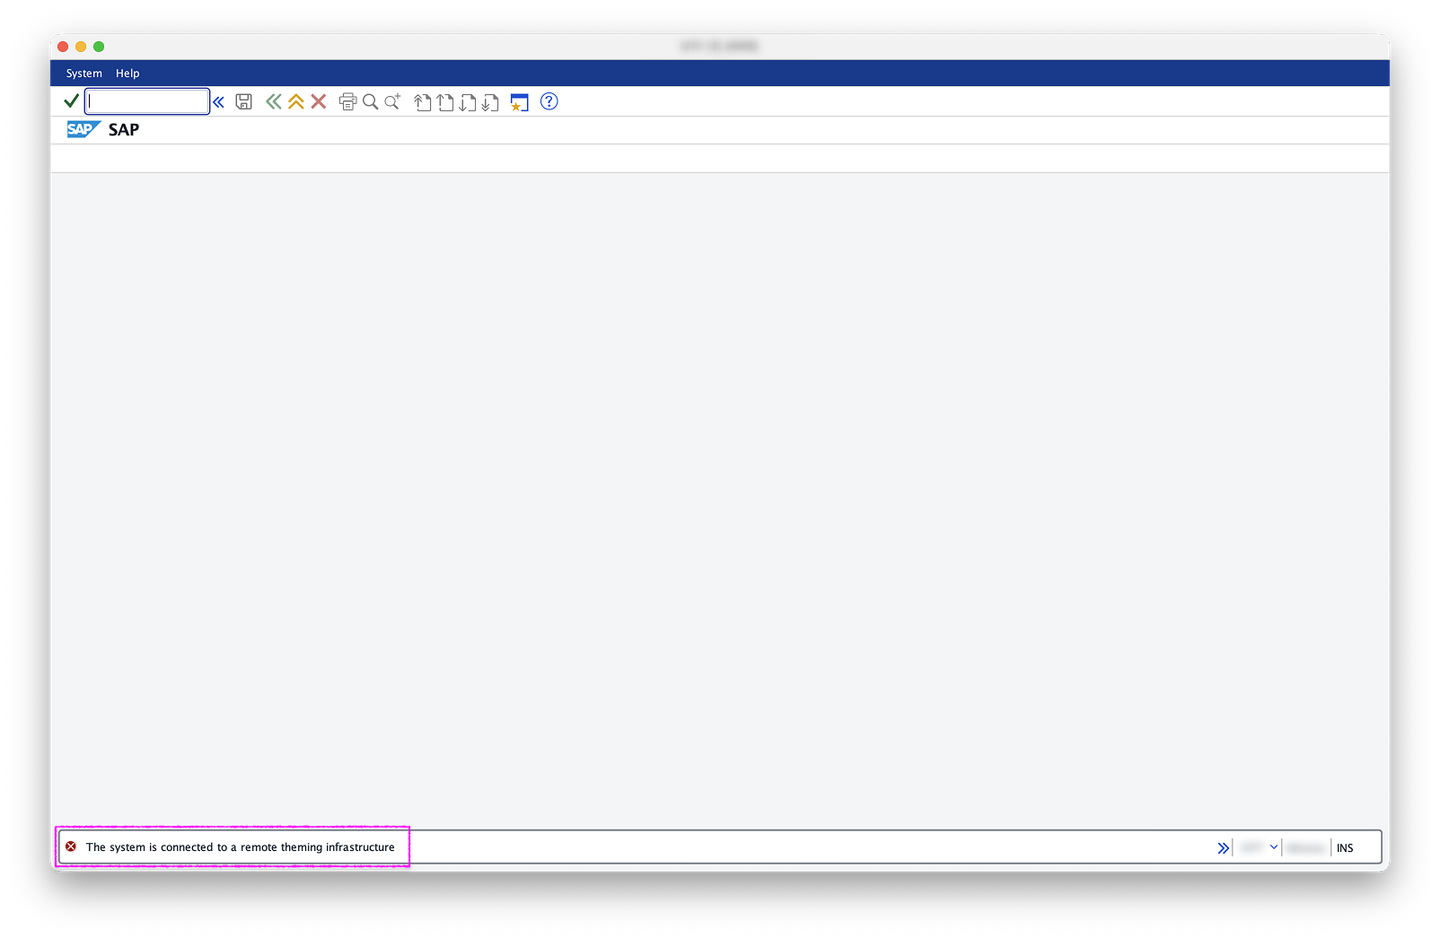
5.2: THEME_DESIGNER - error Make sure you have a published theme in your CF theming service instance. Follow the Create a Theme with the UI Theme Designer tutorial or UI Theme Designer: Create and Edit Themes and Theme Sets to create one:
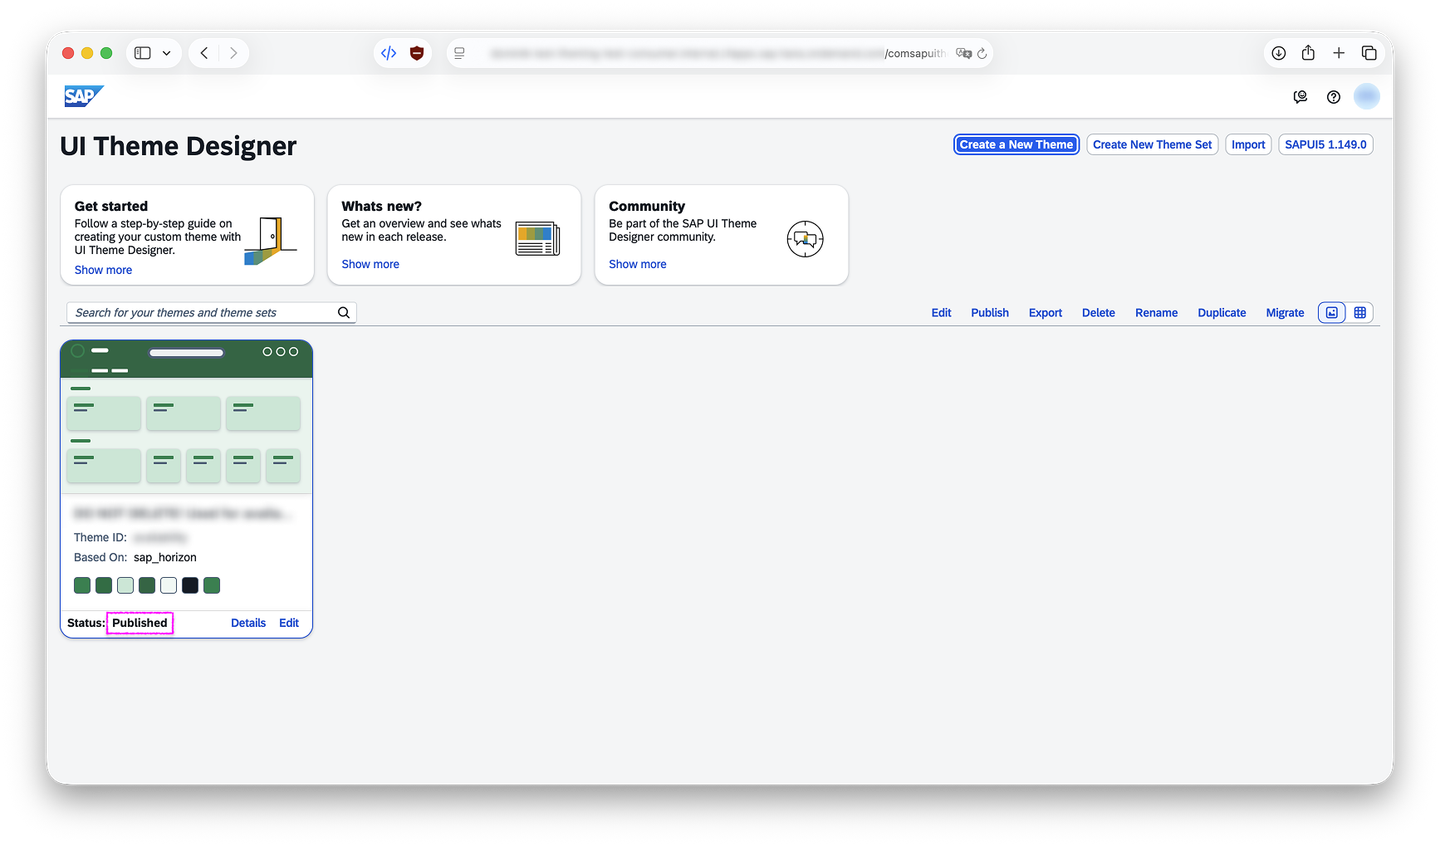
5.3: theming-ui - published theme In your ABAP system, start the transaction
/UI2/FLP: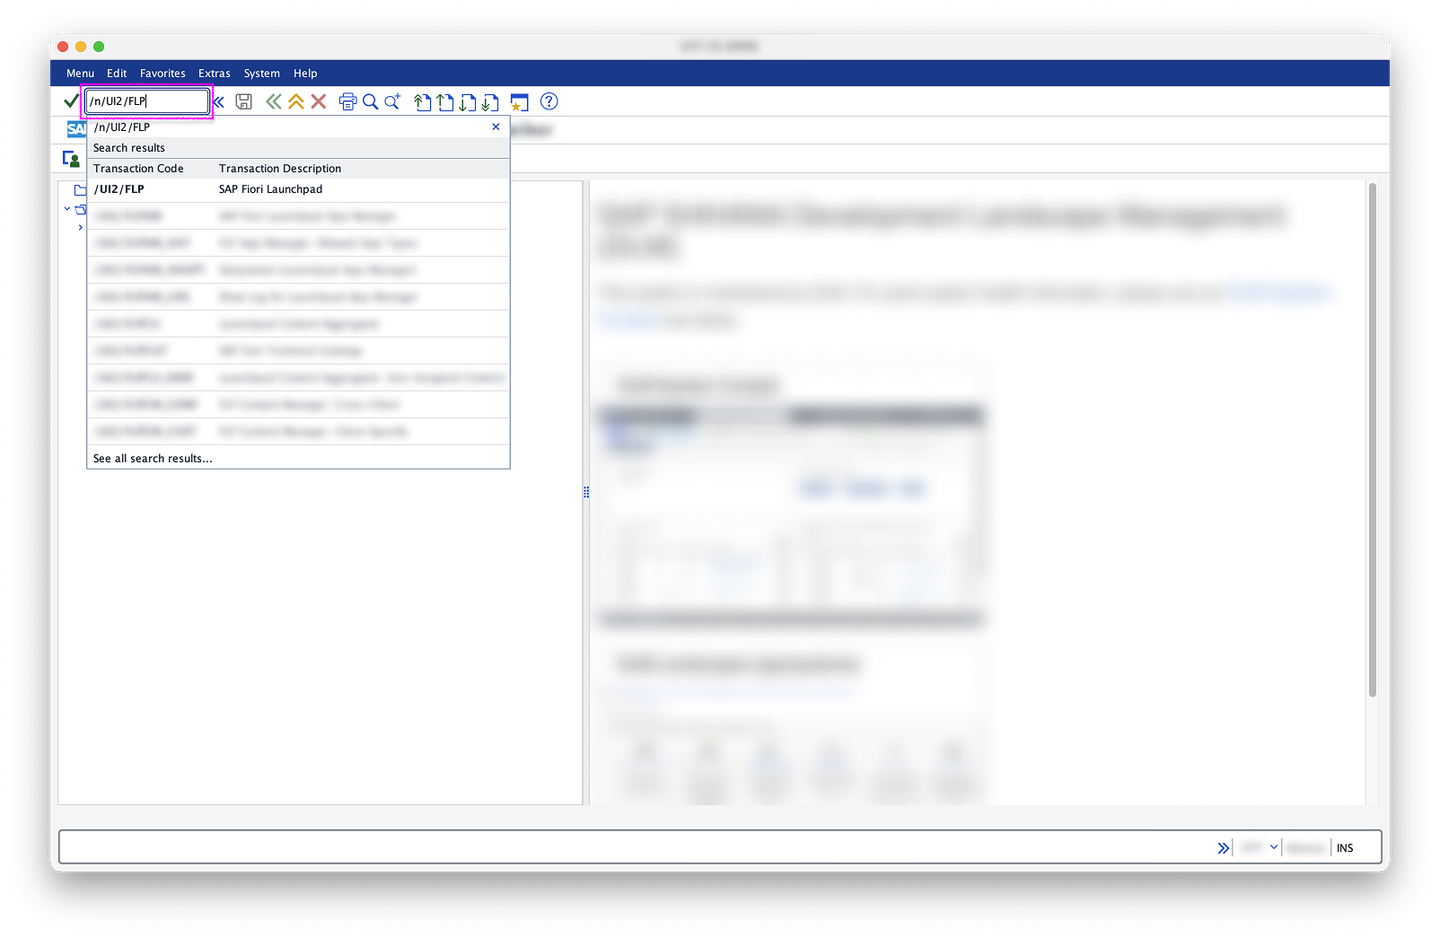
5.4: SAPGUI - easy access with /UI2/FLP In the FLP, select your Avatar (the circle in the top-right corner) to open the User Menu:
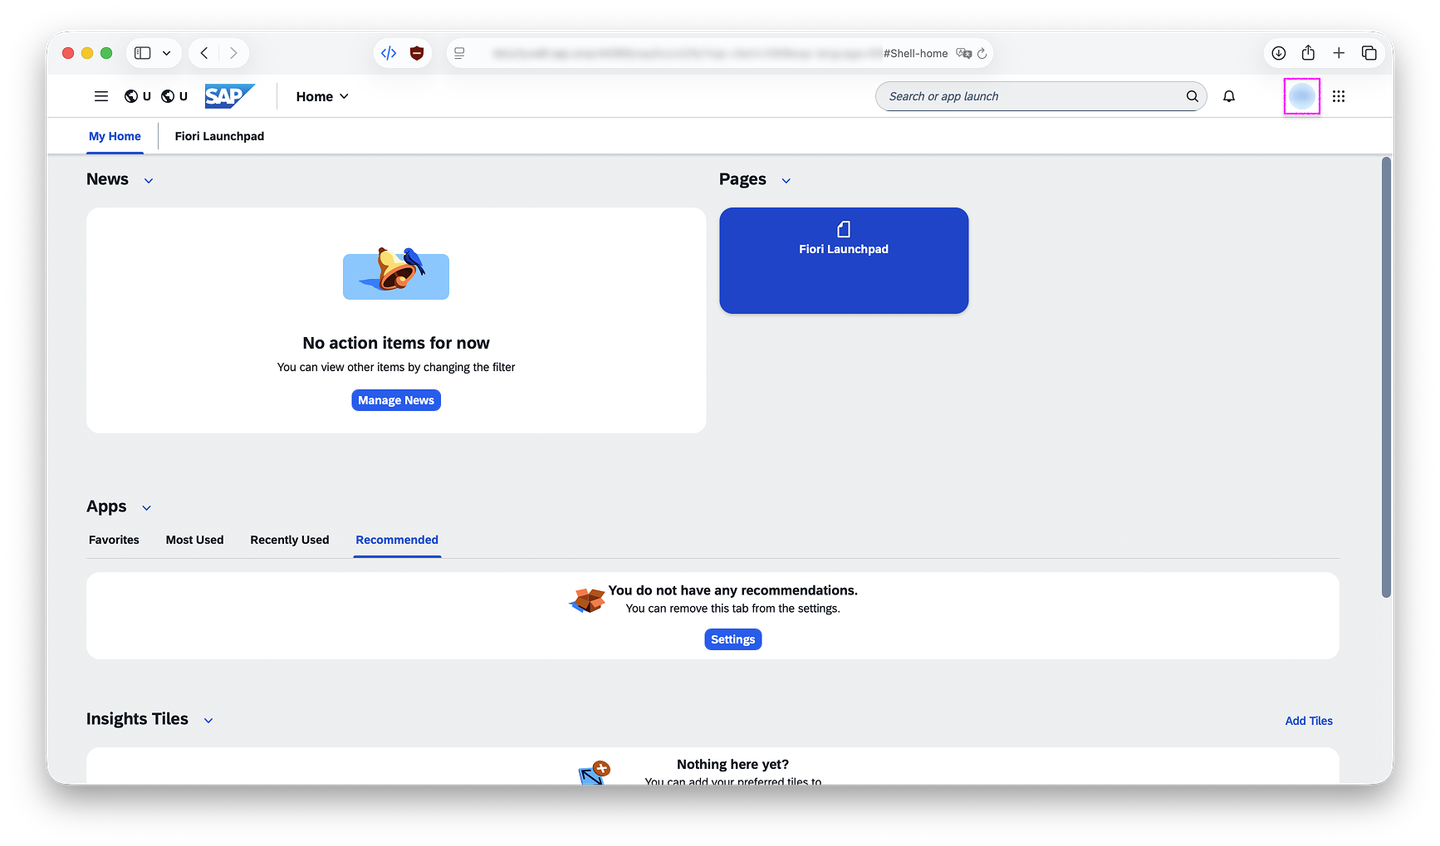
5.5: FLP - initial view From the User Menu, select Settings:
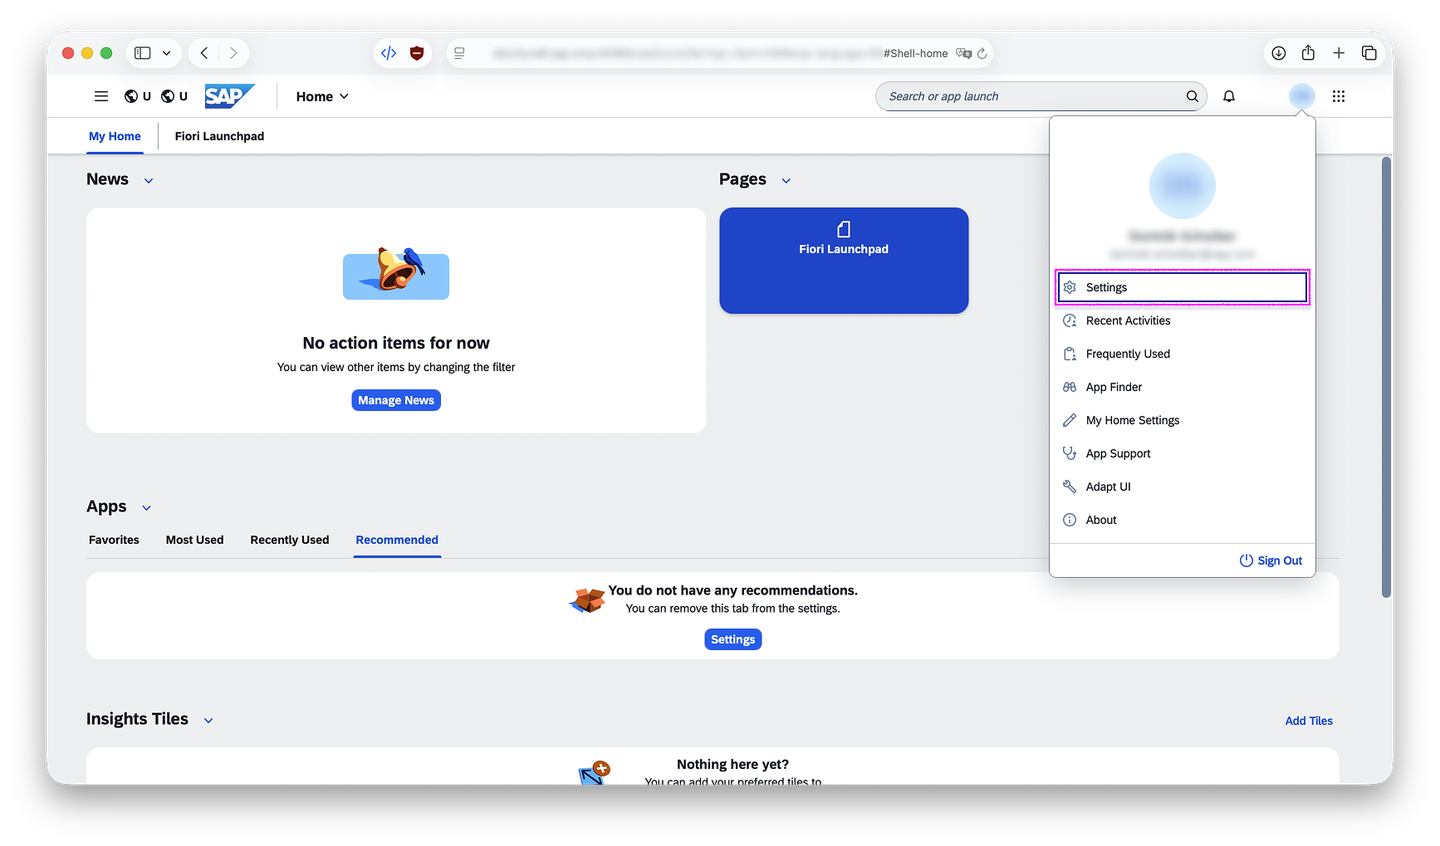
5.6: FLP - user menu From the Settings dialog, select Appearance:
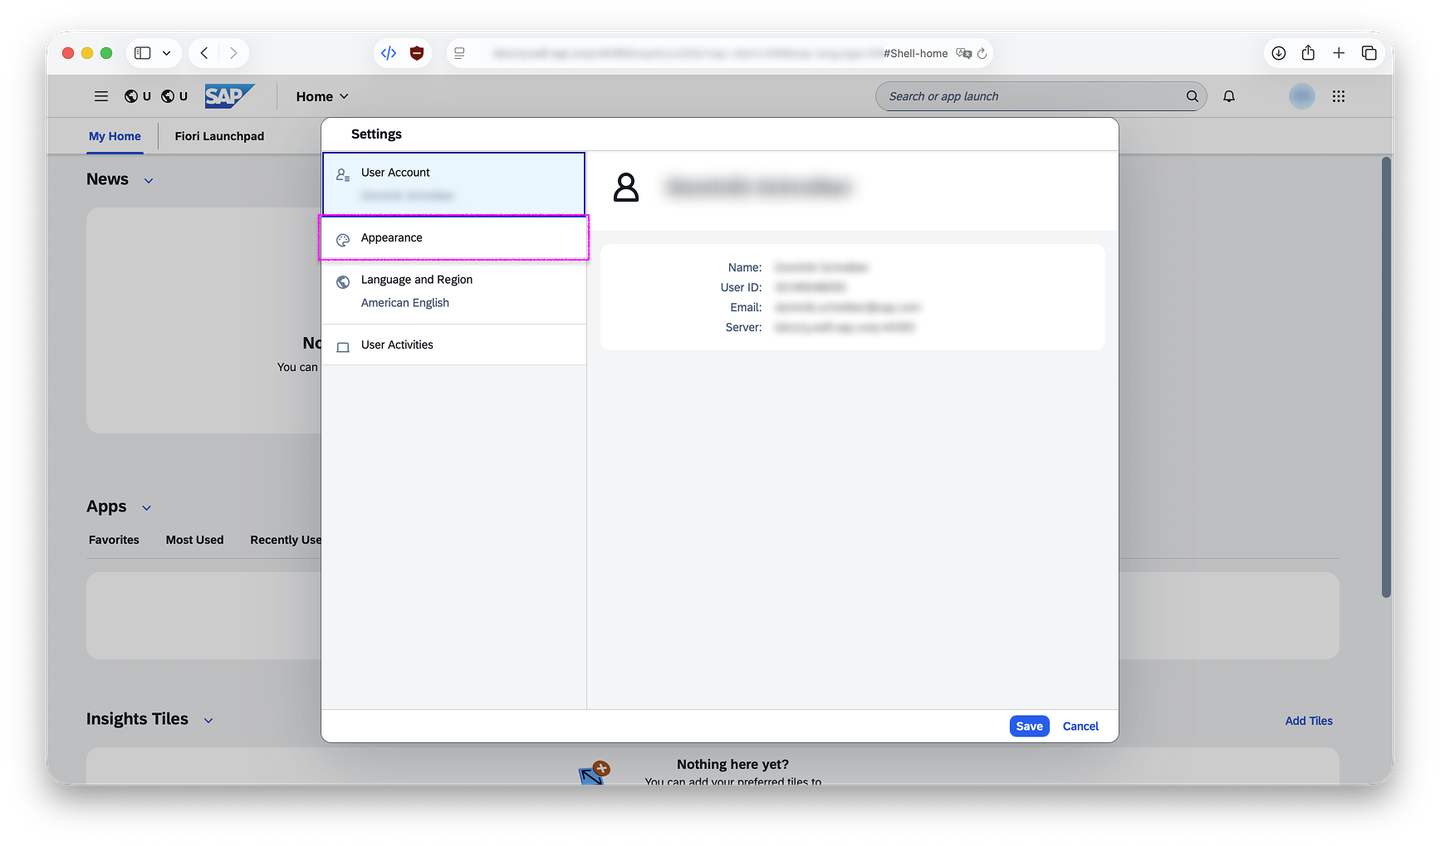
5.7: FLP - settings dialog In addition to the SAP-provided themes, the list of available themes should contain exactly the published themes from your CF theming service. Select your published theme and confirm with Save.
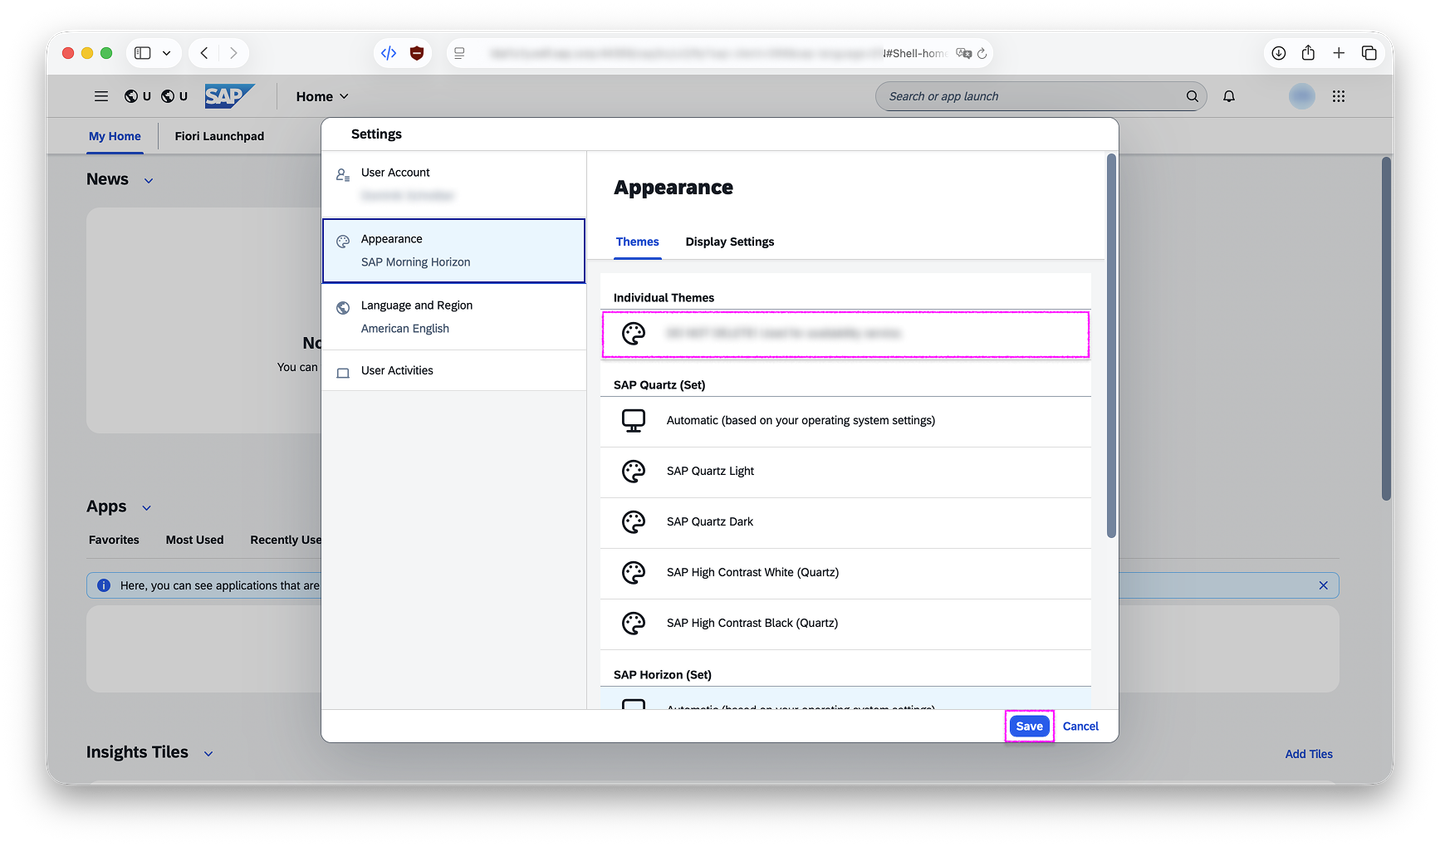
5.8: FLP - appearance dialog Reload the page. It should now appear in the theme you published in your CF theming service instance:
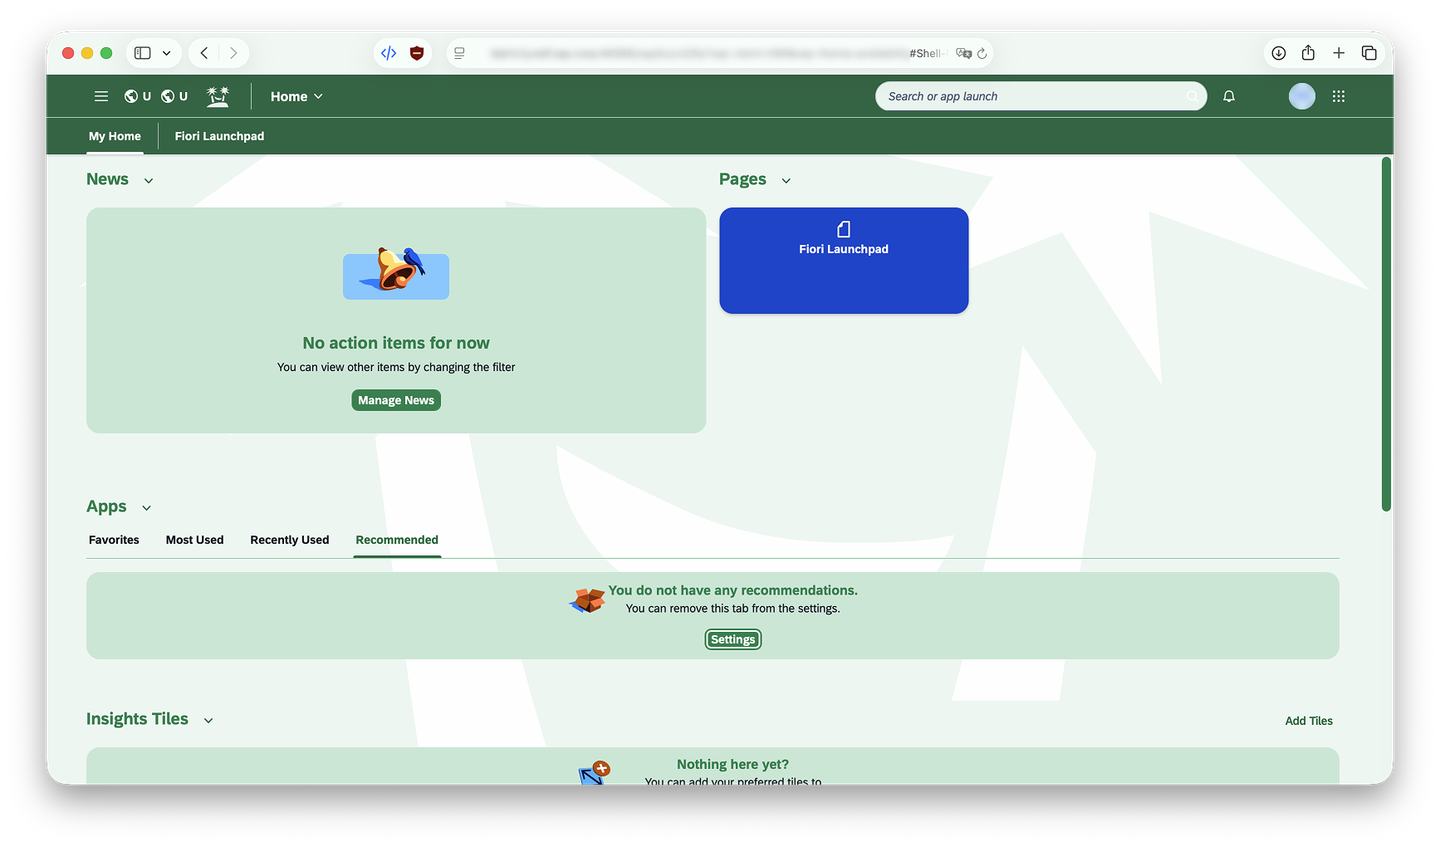
5.9: FLP - with custom theme
Resources
Discussion
Share feedback on this tutorial or join the conversation in SAP Community.