
Overview
You will learn
- How to create a skeleton React project
- How to create a skeleton UI5 project
- How to add Luigi and other dependencies to your project


Prerequisites
- It’s recommended to try the simpler examples on GitHub or the Getting Started page before this tutorial.
- You need to install Node.js. If you already have an old version installed on your machine, please run
npm install npm@latest -g. - You need to install SAP Fonts.
Steps
In this step, you will create a React skeleton project which will be used to create your Luigi app.
Open a Terminal or Command Prompt window and navigate to the space where you want to install the app. Then create a new folder:
Shellmkdir luigi-react-ui5 cd luigi-react-ui5Create a new folder to host the React core app:
Shellmkdir react-core-mf cd react-core-mfDownload the React example package JSON file containing minimal dependencies required for a React app. Next, install styling libraries to handle CSS files, as well as Fundamentals and React web components packages.
curl https://raw.githubusercontent.com/SAP/luigi/main/core/examples/luigi-example-react/package.json > package.json
npm install fundamental-styles @ui5/webcomponents-react --save
npm install style-loader css-loader --save-dev 4. The React application will be bundled using Webpack. Download the Luigi Webpack configuration from an existing Luigi example app using the line below:
curl https://raw.githubusercontent.com/SAP/luigi/main/core/examples/luigi-example-react/webpack.config.js > webpack.config.jsNext, create the project structure for the React app. Create the following folders:
Shellmkdir -p src/views mkdir -p src/assets mkdir -p public
Download the Luigi React app files:
Shellcurl https://raw.githubusercontent.com/SAP/luigi/main/core/examples/luigi-example-react/public/luigi-config.js > public/luigi-config.js curl https://raw.githubusercontent.com/SAP/luigi/main/core/examples/luigi-example-react/src/views/home.js > src/views/home.js curl https://raw.githubusercontent.com/SAP/luigi/main/core/examples/luigi-example-react/src/views/sample1.js > src/views/sample1.js curl https://raw.githubusercontent.com/SAP/luigi/main/core/examples/luigi-example-react/src/views/sample1.js > src/views/sample2.js curl https://raw.githubusercontent.com/SAP/luigi/main/core/examples/luigi-example-react/public/index.html > public/index.html curl https://github.com/luigi-project/luigi/blob/main/core/examples/luigi-example-react/public/sampleapp.html > public/sampleapp.htmlInstall and run the configuration:
npm i
npm run start 8. Move back into the root directory:
cd ..In this step, you will create a skeleton UI5 project for your UI5 micro-frontend.
If you didn’t already, navigate to the root folder of your project in the terminal.
Create a new folder:
Shellmkdir ui5-mf && cd ui5-mfInstall the UI5 project generator:
Shellnpm install -g yo generator-easy-ui5Enter this command in the Terminal/Command Prompt:
Shellyo easy-ui5Use the settings shown in the screenshot below. For “Select your generator”, use the arrow keys to scroll down and select
app. For the questions “Which framework do you want to use?” and “Who is the author of this application?”, choose the default option and press Enter.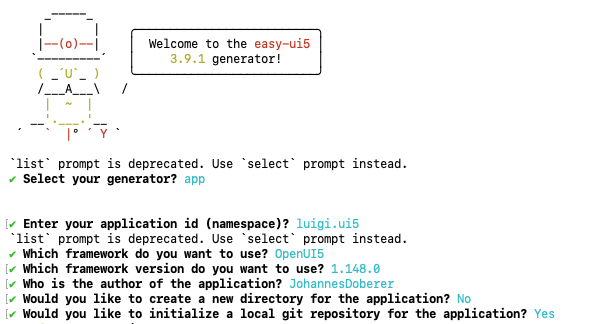
UI5 Terminal
Resources
Discussion
Share feedback on this tutorial or join the conversation in SAP Community.