
Overview
You will learn
- How to create a connection between Jupyter Notebook and database instance
- How to load CSV data into pandas data-frame
- How to create a table in database instance from pandas data-frame
- How to create data visualizations in SAP HANA Cloud, SAP HANA database


Prerequisites
Prerequisites
- Make sure that you have a running SAP HANA database instance in SAP HANA Cloud.
- Download the sample data “travelroute.zip” file from GitHub repository
Steps
Intro
There are many data driven applications that can be developed by using the SAP HANA database instance in SAP HANA Cloud with any other development environment, such as Jupyter Notebook.
In this example, we’ll focus on creating a Python 3 file on Jupyter Notebook and connect it to our database instance. Once the connection is created, then we can add data to the instance or access data stored in the instance.
By connecting Python files to your database instance, it also possible to use machine learning capabilities.
Before you get started, make sure you have Anaconda installed on your system. You can install Anaconda from here.
You can also use Jupyter Notebook from Visual Studio. If you prefer to use Visual Studio with Anaconda, you can install Visual Studio Code from here.
To work with Jupyter Notebook, you must activate an Anaconda environment in VS Code. To select an environment, use the Python Select Interpreter command from the Command Palette (Ctrl+Shift+P). Once the appropriate environment is activated, you can create and open a Jupyter Notebook.
In this tutorial, you will see an example of Jupyter Notebook from Anaconda.
To get started, install two packages, hdbcli and hana_ml. The hdbcli package is an SAP python driver, which allows a connection to SAP HANA Cloud from a Python application. The hana_ml package allows you to create an SAP HANA data-frame, as well as create a connection to your SAP HANA database instance in SAP HANA Cloud.
In addition to this hana_ml package can also be used to experience various machine learning capabilities. It is recommended to install hdbcli driver version 2.5 and the latest version of hana_ml driver. You can install both these packages from here.
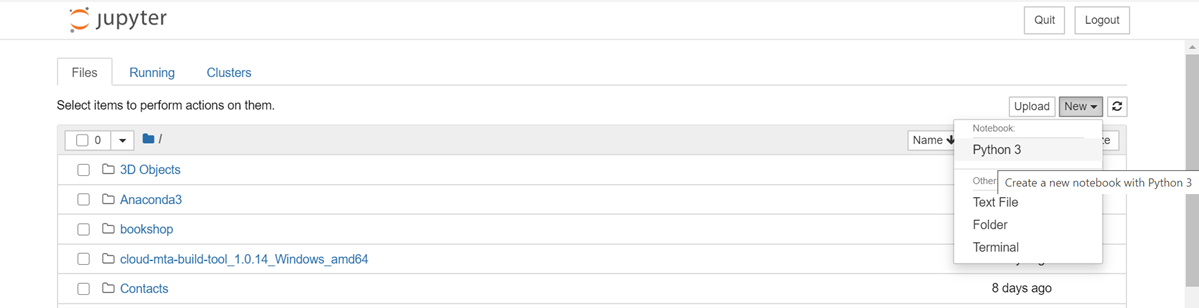
Once the packages are installed, launch Jupyter Notebook.
Create a new Python 3 notebook.

Import Packages 1 Import the packages using the following lines of code:
Python
import hdbcli from hdbcli import dbapi import hana_ml
3. To check if the package has been imported correctly, you can check the package version. Just type the following:

   ```Python
print(hdbcli.__version__) #Use two underscores '_''_' for __version__
print(hana_ml.__version__) #Use two underscores '_''_' for __version__
Next, import the following packages required for this tutorial:
Python
from hana_ml import dataframe from hana_ml.dataframe import ConnectionContext import pandas as pd
5. From the `hana_ml` package we import data-frame to create an SAP HANA data-frame and `ConnectionContect` to create a connection to the SAP HANA Cloud, SAP HANA database instance. We also import pandas to load data from CSV file into pandas data-frame.

</div><div class="step-validation-mount"
         data-step="3"></div>
    <div class="step-actions">
      <button class="fd-button fd-button--emphasized" data-action="mark-done" data-step="3">Done</button>
    </div>
  </div>
</div>


<div id="step-4" class="tutorial-step" data-step="4">
  <div class="step-header" data-action="toggle-step">
    <span class="step-check-circle"></span>
    <div class="step-header-text">
      <span class="step-label">Step 4</span>
      <span class="step-title-text">Create a connection to database instance</span>
    </div>
    <span class="step-toggle-icon">+</span>
  </div>
  <div class="step-body" hidden>
    <hr class="step-divider" />
    <div class="step-content">

To create a connection to the SAP HANA Cloud, SAP HANA database instance, replace in the code below XXXX with your host, port, user and password information. Then run it.


```Python
conn2 = dataframe.ConnectionContext(address='XXXX', port='XXXX', user='XXXX', password='XXXX', encrypt='true', sslValidateCertificate='false')You will be provided with a zip file. From the zip file, extract travelroute.csv file on to your local machine. To load data from CSV file, run the following code and replace the XXXX with the path to the CSV file on your local machine.
flight_pd = pd.read_csv('XXXX', sep=';', header=0, names=["CITYFROM","CITYTO", "NUMBOOKINGS"])To create a table in the database from pandas data-frame, use the method below from the hana_ml package. Make sure to replace the XXXX with your schema name. This is part of the pandas data-frame created above and will generate an SAP HANA data-frame. The SAP HANA data-frame is simply a table hosted in SAP HANA database in SAP HANA Cloud that you can run a select statement from Jupyter notebook.
flight_hdf = dataframe.create_dataframe_from_pandas(conn2, flight_pd, 'TRAVEL_ROUTE2', 'XXXX', force=True, replace=True)
flight_hdf = conn2.table("TRAVEL_ROUTE2", schema="XXXX")
print(flight_hdf.select_statement)Now that you have a table in your database, to access this table we execute the following lines of code. Replace the XXXX with your schema name and table with your table name.
Python
flight_hdf=conn2.sql (‘select * from XXXX.(table) ‘)
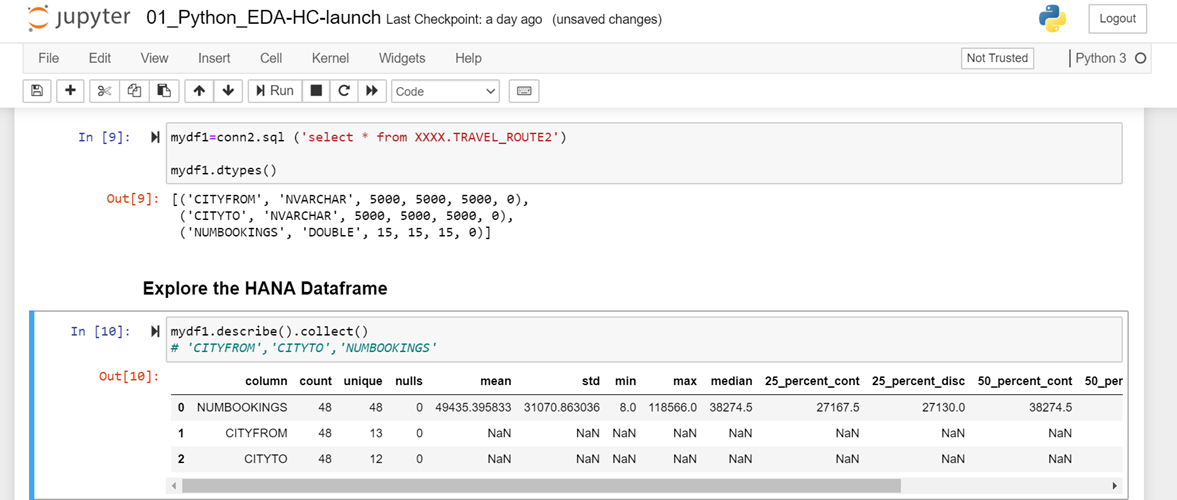
2. To check the data types of the table, you can execute the following command:

   ```Python
flight_hdf.dtypes()
To explore the SAP HANA data-frame, you can execute the following command:
Python
flight_hdf.describe().collect()
</div><div class="step-validation-mount"
data-step="7"></div>
<div class="step-actions">
<button class="fd-button fd-button--emphasized" data-action="mark-done" data-step="7">Done</button>
</div>
</div>
</div>
<div id="step-8" class="tutorial-step" data-step="8">
<div class="step-header" data-action="toggle-step">
<span class="step-check-circle"></span>
<div class="step-header-text">
<span class="step-label">Step 8</span>
<span class="step-title-text">Explore data visualizations</span>
</div>
<span class="step-toggle-icon">+</span>
</div>
<div class="step-body" hidden>
<hr class="step-divider" />
<div class="step-content">
1. To add visualizations to your data, import `EDAVisualizer` using the command:
```Python
from hana_ml.visualizers.eda import EDAVisualizerNext, import the following packages required for this tutorial.
Python
from hana_ml import dataframe import pandas as pd import matplotlib.pyplot as plt import time import numpy as np from hana_ml.algorithms.pal import stats
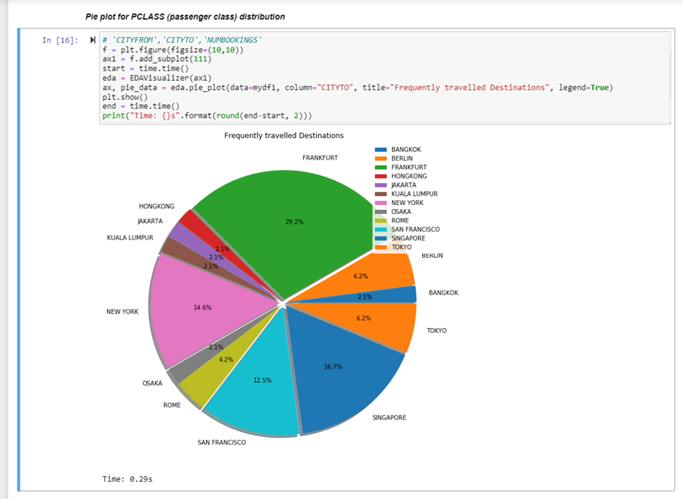
3. Now we will create a pie chat using the database table to find the most frequently travelled destination. To create a pie chart using run the following:
```Python
f = plt.figure(figsize=(10,10))
ax1 = f.add_subplot(111)
start=time.time()
eda=EDAVisualizer(ax1)
ax, pie_data=eda.pie_plot(data = flight_hdf, column = "CITYTO", title="Frequently travelled Destinations",legend=True)
plt.show()
end=time.time()
print("Time: {}s".format(round(end-start),2))- As you can see, the most frequently travelled destination is Frankfurt.
You have completed the second tutorial of this tutorial group. In the next tutorial, you will learn how to connect SAP Business Warehouse to SAP HANA Cloud.
Related topics
Connecting to SAP HANA from anywhere: Blog
Set Up Jupyter Notebook and Client Library for Document Classification: Tutorial
Resources
Discussion
Share feedback on this tutorial or join the conversation in SAP Community.