---
parser: v2
auto_validation: true
primary_tag: software-product>mobile-development-kit-client
tags: [ tutorial>advanced, operating-system>ios, operating-system>android, topic>mobile, software-product>sap-business-technology-platform, software-product>mobile-development-kit-client, software-product>sap-mobile-services, software-product>sap-build-code, software-product>sap-build, software-product>sap-business-application-studio ]
time: 35
author_name: Jitendra Kansal
author_profile: https://github.com/jitendrakansal
slug: cp-mobile-dev-kit-map-extension
canonical_url: https://developers.sap.com/tutorials/cp-mobile-dev-kit-map-extension
---
# Extend Your MDK App With a Map Custom Control (Using Metadata Approach)
Build and run the mobile development kit client with Map custom control functionality for Android and iOS platforms.
## Prerequisites
- **Tutorial**: [Set Up for the Mobile Development Kit (MDK)](https://developers.sap.com/group.mobile-dev-kit-setup.html)
- **Download the latest version of mobile development kit SDK** either from the SAP community [trial download](https://developers.sap.com/trials-downloads.html?search=Mobile+Development+Kit) or [SAP Software Center](https://me.sap.com/softwarecenter) if you are a SAP Mobile Services customer. You will need to build your branded client using the MDK SDK when accessing the Google Maps on Android device.
- **Install SAP Mobile Services Client** on your [iOS](https://apps.apple.com/us/app/sap-mobile-services-client/id1413653544) device.
 iOS
(If you are connecting to `AliCloud` accounts, you will need to brand your [custom MDK client](https://developers.sap.com/tutorials/cp-mobile-dev-kit-build-client.html) by allowing custom domains.)
## You will learn
- How to register and consume an Extension control in MDK Metadata
- How to build a Mobile development kit client for iOS and Android
- How to connect to SAP Mobile application
## Intro
You may clone an existing metadata project from [GitHub repository](https://github.com/SAP-samples/cloud-mdk-tutorial-samples/tree/main/6-Create-Extension-Controls-in-mobile-development-kit-Apps/3-Extend-Your-MDK-App-With-Map-Custom-Control-using-Metadata-approach) and start directly with step 5 in this tutorial.
---
To extend the functionality, or customize the look and feel, and behavior of your client app, you can create extension controls other than the already existing MDK built-in controls by writing Native Code in TypeScript via Marshalling. `NativeScript` provide the ability to access platform-specific objects, class, and types in TypeScript / JavaScript via marshalling. `NativeScript` handles the conversion between JavaScript and native data types implicitly.
In this tutorial, you will create a Map extension via `NativeScript` (in TypeScript language), you will view the Map in Apple Maps on iOS devices and in Google Maps on Android devices.

### Create a New Project Using SAP Build
This step includes creating a mobile project in SAP Build Lobby.
1. In the SAP Build Lobby, click **Create** > **Create** to start the creation process.

2. Click the **Application** tile and choose **Next**.

3. Select the **Mobile** category and choose **Next**.

4. Select the **Mobile Application** to develop your mobile project in SAP Business Application Studio and choose **Next**.

5. Enter the project name `mdk_maps` (used for this tutorial) , add a description (optional), and click **Review**.

>SAP Build recommends the dev space it deems most suitable, and it will automatically create a new one for you if you don't already have one. If you have other dev spaces of the Mobile Application type, you can select between them. If you want to create a different dev space, go to the Dev Space Manager. See [Working in the Dev Space Manager](https://help.sap.com/docs/build_code/d0d8f5bfc3d640478854e6f4e7c7584a/ad40d52d0bea4d79baaf9626509caf33.html).
6. Review the inputs under the Summary tab. If everything looks correct, click **Create** to proceed with creating your project.

7. Your project is being created in the Project table of the lobby. The creation of the project may take a few moments. After the project has been created successfully, click the project to open it.

8. The project opens in SAP Business Application Studio.

>When you open the SAP Business Application Studio for the first time, a consent window may appear asking for permission to track your usage. Please review and provide your consent accordingly before proceeding.
>
### Configure the Project Using Storyboard
The Storyboard provides a graphical view of the application's runtime resources, external resources, UI of the application, and the connections between them. This allows for a quick understanding of the application's structure and components.
- **Runtime Resources**: In the Runtime Resources section, you can see the mobile services application and mobile destination used in the project, with a dotted-line connected to the External Resources.
- **External Resources**: In the External Resources section, you can see the external services used in the project, with a dotted-line connection to the Runtime Resource or the UI app.
- **UI Application**: In the UI Applications section, you can see the mobile applications.
1. Click on **+** button in the **Runtime Resources** column to add a mobile services app to your project.

>This screen will only show up when your CF login session has expired. Use either `Credentials` OR `SSO Passcode` option for authentication. After successful signed in to Cloud Foundry, select your Cloud Foundry Organization and Space where you have set up the initial configuration for your MDK app and click Apply.
>
2. Choose `myapp.mdk.demo` from the applications list in the **Mobile Application Services** editor.

3. Select `com.sap.edm.sampleservice.v4` from the destinations list and click **Add App to Project**.

>You can access the mobile services admin UI by clicking on the Mobile Services option on the right hand side.
In the storyboard window, the app and mobile destination will be added under the Runtime Resources column. The mobile destination will also be added under the External Resources with a dotted-line connection to the Runtime Resource. The External Resource will be used to create the UI application.

4. Click the **+** button in the UI application column header to add mobile UI for your project.

5. In the **Basic Information** step, provide the below information and click **Next**. You will modify the generated project in next step and will deploy it later.
| Field | Value |
|----|----|
| `MDK Template Type` | `List Detail` |
| `Enable Auto-Deployment to Mobile Services After Project Creation` | Select `No` |

>The `List Detail` template generates the offline or online actions, rules, messages and pages to view records. More details on _MDK template_ is available in [help documentation](https://help.sap.com/doc/f53c64b93e5140918d676b927a3cd65b/Cloud/en-US/docs-en/guides/getting-started/mdk/bas.html#creating-a-new-project-cloud-foundry).
6. In the **Data Collections** step, provide the below information and click **Finish**. Data Collections step retrieves the entity sets information for the selected destination.
| Field | Value |
|----|----|
| `Enter a path to service (e.g. /sap/opu/odata/sap/SERVICE_NAME)` | Leave it as it is |
| `Select the Service Type` | Leave the default value as `OData` |
| `Enable Offline` | Choose `No` |
| `Select all data collections` | Leave it as it is |
| `What types of data will your application contain?` | Select `Customers` (if not selected by default) |

Regardless of whether you are creating an online or offline application, this step is needed for app to connect to an OData service. When building an MDK Mobile application, it assumes the OData service created and the destination that points to this service is set up in Mobile Services. For MDK Web application, destination is set up in SAP BTP admin UI.
>Since you have Enable Offline set to *Yes*, the generated application will be offline enabled in the MDK Mobile client and will run as online in Web environment.
>Data Collections step retrieves the entity sets information for the selected destination.
7. After clicking **Finish**, the storyboard is updated displaying the UI component. The MDK project is generated in the project explorer based on your selections.

### Register an Extension Control
The extension control that you will be creating to extend the functionality of your app can be used as base controls by registering it using the MDK editor.
1. Download [Map](https://github.com/SAP-samples/cloud-mdk-tutorial-samples/blob/main/Images/map.png) image and save it locally. This image will be used as a display image on the page editor to represent the extension control.
2. Drag & drop `map.png` file on **Images** folders.

3. Right-click **Extensions** | select **MDK: Register Extension Control**.

4. In the `Template Selection` step, select **New Metadata Extension Control**. Click **Next**.

5. In the **Base Information** step, provide the below information and click **Next**.
| Field | Value |
|----|----|
| `Control Name`| `mdk_maps` |
| `Module` | `MyMapModule` |
| `Control` | `MyMapExtension` |
| `Class` | `MyMapClass` |
| `Display` | click on the link icon and bind it to `map.png` file |
Here is the basic definition for properties you defined above:
**Module**: It is used to identify the extension control.
The path to the extension module under `/Extensions/`.
**Control**: The name of the file under the `/Extensions//controls` that contains the extension class. If not specified, module name would be used as the value for this property.
**Class**: The class name of your custom extension class. The client will check for this class at runtime and if it's found, your extension will be instantiated. Otherwise, a stub with an error message will be shown.
**Display**: This property is used for the image to be displayed on the page editor to represent the extension control.

6. In the **Extension Properties** step, fill schema details in **Schema** column and click **Finish**.
```JSON
{
"type": "object",
"BindType": "",
"properties": {
"Prop": {
"type": "object",
"BindType": "",
"properties": {
"City": {
"type": "string",
"BindType": ""
},
"Country": {
"type": "string",
"BindType": ""
},
"HouseNumber": {
"type": "string",
"BindType": ""
},
"LastName": {
"type": "string",
"BindType": ""
},
"PostalCode": {
"type": "string",
"BindType": ""
},
"Street": {
"type": "string",
"BindType": ""
}
}
}
}
}
```

>Above schema will add these predefined properties (`City`, `Country`, `HouseNumber`, `LastName`, `PostalCode`, and `Street`) in the map extension control which you will bind to **Customer** entity properties in next step.
Some additional files and folders are added to the **Extensions** folder. You will learn more about it in following steps.

>You can find more details about registering extension control in [this](https://help.sap.com/doc/f53c64b93e5140918d676b927a3cd65b/Cloud/en-US/docs-en/guides/getting-started/mdk/advanced/extensions/registering-extension-in-bas.html) guide.
### Consume Extension Control in MDK Metadata
You will add this registered control in the generated `Customers_Detail.page`.
1. Navigate to **Pages** folder | `com_sap_edm_sampleservice_v4_Customers` | `Customers_Detail.page`.
2. Remove the body section of the page.
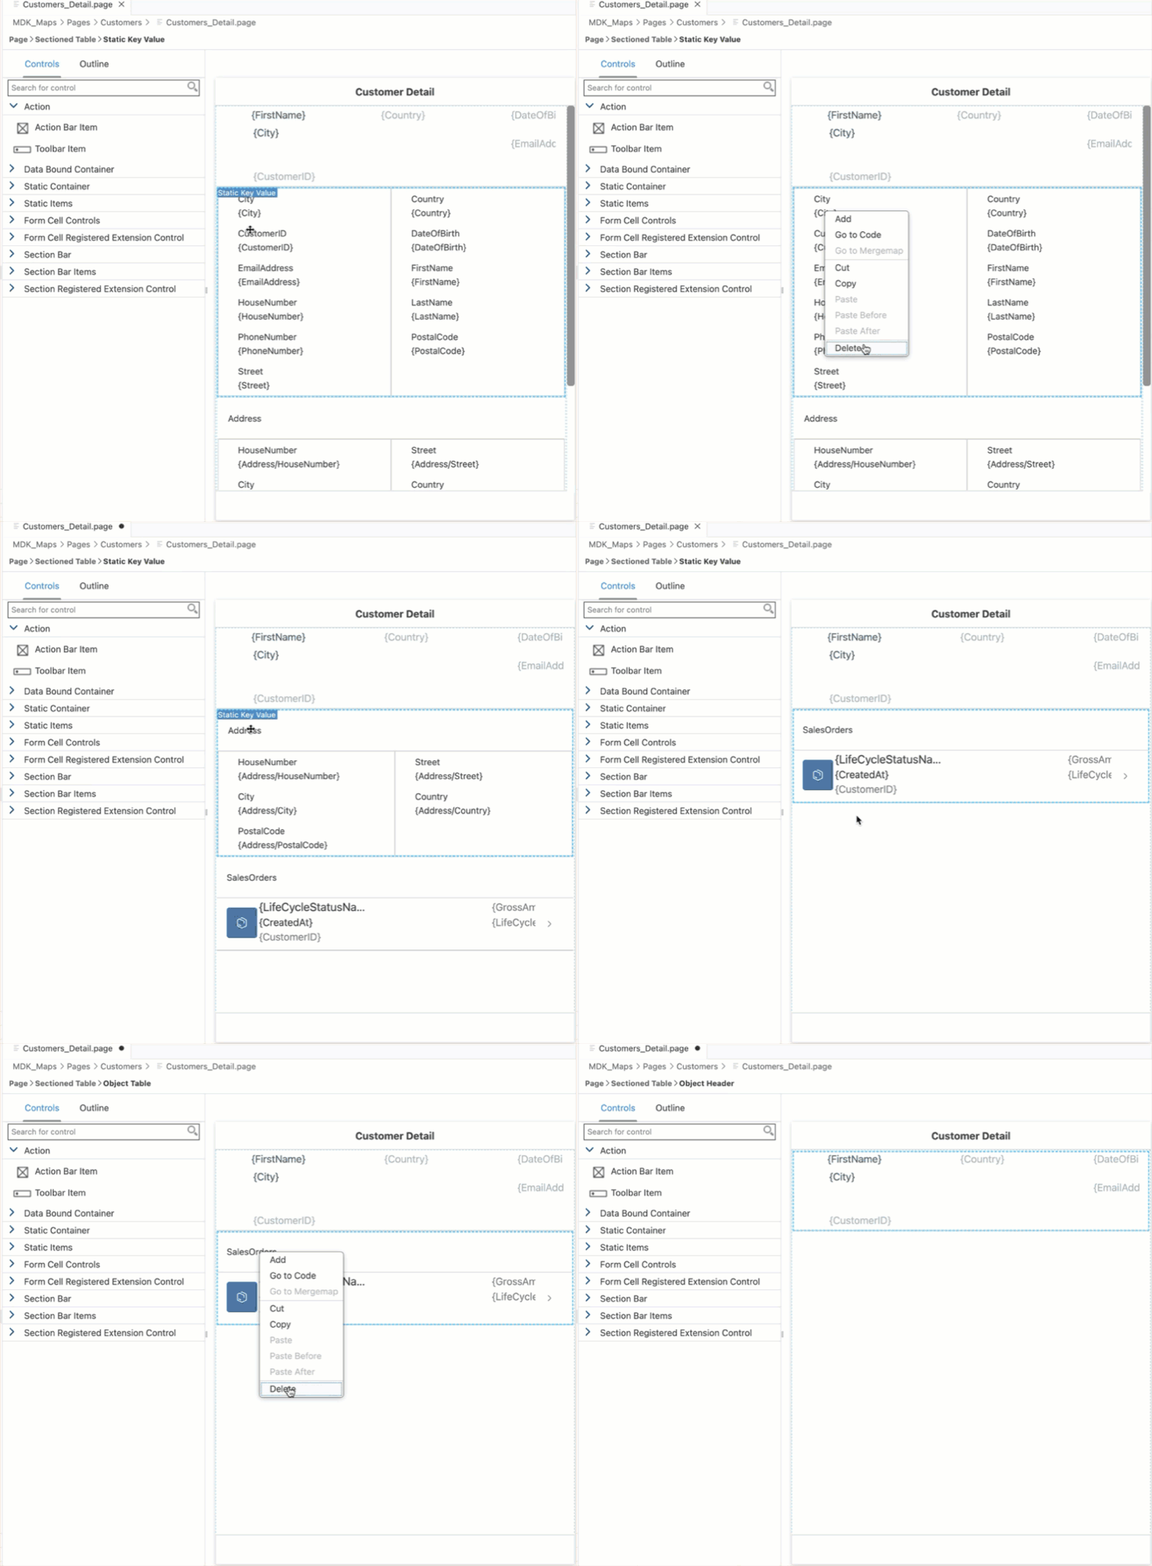
3. Expand **Section Registered Extension Control**, drag & drop the registered `mdk_maps` control on the page area.
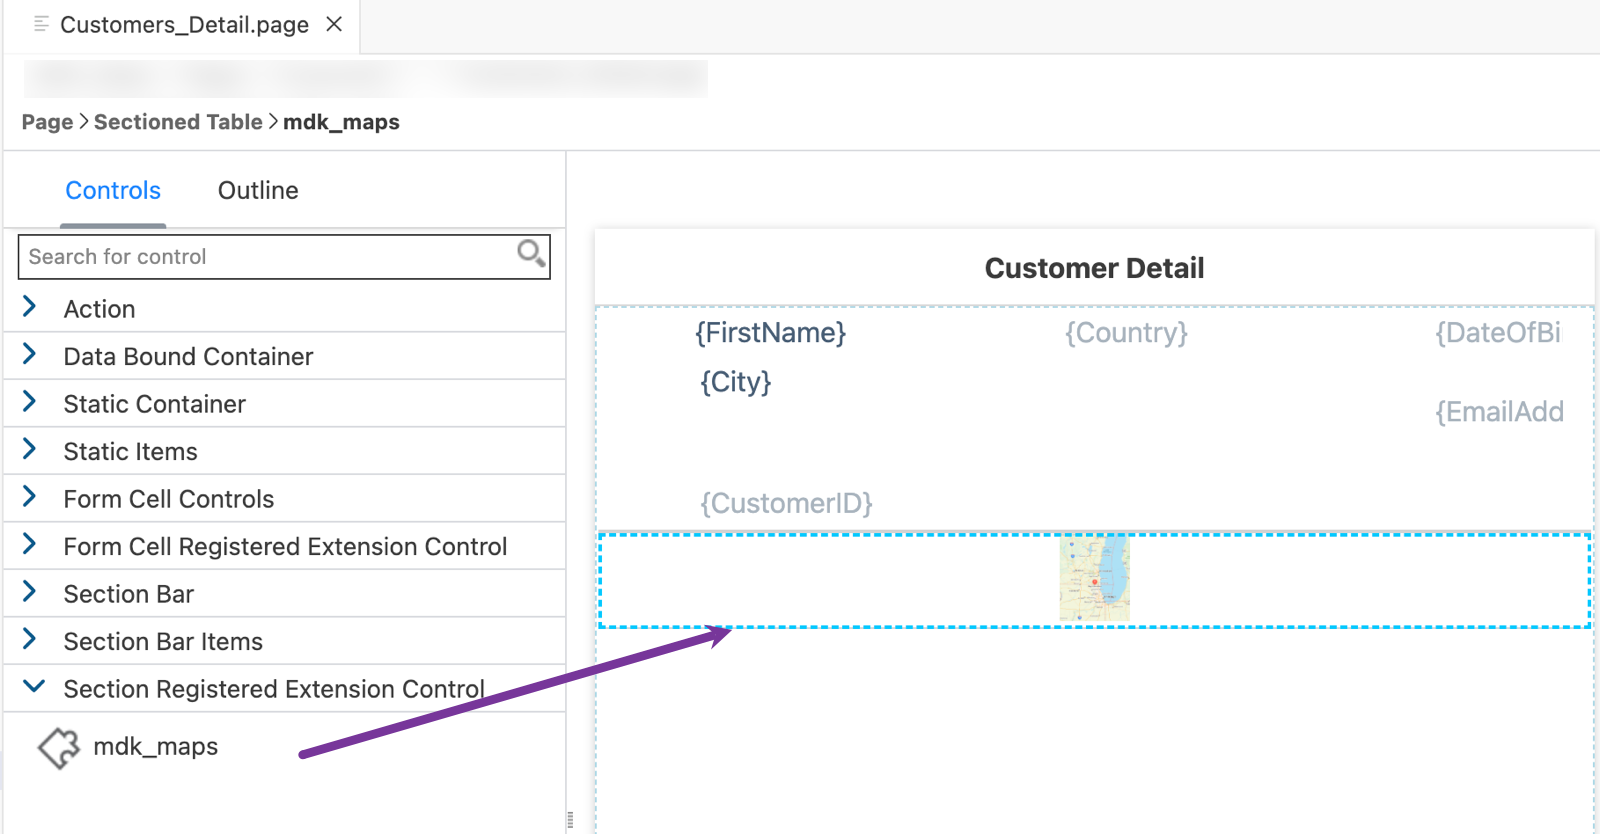
>You can find more details about the **Section Extension** in [this](https://help.sap.com/doc/3642933ef2e1478fb1578ef2acba4ae9/Latest/en-US/reference/schemadoc/Page/SectionedTable/Container/Extension.schema.html) guide.
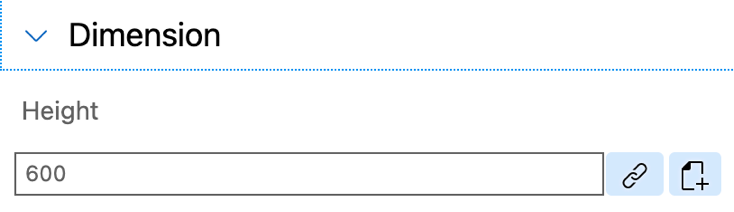
4. In the **Properties** section, set the **Height** to 600.
5. Bind the registered Extension control properties to **Customers** properties.
Under **Extension Properties** section, expand `Prop`, click the **link** icon to open the Object Browser for the **City** property. Double click the **City** property of the **Customer** entity to set it as the binding expression and click **OK**.
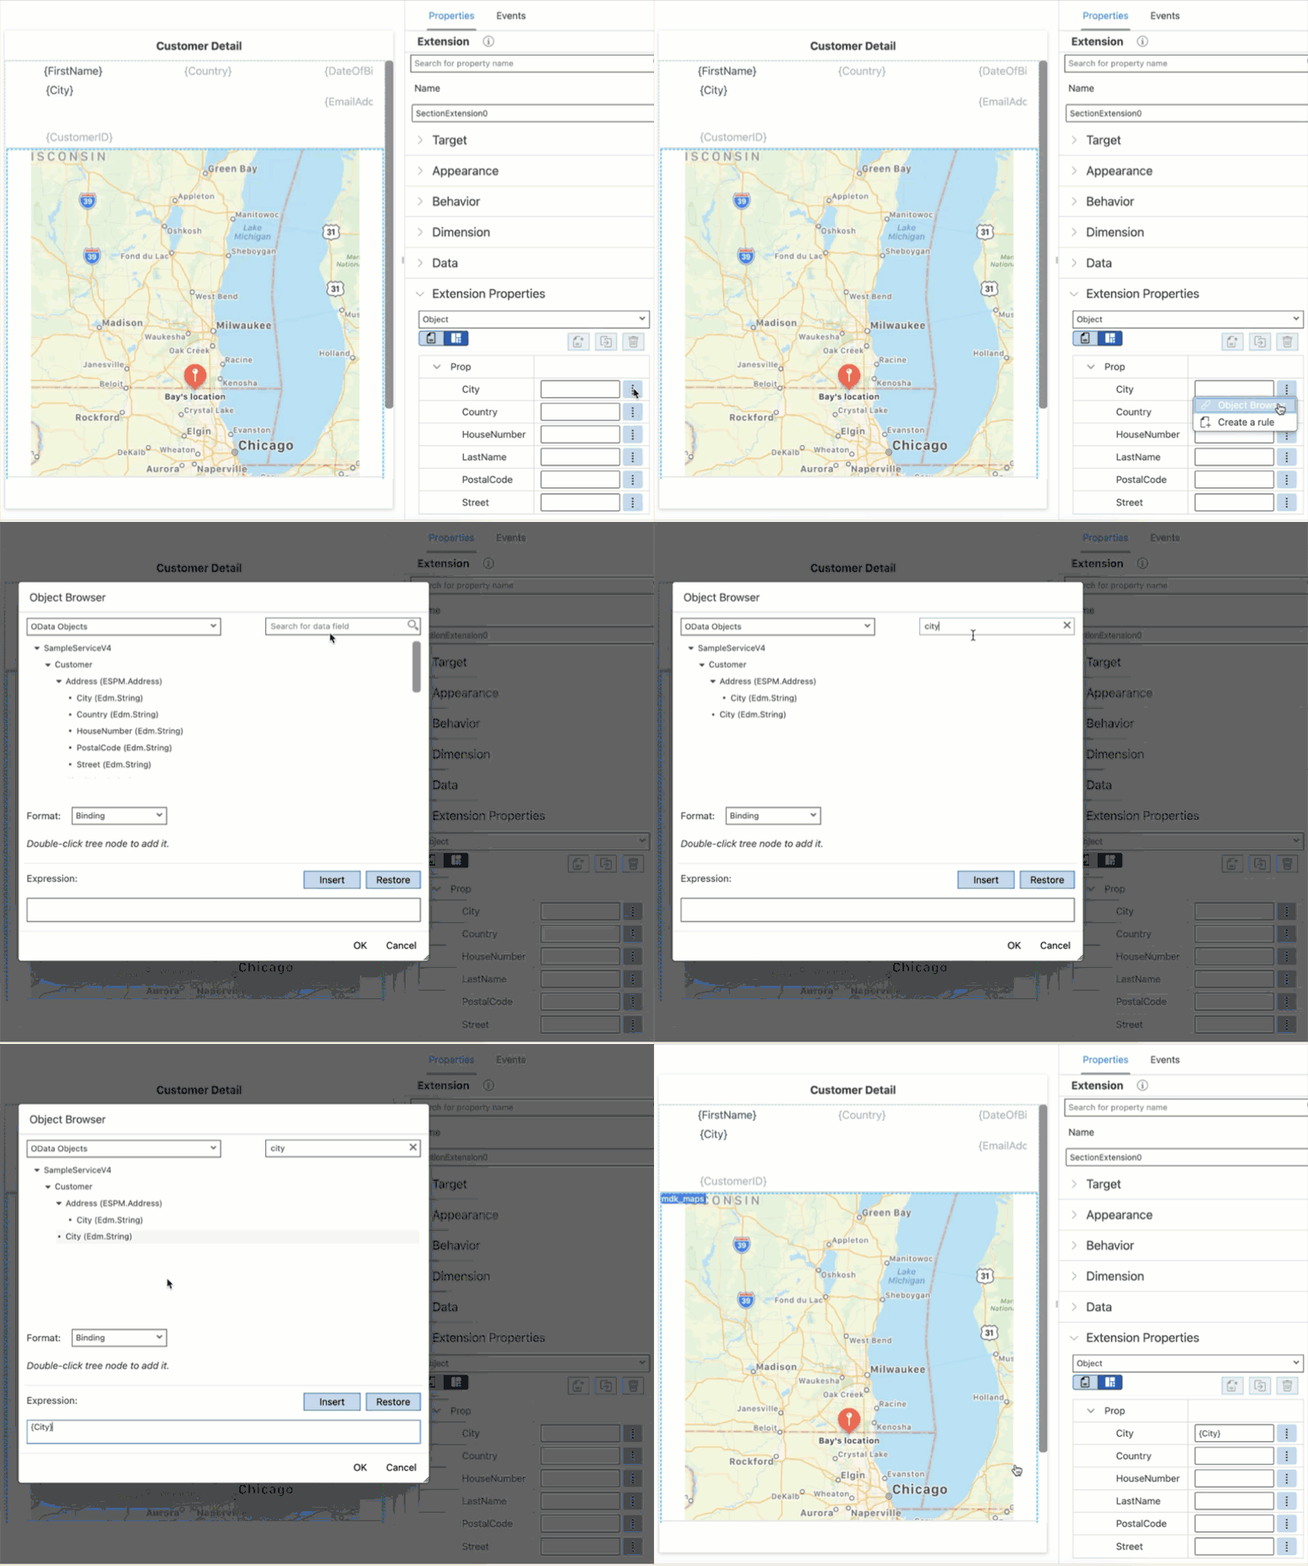
Repeat the above step and bind other properties.
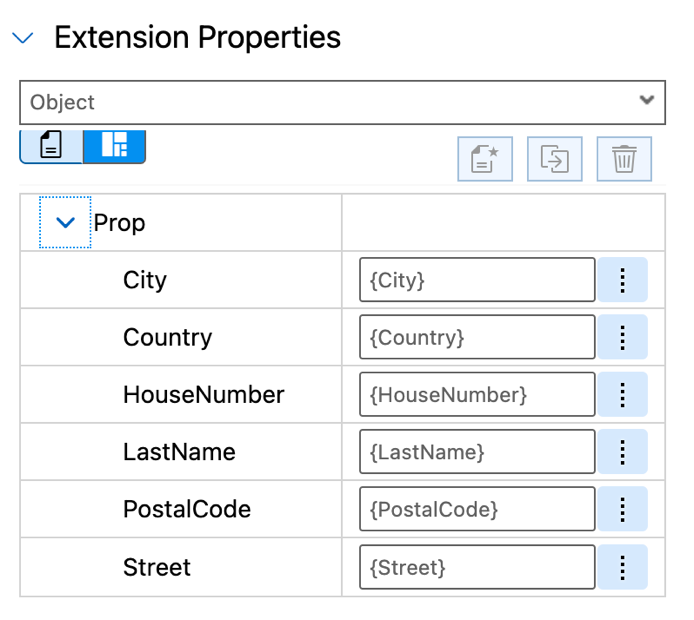
>Be careful not to bind properties from Address (ESPM.Address).
### Implement Extension using metadata approach
1. Navigate to **Extensions** | `MyMapModule` | `controls` | `MyMapExtension.ts`, replace the generated code with the following.
```JavaScript / TypeScript
import * as app from '@nativescript/core/application';
import { IControl } from 'mdk-core/controls/IControl';
import { BaseObservable } from 'mdk-core/observables/BaseObservable';
import { EventHandler } from 'mdk-core/EventHandler'
export class MyMapClass extends IControl {
private _observable: BaseObservable;
private _mapView: any;
private _geo: any;
private _gMap: any;
private _marker: any;
private _customerInfo = {
lastName: "",
houseNumber: "",
street: "",
city: "",
country: "",
postalCode: "",
latitiude: "",
longitude: ""
}
public initialize(props: any): any {
super.initialize(props);
//Access the properties passed from Customers_Detail.page to the extension control.
//in this tutorial, you will be accessing the customer's last name and address
if (this.definition().data.ExtensionProperties.Prop) {
var property = this.definition().data.ExtensionProperties.Prop;
this._customerInfo.lastName = property.LastName;
this._customerInfo.houseNumber = property.HouseNumber;
this._customerInfo.street = property.Street;
this._customerInfo.city = property.City;
this._customerInfo.country = property.Country;
this._customerInfo.postalCode = property.PostalCode;
}
if (app.android) {
//You will display the Google Maps in a MapView.For more details on Google Maps API for android, visit
//https://developers.google.com/android/reference/com/google/android/gms/maps/package-summary
this._mapView = new com.google.android.gms.maps.MapView(this.androidContext());
var localeLanguage = java.util.Locale;
//GeoCoder is required to convert a location to get latitude and longitude
this._geo = new android.location.Geocoder(this.androidContext(), localeLanguage.ENGLISH);
this._mapView.onCreate(null);
this._mapView.onResume();
//when mapview control is used, all the lifecycle activities has to be frowaded to below methods.
app.android.on(app.AndroidApplication.activityPausedEvent, this.onActivityPaused, this);
app.android.on(app.AndroidApplication.activityResumedEvent, this.onActivityResumed, this);
app.android.on(app.AndroidApplication.saveActivityStateEvent, this.onActivitySaveInstanceState, this);
app.android.on(app.AndroidApplication.activityDestroyedEvent, this.onActivityDestroyed, this);
var that = this;
//A GoogleMap must be acquired using getMapAsync(OnMapReadyCallback).
//The MapView automatically initializes the maps system and the view
var mapReadyCallBack = new com.google.android.gms.maps.OnMapReadyCallback({
onMapReady: (gMap) => {
console.log("inside onMapReady function");
that._gMap = gMap;
var zoomValue = 6.0;
that._gMap.setMinZoomPreference = zoomValue;
var customerAddress = that._customerInfo.houseNumber + ' ' + that._customerInfo.street + ' ' + that._customerInfo.city + ' ' +
that._customerInfo.country + ' ' + that._customerInfo.postalCode;
var data = that._geo.getFromLocationName(customerAddress, 1);
var latLng = new com.google.android.gms.maps.model.LatLng(data.get(0).getLatitude(), data.get(0).getLongitude());
that._gMap.addMarker(new com.google.android.gms.maps.model.MarkerOptions().position(latLng).title(this._customerInfo.lastName +
"'s " + "location"));
that._gMap.moveCamera(new com.google.android.gms.maps.CameraUpdateFactory.newLatLng(latLng));
}
});
this._mapView.getMapAsync(mapReadyCallBack);
}
if (app.ios) {
/*initiating Apple Maps
For more details on the Apple Maps visit
https://developer.apple.com/documentation/mapkit */
this._mapView = MKMapView.alloc().initWithFrame(CGRectMake(0, 0, 1000, 1000));
}
}
private onActivityPaused(args) {
console.log("onActivityPaused()");
if (!this._mapView || this != args.activity) return;
this._mapView.onPause();
}
private onActivityResumed(args) {
console.log("onActivityResumed()");
if (!this._mapView || this != args.activity) return;
this._mapView.onResume();
}
private onActivitySaveInstanceState(args) {
console.log("onActivitySaveInstanceState()");
if (!this._mapView || this != args.activity) return;
this._mapView.onSaveInstanceState(args.bundle);
}
private onActivityDestroyed(args) {
console.log("onActivityDestroyed()");
if (!this._mapView || this != args.activity) return;
this._mapView.onDestroy();
}
//In case of iOS you'll use CLGeocoder API to convert an address to get latitude and longitude.
//NOTE - API getlatlang is called only on ios devices
private getlatlang(customerAddress) {
const that = this;
return new Promise((resolve, reject) => {
var latLng = new CLGeocoder();
latLng.geocodeAddressStringCompletionHandler(customerAddress, function (placemarks, error) {
if (error === null && placemarks && placemarks.count > 0) {
var pm = placemarks[0];
var cordinates = {
latitiude: "",
longitude: ""
}
cordinates.latitiude = pm.location.coordinate.latitude;
cordinates.longitude = pm.location.coordinate.longitude;
resolve(cordinates);
} else {
reject();
}
});
});
}
public view() {
this.valueResolver().resolveValue([this._customerInfo.houseNumber, this._customerInfo.street, this._customerInfo.city, this._customerInfo
.country, this._customerInfo.postalCode, this._customerInfo.lastName
], this.context)
.then((address) => {
this._customerInfo.houseNumber = address[0];
this._customerInfo.street = address[1];
this._customerInfo.city = address[2];
this._customerInfo.country = address[3];
this._customerInfo.postalCode = address[4];
this._customerInfo.lastName = address[5];
var customerAddress = address[0] + ' ' + address[1] + ' ' + address[2] + ' ' + address[3] + ' ' + address[4];
console.log("customer's address = " + customerAddress);
if (app.ios) {
return this.getlatlang(customerAddress)
.then((cordinates) => {
/* below code is for the apple maps */
var latlong = CLLocationCoordinate2DMake(cordinates.latitiude, cordinates.longitude);
var annotation = MKPointAnnotation.alloc().init();
annotation.coordinate = latlong;
annotation.title = this._customerInfo.lastName + "'s" + " location";
this._mapView.centerCoordinate = latlong;
this._mapView.addAnnotation(annotation);
});
}
});
if (app.android) {
return this._mapView;
}
if (app.ios) {
return this._mapView;
}
}
public viewIsNative() {
return true;
}
public observable() {
if (!this._observable) {
this._observable = new BaseObservable(this, this.definition(), this.page());
}
return this._observable;
}
public setContainer(container: IControl) {
// do nothing
}
public setValue(value: any, notify: boolean, isTextValue?: boolean): Promise {
// do nothing
return Promise.resolve();
}
}
```
>In your import function, if you see errors related to `@nativescript/core` or `mdk-core`, you can ignore them. There is currently no reference of such libraries in the MDK editor.
### Deploy the Project
So far, you have learned how to build an MDK application in the SAP Business Application Studio editor. Now, you will Deploy the Project definitions to Mobile Services to use in the Mobile client.
1. Switch to the `Customers_Detail.page` tab, click the **Deploy** option in the editor's header area, and then choose the deployment target as **Mobile Services**.

2. Select deploy target as **Mobile Services**.

If you want to enable source for debugging the deployed bundle, then choose **Yes**.

You should see **Deploy to Mobile Services successfully!** message.

### Get the API Key to use the Maps SDK for Android (Required only for Android client)
Since you will display the customer's address in Google Maps on Android device, you will need to provide an API key in generated MDK project (step 8).
1. Visit the [Google Cloud Platform Console](https://console.cloud.google.com/welcome?project=predictive-fx-324416).
2. Click the project drop-down and select or create a new project for which you want to add an API key.

3. Click **ENABLE APIS AND SERVICES**.

4. Click **Maps SDK for Android**.

5. Click **ENABLE**.

6. Open [Credentials console](https://console.cloud.google.com/apis/credentials), click **CREATE CREDENTIALS** and click **API Key**.

7. Copy this generated key and save it locally. This will be required in step 8.
### Create Your Branded MDK Client (Required only for Android)
For iOS, you can just use the App store client. Continue with next step.
For Android, you will pass the API key to the MDK client, there is no way public store client can access it, hence you will create a branded client using MDK SDK or SAP Cloud Build Service.
1. Follow steps 1 to 3 from [this tutorial](https://developers.sap.com/tutorials/cp-mobile-dev-kit-build-client.html).
2. Create below file structure under `DemoSampleApp.mdkproject`.
DemoSampleApp.mdkproject
├── App_Resources_Merge
└── Android
├── app.gradle
└── src
└── main
└── AndroidManifest.xml

>Files specified in the `.mdkproject/App_Resources_Merge` folder override a part of the files in `/app/App_Resources`. You can find more details about it in [help documentation](https://help.sap.com/doc/f53c64b93e5140918d676b927a3cd65b/Cloud/en-US/docs-en/guides/getting-started/mdk/custom-client/app-resources-merge.html).
3. Provide below information in the `app.gradle` file. Save the changes.
```Java
dependencies { implementation 'com.google.android.gms:play-services-maps:17.0.0' }
```
4. Provide below information in the `AndroidManifest.xml` file. Save the changes.
```XML
```
5. Create your MDK client either using MDK SDK by following the step 4 from [Build Your Mobile Development Kit Client Using MDK SDK](https://developers.sap.com/tutorials/cp-mobile-dev-kit-build-client.html) tutorial OR using SAP Cloud Build Service by following [Build Your mobile development kit Client Using Cloud Build Service](https://developers.sap.com/tutorials/cp-mobile-dev-kit-cbs-client.html) tutorial.
### Run the MDK Client
>Make sure you are choosing the right device platform tab above.
[OPTION BEGIN [Android]]
In this step, you will Run the Project on an Android device.
1. Attach the device to your Mac or Windows machine and run `tns device android` command to print a list of attached devices.

>Make sure **Developer option** and **USB debugging** option is enabled in android device.
2. Copy the **Device Identifier** value for your device.
3. In terminal or command line window, navigate to the app name folder **`DemoSampleApp`** (in `MDClient_SDK` path) and use `tns run android --device ` command to run the MDK client on android device.

4. Once, above command gets successfully executed, you will see new MDK client up and running in Android device.
In Welcome screen, Tap **Agree** on End User License Agreement.

5. Tap **Start** to connect MDK client to SAP Business Technology Platform (BTP).

6. Enter your BTP E-Mail, ID or Login Name to continue.

7. Enter your password to login to SAP Business Technology Platform (BTP). If you see an Universal ID screen, enter your Universal ID password.

8. Choose a passcode with at least 8 characters for unlocking the app and tap **Next**.

9. Confirm the passcode and tap **Done**.

Optionally, you can enable fingerprint to get faster access to the app data.

10. Tap **Next**. If you want your MDK client to send you notifications, tap **Allow**, otherwise, tap **Don't allow**.


11. Tap **Now** to update the client with new MDK metadata.

12. Tap `Customers` to navigate to customers list.

13. Tap any of customer record to navigate to details page. In Customer Details page, you will see the Customer's address loading in Google Maps.


[OPTION END]
[OPTION BEGIN [iOS]]
SAP Business Application Studio has a feature to display the QR code for onboarding in the Mobile client.
1. To view the onboarding QR code, click the **Application QR Code** icon in the editor's header area.

The On-boarding QR code is now displayed.

>Leave the Onboarding dialog box open for the next step.
2. Follow [these steps](https://github.com/SAP-samples/cloud-mdk-tutorial-samples/blob/main/Onboarding-iOS-client/Onboarding-iOS-client.md) to successfully on-board the MDK client on your iOS device.
3. After you have accepted the app update, tap `Customers` to navigate to customers list.

4. Tap any of customer record to navigate to details page. In Customer Details page, you will see the Customer's address loading in Apple Maps.


[OPTION END]
---