Onboard an MDK Client to Your OData Cache Database
- How to create an MDK sample app using a template in SAP Business Application Studio
- How to deploy an MDK app to Mobile Services and run it in mobile client
- How to onboard an MDK app to an OData Service destination in SAP Mobile Services that requires client registrations
- How to work with client filters

Prerequisites
- This tutorial requires that you have a running OData Cache Database in your space, connected to SAP Mobile Services. It is based on the project created in Create a cached OData Service for improved Offline OData
- Tutorial Set Up SAP Business Application Studio for Multi-Channel Development
- Download and install: SAP Mobile Services Client on your iOS or Android device (If you are connecting to
AliCloudaccounts then you will need to brand your custom MDK client by allowing custom domains.)
In some cases where the OData producer implements specific synchronisation logic and/or requires download tracking on OData producer side, you might face an OData service that requires client registrations. For these services, before data can be synchronised via an InitializeOffline.action, a registration procedure must be sent to the OData producer.
This tutorial shall give an example how you could implement such an initialization procedure for an SAP Mobile Services, mobile development kit (MDK) client. The tutorial shares a lot of common steps with the tutorial Quick Start with the Mobile Development Kit (MDK), but focuses on another scenario. These common steps are similar, but not equal and do in case of this tutorial not cover the MDK web client. It is still recommendable to go through both tutorials if you want to learn more about MDK.
- Step 1
This step includes creating the mobile development kit project in the editor.
-
Launch the Dev space in SAP Business Application Studio.
-
From the Welcome page, select Start from template or (alternatively) select View → Find Command, type in ‘Open Template’ and select Open Template Wizard.

-
Select MDK Project and click Start.

-
In Basic Information step, provide the below information and click Next:
Field Value MDK template typeSelect CRUDfrom the dropdownYour project nameEpmCacheAppYour application name<default name is same as project name, you can provide any name of your choice> 
If you see Cloud foundry token expired, continue without mobile services connection? message, then set up the Cloud Foundry environment again by navigating to View menu > Find Command> CF: Login to Cloud foundry to initiate a valid session and click Start Over.
-
In Service Configuration step, provide or select the below information and click Next:
Field Value Data SourceSelect Mobile Servicesfrom the dropdownMobile Services LandscapestandardApplication IdAs specified in the previous tutorial: com.sap.MbtEpmDemoDestinationAs specified in the previous tutorial: com.sap.MbtEpmDemoEnter a path to serviceBlank (leave it empty) Enable OfflineYes 
-
In OData Collections step, click Select all data collections → Yes.

In this tutorial, server-side configuration for this MDK app was already done.
-
After clicking Finish, the wizard will generate your MDK Application based on your selections and open it in a new workspace. You should now see the
EpmCacheAppproject in the workspace.
Which MDK component is being used in this tutorial to manage the registration flow?
-
- Step 2
This is how the project structure looks like within the workspace.

These are the metadata definitions available in the editor and the format in which these metadata definitions are stored in the editor. Just to brief on some of these:
-
InitializeOffline.action: This action will initialize the offline store in the MDK mobile client and will download the required data to the offline store on the mobile device. In Web environment, it will initialize the service to be consumed in online mode. -
DownloadOffline.actionandUploadOffline.action: These actions are applicable to Mobile client only. Using app initialization, data is downloaded to the offline store. If you want to have the application download any updated data from the backend server or upload changed data to the backend server, these actions will be needed. -
InitializeOfflineSuccessMessage.action,IninitializeOfflineFailureMessage.actionand other Success or Failure Message actions: These are messages showing up in the app on a successful or failure of data initialization, sync etc. -
Main.page: This is the first page of your MDK application that is shown. For this application you will use this as a launching page to get to application functionality. -
OnWillUpdate.js: This rule is applicable to Mobile client only. MDK applications automatically download updates and apply them to the client without the end-user needing to take any action. TheOnWillUpdaterule empowers the user to run business logic before the new definitions are applied. This allows the app designer to include logic to prompt the user to accept or defer applying the new definitions based on their current activity. For example, if the end-user is currently adding new customer details or in the middle of a transaction, they will be able to defer the update. The app will prompt again the next time it checks for updates. -
Application.app: this is the main configuration file for your application from within SAP Business Application Studio. Here you set your start page (here in this tutorial, it is main.page), action settings for different stages of the application session lifecycle, push notifications, and more.
You can find more details about metadata definitions.
-
- Step 3
The approach for handling the service onboarding introduced here will leverage MDK Online communication to send a registration before the initial synchronization of the offline store is made.
The procedure consists of an additional MDK Service for online communication, additional actions, modified actions and rules for controlling the flow and generating randoms.
-
Create a rule to make an app-unique
Client-Instance-IDavailable to other MDK components.-
Right-click the folder
Rules→ select MDK: New Rule File. -
In the wizard select Empty JS Rule, then Next, fill the name
GetOrGenerateClientInstanceId→ Next and Finish. -
Paste the following content to the file:
JSCopyvar clientAPI; let FINAL_INSTANCE_ID_KEY = "KEY_CLIENT_INSTANCE_ID"; /** * Functions checks availability of Client-Instance-ID in appSettings Key-Value Store and returns or generates, persists and returns it. * @returns {String} uuidv4-compliant string */ export default function GetOrGenerateClientInstanceId(clientAPI) { let appSettings = clientAPI.nativescript.appSettingsModule; console.log("Rule GetOrGenerateClientInstanceId: entered"); if(appSettings.hasKey(FINAL_INSTANCE_ID_KEY)){ let sClientInstanceId = appSettings.getString(FINAL_INSTANCE_ID_KEY); console.log("Rule GetOrGenerateClientInstanceId: returning CID: " + sClientInstanceId); return sClientInstanceId; } else { console.log("Rule GetOrGenerateClientInstanceId: Generating CID"); //Using unsafe simple Math UUID generation let sClientInstanceId = 'xxxxxxxx-xxxx-4xxx-yxxx-xxxxxxxxxxxx'.replace(/[xy]/g, function(c) { var r = Math.random() * 16 | 0, v = c == 'x' ? r : (r & 0x3 | 0x8); return v.toString(16); }); console.log("Rule GetOrGenerateClientInstanceId: generated CID: " + sClientInstanceId); appSettings.setString(FINAL_INSTANCE_ID_KEY, sClientInstanceId); console.log("Rule GetOrGenerateClientInstanceId: persisted CID: " + sClientInstanceId); return sClientInstanceId; } }
-
-
In the same way, create another Rule
RandomInt64and paste the following content:JSCopyvar clientAPI; /** * Will generate a random positive number in Int64 range * @returns {number} random int */ export default function RandomInt64(clientAPI) { let min = 0, max = 2147483647; let iRandom = Math.floor(Math.random() * (max - min + 1) ) + min; console.log("Rule RandomInt64: generated Number: " + iRandom) return iRandom; }
-
- Step 4
-
Duplicate Service
com_sap_MbtEpmDemo.serviceand.com_sap_MbtEpmDemo.xmlby copying and pasting them in the same directory, then rename them tocom_sap_MbtEpmDemoOnline.serviceand.com_sap_MbtEpmDemoOnline.xmlkeeping the corresponding endings.
-
Open
com_sap_MbtEpmDemoOnline.service, disable Enable Offline Store and save.
-
Edit
com_sap_MbtEpmDemo.serviceto reflect the created rule for custom header. Therefore opencom_sap_MbtEpmDemo.service, expand Headers and enter the following:Name Value Client-Instance-ID /EpmCacheApp/Rules/GetOrGenerateClientInstanceId.jsYou can alternatively open the Object Browser via the button next to the Value field (chain icon). Find and double click
GetOrGenerateClientInstanceIdfrom Rules
-
Expand folders Actions → Service, duplicate
InitializeOffline.actionand rename the copy toInitializeOnline.action. - Click it to open and switch Service through dropdown to
EpmCacheServiceOnline.service. Remove all the Defining Requests.
-
Click
ClientRegistrationSet_CreateEntity.actionfrom folderActions→ClientRegistrationSetto open the file. -
Switch service to
/EpmCacheApp/Services/EpmCacheServiceOnline.service -
Via Object Browser, locate and insert rule
RandomInt64.jsas value forClientId. Alternatively you can paste/EpmCacheApp/Rules/RandomInt64.js -
In Headers section, add the following entry:
Name Value Client-Instance-ID /EpmCacheApp/Rules/GetOrGenerateClientInstanceId.jsYour action should now look like below:

-
- Step 5
To allow proper upload of a filter entity, modify
BusinessPartnerFilterSet_Create.pageto meet requirements-
Click
BusinessPartnerFilterSet_Create.pagefrom Pages →BusinessPartnerFilterSetfolder to open it with MDK page Editor. -
Expand Form Cell Controls on the Controls pane and drag a list picker control it into the existing section.
-
Via right-click, delete the
CountryFilterandFilterIDelements. -
Edit the properties of the so-created list picker control
Property Value Name CountryPickerCaption Choose Country for subscriptionBehavior → IsPickerDismissedOnSelectiontrue -
In Data section add three exemplary values for picker items (for which data exists in the referenced system)
Property Value item0DEitem1GBitem2US
-
Open
BusinessPartnerFilterSet_CreateEntity.actionto reflect the change made in the UI and link the rule.
-
For property
CountryFilter, via Object Browser choose selected value of the picker control created (#Page:BusinessPartnerFilterSet_Create/#Control:CountryPicker/#SelectedValue). -
For property
FilterId, link the ruleRandomInt64.js(/EpmCacheApp/Rules/RandomInt64.js).
-
- Step 6
-
Like in step 3, create a new rule. This one shall control the onboarding flow and will be triggered from
Application.app.-
Right-click folder Rules → select MDK: New Rule File.
-
In the wizard select Empty JS Rule → Next, fill the name
BootstrapOffline→ Next → Finish. -
Paste the following content to the file:
JSCopylet FINAL_INSTANCE_ID_KEY = "KEY_CLIENT_INSTANCE_ID"; let FINAL_INSTANCE_ID_KEY_REGISTERED = "KEY_CLIENT_INSTANCE_ID_REGISTERED"; export default async function BootstrapOffline(clientAPI) { let LOG_PREFIX = "Rule BootstrapOffline: "; console.log(LOG_PREFIX + "entered") let appSettings = clientAPI.nativescript.appSettingsModule; if (appSettings.hasKey(FINAL_INSTANCE_ID_KEY) && appSettings.hasKey(FINAL_INSTANCE_ID_KEY_REGISTERED)) { let sInstanceId = appSettings.getString(FINAL_INSTANCE_ID_KEY); console.log(LOG_PREFIX + "instance ID found: " + sInstanceId); clientAPI.executeAction("/EpmCacheApp/Actions/Service/InitializeOffline.action"); return sInstanceId; } else { return new Promise( async function( fnResolve, fnReject ) { try{ console.log(LOG_PREFIX + "Registration missing or bootstrap incomplete - initializing sequence - opening online service"); await clientAPI.executeAction("/EpmCacheApp/Actions/Service/InitializeOnline.action"); console.log(LOG_PREFIX + "Online service opened - performing registration for client instance ID"); await clientAPI.executeAction("/EpmCacheApp/Actions/ClientRegistrationSet/ClientRegistrationSet_CreateEntity.action"); appSettings.setBoolean(FINAL_INSTANCE_ID_KEY_REGISTERED, true); fnResolve(appSettings.getString(FINAL_INSTANCE_ID_KEY)); await clientAPI.executeAction("/EpmCacheApp/Actions/Service/InitializeOffline.action"); console.log(LOG_PREFIX + "Offline Store initialized"); await clientAPI.executeAction("/EpmCacheApp/Actions/Service/SyncStartedMessage.action"); console.log(LOG_PREFIX + "Starting Sync"); } catch (error) { fnReject(error); } }); } } -
-
Update
Application.app, to run the so-created ruleBootstrapOfflineinstead of initializing OData directly for eventOnDidUpdateandOnLaunch.
-
- Step 7
So far, you have learned how to build an MDK application in the SAP Business Application Studio editor. Now, deploy this application definition to Mobile Services to consume it as Mobile application.
-
Right-click
Application.appand select MDK: Deploy.
-
Select deploy target as Mobile Services.
First deployment starts to Mobile Services (for Mobile application).

You should see successful messages for the deployment including the current revision.
-
- Step 8
SAP Business Application Studio has a feature to generate QR code for onboarding the mobile app.
Click the
Application.appto open it in MDK Application Editor and click Application QR Code icon to populate the QR code.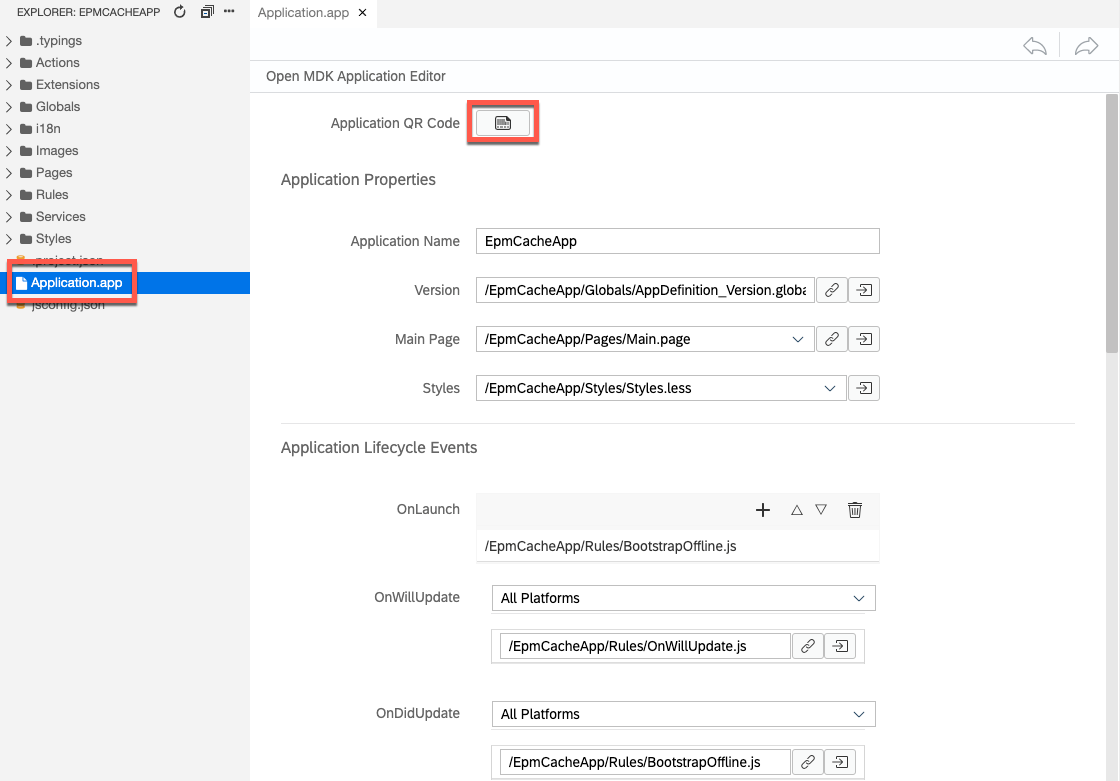

- Step 9
Make sure that all application instances are started in SAP BTP Cockpit, as trial landscapes shut down applications every day.

Follow these steps to on-board the MDK client.
Once you accept app update, you will see the list of entities on the Main page, LOGOUT and SYNC options at bottom of the page and Offline store is being initialized. Click either entity, it navigates to detail page, you can create, update, delete a record.
If you followed only this series of tutorials, the OData service cannot accept create, delete or update-requests on
CustomerSetandSalesOrderSet. You can still modify data locally, but you will not be able to successfully synchronize.Perform the following steps to verify all the mechanisms work.
-
Open page
ClientRegistrationSet. You will notice that your personal user ID was populated by the backend as a result of the registration. Go back to main screen. -
Open page
BusinessPartnerSetorSalesOrderSet. You will notice that both pages are empty. Go back to the main screen. -
Open page
BusinessPartnerFilterSetand create a new entity by pressing the “plus” button.-
Select GB and press the save button.
-
-
Navigate back to the main screen and press SYNC to perform a synchronization (flush and refresh).
-
Open page
BusinessPartnerSetagain. You will notice that business partners as well as related sales orders by customers in GB were downloaded. -
Optionally, create another Filter for DE or US. You will notice, after synchronization, that corresponding data was populated in the business partner page.
The crucial advantage of this kind of filtering is, that the defining requests in the app remain stable so that the Offline Store definition does not have to be modified and delta tokens remain valid. Only the OData producer recognizes the filter and will send different data on the next download query for this specific registration.

Congratulations! You have created a simple MDK-Based mobile application that can register to a cache database and make use of client-filters.
Which statements about client filters are correct?
-