
Overview
You will learn
- How to use SAP Business Application Studio to clone an existing SAP Fiori application and make changes to it.
- How to set up the SAP Continuous Integration and Delivery service to build the modified application and transfer it to SAP Cloud Transport Management service.
- How to configure SAP Cloud Transport Management service so that you can import the app into another subaccount.


Prerequisites
- You have an SAP BTP account. If you don’t have one, create an SAP BTP trial account following the tutorial Get an Account on SAP BTP Trial. The tutorial shows the steps in SAP BTP Trial.
- You’ve set up SAP Cloud Transport Management service in a central administrative subaccount. If you haven’t done that, follow the tutorial Get Started with SAP Cloud Transport Management. You need a subscription to SAP Cloud Transport Management and an instance of the service. If you’ve set up the SAP Cloud Transport Management in an SAP BTP Trial account as described in that tutorial, you can follow the steps of the current tutorial, as it builds on that setup.
- You have an account on GitHub. You will need it to fork the Bookshop Sample Repository that serves as the source code repository for your SAP Fiori application.
Steps
In this tutorial, you work with the following entities:
- SAP BTP global account and subaccounts: You have a source (DEV), and a test (trial) subaccount, as well as a central administrative (Central Services) subaccount.
- Git repository on GitHub: It contains the SAP Fiori application (Bookshop app) that you want to transport. You clone the repository to SAP Business Application Studio, and connect it to SAP Continuous Integration and Delivery service.
- SAP Business Application Studio (DEV Subaccount): Your development environment, connected to the Git repository. You use it to push source code changes to the repository.
- SAP Continuous Integration and Delivery service (Central Services subaccount): Monitors the Git repository for source code changes. When changes are detected, it automatically runs the configured pipeline, which builds an MTAR file from the source code and exports it to SAP Cloud Transport Management service.
- SAP Cloud Transport Management service (Central Services subaccount): Deploys a transport request available in the import queue of trial.

You’ll complete the following tasks:
- Prepare your environment: Create a new subaccount, assign entitlements, subscribe to SAP Business Application Studio and SAP Continuous Integration and Delivery, configure required roles, set up a destination for SAP Cloud Transport Management, and fork the Bookshop sample Git repository containing the SAP Fiori application source code.
- Set up the CI/CD and transport infrastructure: Configure a CI/CD pipeline and a transport landscape.
- Develop and deploy changes: Make development changes in SAP Business Application Studio, push them to the Git repository, automatically trigger the CI/CD pipeline, and generate a transport request. Deploy the changes to your target trial subaccount.
In this step, you create a new DEV subaccount in the SAP BTP Trial global account, enable Cloud Foundry, and create a space.
If you work in SAP BTP Trial, use the DEV subaccount as the development subaccount, and the default trial subaccount as the target subaccount. The following steps show the creation of the DEV subaccount.
In the Account Explorer of your SAP BTP Trial global account, choose Create > Subaccount.

Create subaccount 1 In the Create Subaccount dialog, enter a name, here
DEV(1), select a region, hereUS East(2), and choose Create (3).
Create subaccount 2 Open the new subaccount and choose Enable Cloud Foundry.

Create subaccount 3 In the Enable Cloud Foundry dialog, choose Create.

Create subaccount 4 Create a space in the Cloud Foundry org. Choose Create Space.

Create subaccount 5 In the Create Space dialog, enter a space name, here
DEV(1), and choose Create (2).
Create subaccount 6 If you want to create another subaccount, for example, a PRD subaccount, you can proceed accordingly. However, this is not possible in SAP BTP trial. The trial subaccount is the only subaccount that can be used to deploy the app.
The result looks as follows: You have a Central Services subaccount where you’ve subscribed to SAP Cloud Transport Management service, and where you will subscribe to the Continuous Integration and Delivery service. Additionally, you have the DEV subaccount for app development and the trial subaccount for deploying and testing the app.

Create subaccount 7
More information: Managing Subaccounts Using the Cockpit
In this step, you entitle the DEV subaccount to use SAP Business Application Studio and subscribe to it.
In the DEV subaccount, go to Entitlements (1). Filter for
Businessto verify that there’s no entitlement for SAP Business Application Studio (2). Choose Edit (3).
Subscribe to SAP Business Application Studio 1 Choose Add Service Plans.

Subscribe to SAP Business Application Studio 2 In the Add Service Plans dialog, enter
SAP Businessto filter the entries (1). Select SAP Business Application Studio (2). Select the trial (Application) plan (3), and choose Add 1 Service Plan (4).
Subscribe to SAP Business Application Studio 3 The entitlement for SAP Business Application Studio is now added to the subaccount. Choose Save.

Subscribe to SAP Business Application Studio 4 The entitlement is saved.

Subscribe to SAP Business Application Studio 5 To subscribe to the service, go to Services > Service Marketplace (1). Find SAP Business Application Studio, and choose Create from its context menu (2).

Subscribe to SAP Business Application Studio 6 In the New Instance or Subscription dialog, the service and plan are pre-selected. Choose Create.

Subscribe to SAP Business Application Studio 7 When the subscription is finished, SAP Business Application Studio shows the status Subscribed.

Subscribe to SAP Business Application Studio 8
In general, to use the service, you need to grant the required user permissions
Business_Application_Studio_Developerto your user as described in Manage Authorizations and Roles. If you run the tutorial in SAP BTP trial, however, the subaccount administrator role in DEV is sufficient for the purpose of the tutorial.
More information: Set Up SAP Business Application Studio
In this step, you subscribe to SAP Continuous Integration and Delivery in the Central Services subaccount. If you are using SAP BTP trial, the trial subaccount is entitled for SAP Continuous Integration and Delivery by default. You first need to move the entitlement from trial to Central Services.
In the global account, choose Entitlements > Entity Assignments (1). Choose the subaccounts selector icon (2).

Entitlement to CICD 1 In the Select Subaccounts and Directories dialog, select the Central Services and trial subaccounts (1). Choose Select (2).
It’s sufficient to select only Central Services and trial. However, the following screenshots show all three subaccounts selected.

Entitlement to CICD 2 In the Entity Assignments view, filter for
continuousin both subaccounts (1) to verify that there’s an entitlement to Continuous Integration & Delivery service in the trial subaccount. Choose Edit for trial (2).
Entitlement to CICD 3 To remove the Continuous Integration & Delivery service plan assignment, choose the × in the Actions column.

Entitlement to CICD 4 Choose Save to confirm the removal of the entitlement from the trial subaccount.

Entitlement to CICD 5 Now assign the entitlement to the Central Services subaccount. Choose Edit for Central Services (1).
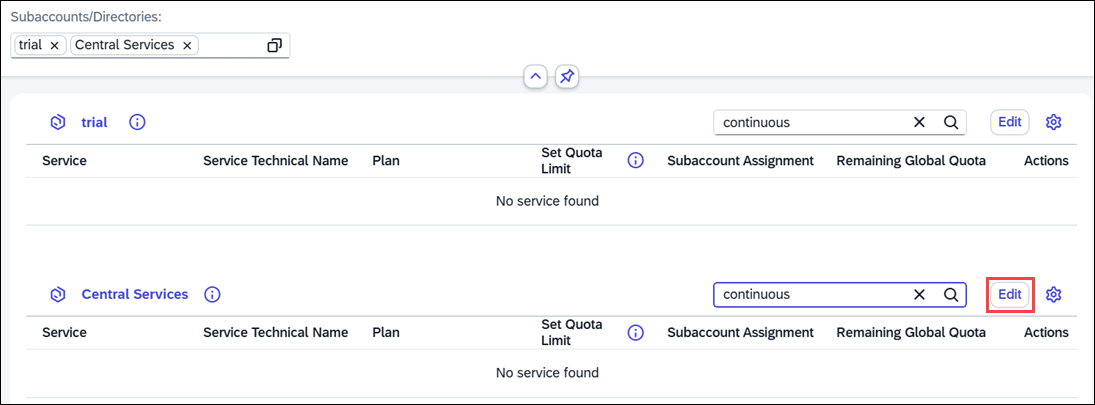
Entitlement to CICD 6 Choose Add Service Plans.

Entitlement to CICD 7 In the Add Service Plans dialog, enter
continuous(1). Select Continuous Integration & Delivery from the list (2). Select the trial (Application) plan (3), and choose Add 1 Service Plan (4).
Entitlement to CICD 8 Choose Save to confirm adding the entitlement to the Central Services subaccount.

Entitlement to CICD 9 You can now subscribe to SAP Continuous Integration and Delivery.
In the Central Services subaccount, choose Services > Service Marketplace (1). In the Search field, enter
Continuous(2). From the context menu on the tile, choose Create (3).
Subscribe to CICD 1 In the New Instance or Subscription dialog, keep the trial plan selected, and choose Create.

Subscribe to CICD 3 You are now subscribed to SAP Continuous Integration and Delivery.

Subscribe to CICD 4
Before you proceed to the UI of the service, assign the required role collections to your user and the users who will work with it.
More information: Enabling the Service
In this step, you assign the required role collections to your user so that you can access SAP Continuous Integration and Delivery.
From the navigation pane, choose Security > Users (1). Choose your user name (2). In the details view of your user, select the Role Collections tab (3). Choose Assign Role Collection (4).

Assign role collection for CICD 1 From the role collection list, select CICD Service Administrator and CICD Service Developer (1). Confirm your choice with Assign Role Collection (2).

Assign role collection for CICD 2
More information: Assigning Roles and Permissions
You’ve completed the configuration steps for SAP Continuous Integration and Delivery. In the next step, you prepare the source code repository that you will use for the app development. Afterwards, you will go to SAP Continuous Integration and Delivery service to add this repository and create a pipeline.
In this step, you fork the GitHub Bookshop Sample Repository so that it is available for cloning in SAP Business Application Studio in a later step.
Log in to your GitHub account and go to the Bookshop Sample Repository on GitHub. On the main page of this repository, choose Fork on the top right.

Fork Repository 1 Select an Owner that matches the GitHub account that you want to use for this tutorial (1). You can leave all other information unchanged. Select Create fork (2).

Fork Repository 2
More information: Working with forks
In this step, you add the forked GitHub repository to SAP Continuous Integration and Delivery to prepare it for pipeline setup.
In your Central Services subaccount, go to Services > Instances and Subscriptions (1). To open the service’s user interface, select Continuous Integration & Delivery in the Subscriptions overview (2).

Add repository in CICD 1 The user interface opens on the Jobs tab, which is initially empty. Select the Repositories tab. No repositories are connected. To connect the SAP Continuous Integration and Delivery service with the forked repository, choose the + (Add repository) button.

Add repository in CICD 3 Before you continue adding the repository in SAP Continuous Integration and Delivery, go to the forked Bookshop repository on GitHub, and copy the clone URL that you will need in the next step. Choose <> Code (1) and the Copy URL to Clipboard button (2).

Add repository in CICD 4 Back in the Add Repository dialog in SAP Continuous Integration and Delivery service, enter a Name for the repository, here
BookshopSample, and paste the Clone URL you just copied.
Add repository in CICD 5 Don’t close the dialog yet. In the next step, you’ll add a GitHub webhook credential.
To create a webhook credential, in the Webhook Event Receiver section, choose the multiselect button.

Add webhook credential in CICD 1 The Select Credentials dialog opens. Choose + (Create credentials).
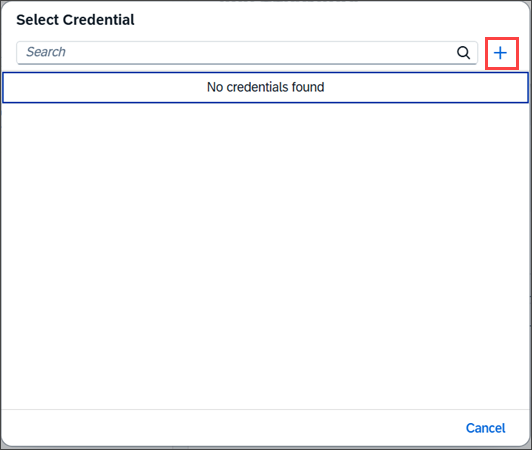
Add webhook credential in CICD 2 In the Create Credentials dialog, enter a name for the webhook credential, here
webhook-credential(1). To create a secret, choose Generate (2).
Add webhook credential in CICD 3 Use the button to copy the secret (1). Note down the secret, as it will not be shown again. Choose Create (2).

Add webhook credential in CICD 4 A toast message confirms that the credential was created.
To add the repository, choose Add.

Add webhook credential in CICD 5 The repository was added to the service and appears in the repositories overview. Copy the Payload URL in the Webhook Data section and note it down.

Add webhook credential in CICD 6
More information: Add a Repository
In this step, you add a webhook to your GitHub repository that automatically triggers deployments upon changes.
In your repository in GitHub, go to the Settings tab (1). Choose Webhooks (2).

Add webhook in CICD 7 Choose Add webhook.

Add webhook in CICD 8 Enter the Payload URL you copied from the service (1). Select the Content type as application/json (2). Enter the Secret you copied from the Webhook Data in SAP Continuous Integration and Delivery (3). Leave all other settings at their default values. Choose Add webhook (4).

Add webhook in CICD 9 The result should show the message Last delivery was successful.

Add webhook in CICD 10
More information: Creating Webhooks
In this step, you create a pipeline job in SAP Continuous Integration and Delivery and integrate Cloud Transport Management into that job.
Create a Pipeline Job
In SAP Continuous Integration and Delivery, go to the Jobs tab and choose + (Create job).

Create pipeline job in CICD 1 In the General Information section of the Create Job pane, enter the following values:
Field Value Name Choose a unique name for your job. We recommend using a name that contains both your GitHub repository name and branch, for example bookshop-main-job.Repository Select the repository you just created (if not already selected). Branch Enter main.Pipeline Keep the default Cloud Foundry Environmentselected.
Create pipeline job in CICD 2
You can keep all values in the Build stage unchanged. Don’t close the dialog yet. In the next step, you’ll integrate SAP Cloud Transport Management into the job.
Integrate Cloud Transport Management into the Job
To integrate Cloud Transport Management into your job, in the Release stage of your job, you need to provide the following information:
- Name of the transport node that’s used for the upload to SAP Cloud Transport Management
- Service key of Cloud Transport Management for authentication
Scroll down to the Release stage in your job details. Choose the + button next to Cloud Transport Management to open the section.

Create pipeline job in CICD 3a Enter
DEVas the name of the initial transport node that you will create later in SAP Cloud Transport Management service (1). To add the service key, choose the value help button (2).
Create pipeline job in CICD 4 As a result, the Select Credentials window opens. Choose the + button, which opens the Create Credential dialog.

Create pipeline job in CICD 5 In another browser window, in the Central Services subaccount, go to Services > Instances and Subscriptions (1). In the Instances area, find the Service Key of the Cloud Transport Management instance. Choose the 1 key link (2).

Create pipeline job in CICD 6 Choose Copy JSON to copy the entire service key.

Create pipeline job in CICD 7 Return to the Create Credential dialog in SAP Continuous Integration and Delivery service. Enter a name for the service key, for example
ctms-servicekey(1), paste the copied service key into the Service Key text box (2), and choose Create (3).
Create pipeline job in CICD 8 To create the job, choose Create.

Create pipeline job in CICD 9 You’ve successfully created your first CI/CD job with the Build and Release stages enabled.

Create pipeline job in CICD 10
Changes committed to your GitHub repository will be automatically picked up by your delivery pipeline, built and put into the import queue of SAP Cloud Transport Management service. However, before a transport request can be received by SAP Cloud Transport Management service, you need to create your transport landscape in the next step.
More information: Configuring Jobs and Integrate Cloud Transport Management into Your Job
You’ve already set up SAP Cloud Transport Management service in the Central Services subaccount as part of the prerequisite tutorial Get Started with SAP Cloud Transport Management. In this step, you create a destination in the Central Services subaccount that SAP Cloud Transport Management uses to deploy content to the trial subaccount. You will reference it in your trial node when you create the transport landscape in SAP Cloud Transport Management service in the next step.
Go to the Central Services subaccount.
In the navigation area, choose Connectivity > Destinations (1). Choose Create (2).

Create destination 1 In the Create New Destination dialog, choose From Scratch (1), and Create (2).

Create destination 2 Before filling in the destination form, open the trial subaccount in another browser window. In the subaccount overview, choose the Cloud Foundry Environment tab. Note down the following values, as you will need them to construct the destination URL:
Value How to use it API Endpoint Remove https://api.cf.— the remainder is the<domain>placeholder used in the URL and Token Service URL fields.Org Name Use as the <myorg>placeholder in the URL field.Space Name Use as the <myspace>placeholder in the URL field.
Create destination 3 Back in the Create Destination dialog in the Central Services subaccount, select or enter the following data (1), and choose Create (2):
Field Value Name Enter any name, here Deploy-to-trial.Type HTTPProxy Type InternetURL Specify the URL to the SAP Cloud Deployment service in the trial subaccount. Use this pattern, replacing the placeholders with the values from the previous step: https://deploy-service.cf.<domain>/slprot/<myorg>/<myspace>/slpAuthentication Select OAuth2Password.Client ID Enter cf.Client Secret Select the Set empty checkbox. Token Service URL Enter the URL to the Cloud Foundry UAA (CF UAA) authentication service. Use this pattern, replacing the placeholder with the domain value from the previous step: https://login.cf.<domain>User Enter an email address of the user that is used for the deployment. For the tutorial, you can use your email address. Password Enter your password. 
Create destination 4 The destination is created. Select the destination to see its details.
Choose Check Connection.

Create destination 5 The destination check is expected to be successful. Note that this doesn’t mean that the deployment will succeed. You’ll need to run a test transport in a later step.

Create destination 6
More information: Creating Destinations Using SAP Cloud Deployment Service with OAuth2Password Authentication
In this step, you configure the transport landscape in SAP Cloud Transport Management by creating two transport nodes and a route to connect them.
Open the UI of SAP Cloud Transport Management Service in the Central Services subaccount where you have subscribed to the service, and open the Instances and Subscriptions view (1). In the Subscriptions area, choose the Cloud Transport Management link (2).

Configure transport landscape 1 The overview page of SAP Cloud Transport Management opens. Go to the Landscape Visualization.
You will now create a new transport landscape. This includes the creation of two transport nodes (
DEVandtrial) and a transport route to connect them. To create the first (DEV) node, choose the + (Create a Node) button.
Configure transport landscape 2 In the Create Node dialog, select or enter the following data (1), and choose OK (2).
Field Value Name Enter any name, here DEV.Allow Upload to Node Select the checkbox. Forward Mode Keep the default Pre-Importselected.Virtual Node Select the checkbox, since this is the first node. 
Configure transport landscape 3 To create the second (
trial) node, choose the + button again.In the Create Node dialog, select or enter the following data (1), and choose OK (2).
Field Value Name Enter any name, here trial.Allow Upload to Node Do not select the checkbox. Content Type Select Multi-Target Application.Destination Select Deploy-to-trial.
Configure transport landscape 4 To create routes between the transport nodes, select
DEVas the source node, and choose the connector icon from the context menu.
Configure transport landscape 5 In the Create Route dialog, enter or select the following data (1), and choose OK (2).
Field Value Name Enter any name, here DEV-to-trial.Source Node Keep DEVselected.Target Node Select trial.
Configure transport landscape 6 The result should look as follows:
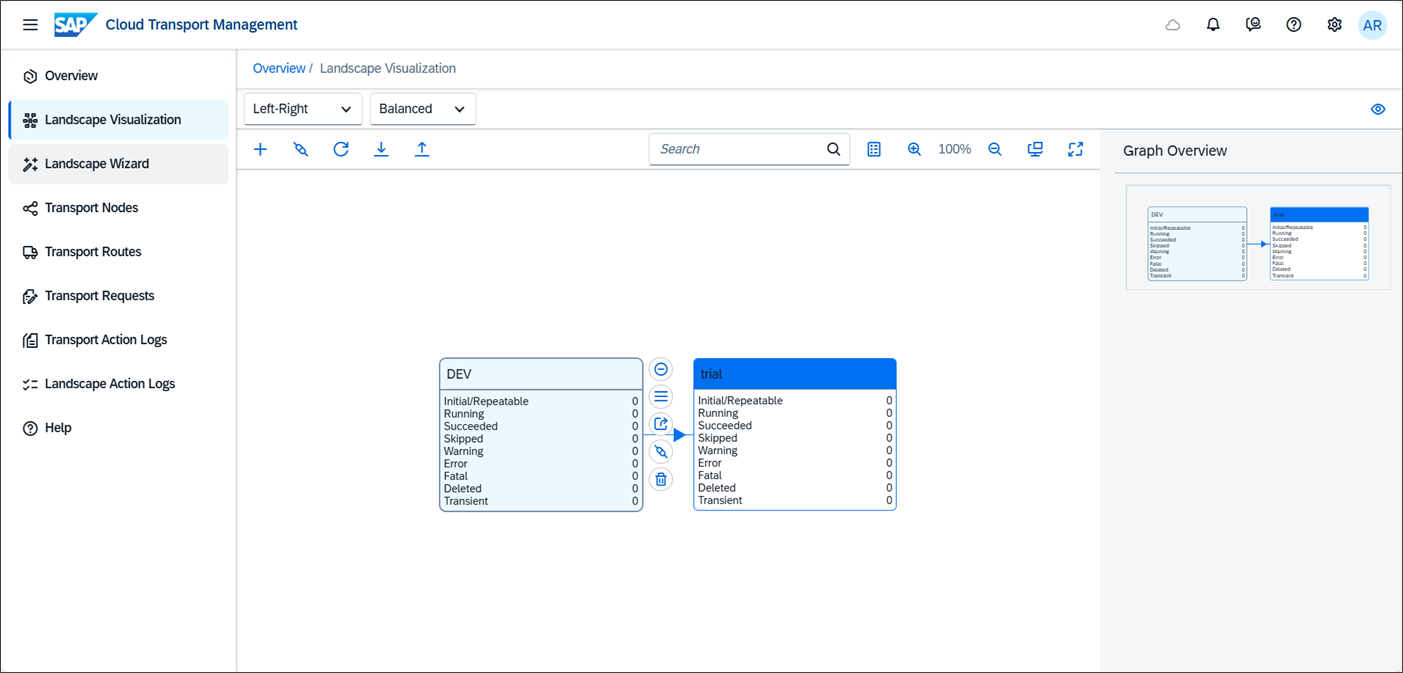
Configure transport landscape 7
You’ve set up the transport landscape in SAP Cloud Transport Management.
More information: Configuring the Landscape
In this step, you open SAP Business Application Studio, clone the Bookshop sample repository, make small code changes, and release them to your Git repository.
In the DEV subaccount, go to Services > Instances and Subscriptions (1). To open SAP Business Application Studio, select the link (2).

Create a transport 1 If this is the first time you open SAP Business Application Studio, you need to create a development space first. Choose Create Dev Space.

Create a transport 2 Enter a name for the new dev space, here
Dev(1). Choose Full Stack Cloud Application (2). Choose Create Dev Space (3).
Create a transport 3 It takes a while until the dev space is created. During this time, you see that it’s starting. When it’s created, the status changes to Running. Select the Dev link to start it.
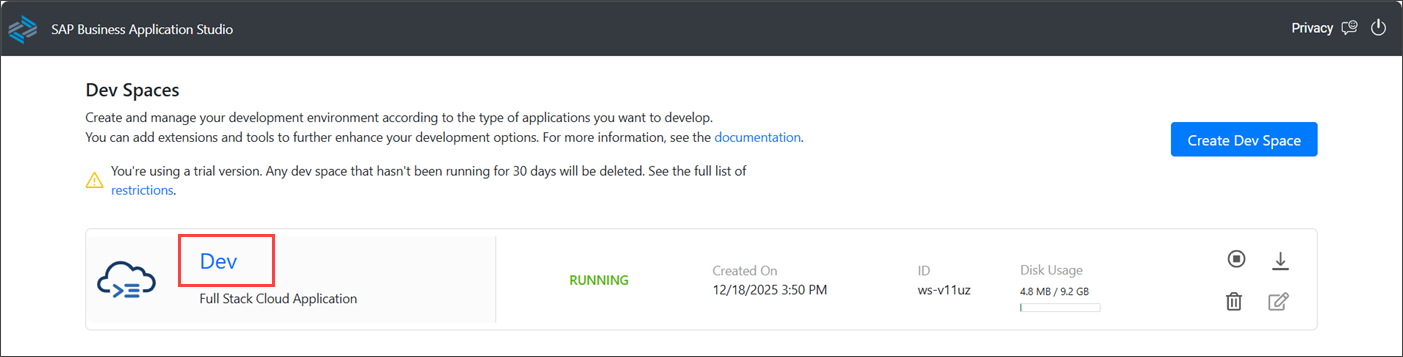
Create a transport 5 Choose Clone from Git.

Create a transport 6 Enter the clone URL of your forked repository. Press
Enter.
Create a transport 7 Confirm that you want to open the cloned repository.

Create a transport 8 Now that your workspace was created, you can start development.

Create a transport 9 You will add additional sample data to your application. In your
CAP-BOOKSHOP-WDI5workspace, go to db > data > sap.capire.bookshop-Books.csv.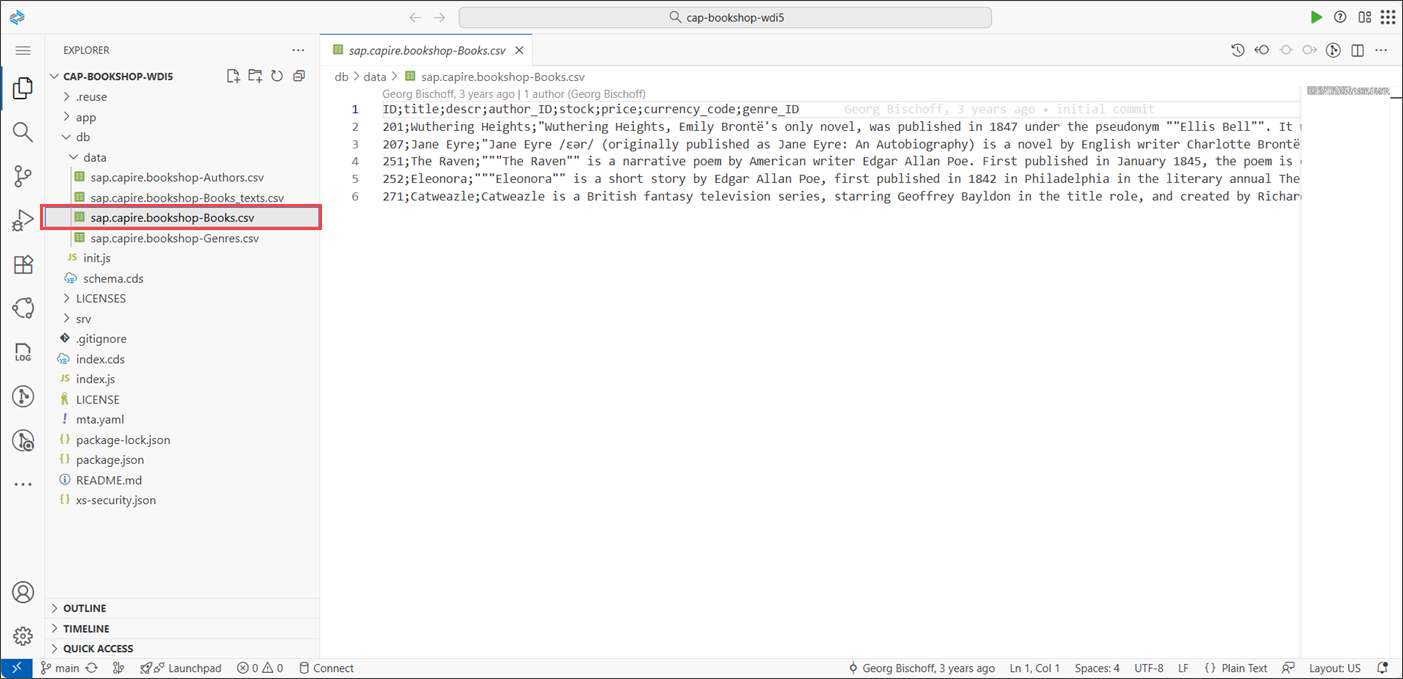
Create a transport 10 Add the following entries (1).
275;The Phoenix Project;"The Phoenix Project: A Novel About IT, DevOps, and Helping Your Business Win is a business novel by Gene Kim, Kevin Behr, and George Spafford. It presents a fictional case study of a troubled IT organization and its journey towards DevOps, emphasizing the importance of collaboration, automation, and continuous improvement.";180;33;14.99;USD;19
276;Italian Journey;"Italian Journey, a travelogue written by Johann Wolfgang von Goethe, recounts his travels through Italy between 1786 and 1788. The work is notable for its detailed descriptions of the Italian landscape, culture, and art, providing a valuable historical perspective.";190;44;11.50;EUR;13
277;Life 3.0;"Life 3.0: Being Human in the Age of Artificial Intelligence is a non-fiction book by Swedish-American physicist and cosmologist Max Tegmark. The book explores the implications of artificial intelligence and discusses potential scenarios of advanced AI impacting human society.";200;55;19.99;USD;16
278;A Transport Wizard's Tale;"A Transport Wizard's Tale: A tribute to the players who walked every street, spun every PokéStop, and caught every Pokémon. In memory of harry2ndstreet, whose adventures ended way too early.";42;10;0.00;USD;0
To release them to your Git repository, open the Source Control on the side panel (2).
Stage your changes.

Create a transport 12 To commit your changes, enter a commit message, here
new book entries(1), and choose Commit (2).
Create a transport 13 To push the changes to remote, choose Sync Changes.

Create a transport 14 Confirm the push to the main branch.

Create a transport 15 Choose the button to copy the verification code and open GitHub.

Create a transport 16 On the GitHub Device Activation page, choose Continue.

GitHub Device Activation page with Continue button highlighted On the Authorize your device page, paste the verification code you copied in the step 16 (1) and choose Continue (2).

GitHub Authorize your device page with the code input field and Continue button highlighted On the Authorize SAP Business Application Studio page, choose Authorize SAP.
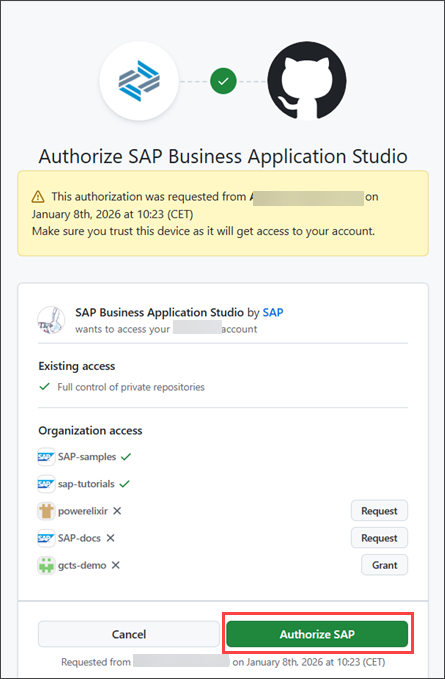
GitHub Authorize SAP Business Application Studio page with Authorize SAP button highlighted GitHub confirms that your device is now connected.
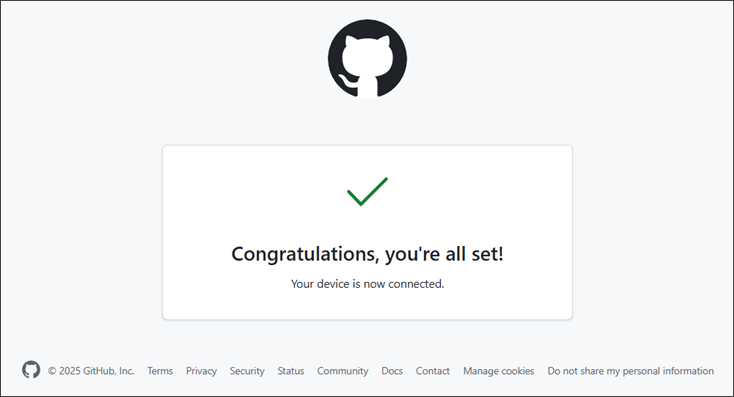
GitHub confirmation page showing Congratulations, you’re all set and Your device is now connected Go back to SAP Business Application Studio, and choose one of the options to save your credentials.

SAP Business Application Studio credential storage selection dialog When SAP Business Application Studio asks you whether you want to regularly fetch changes from remote, you can answer with No.
Afterwards, your code changes are added to your Git Repository.
Go to your repository on GitHub and verify that the changes were added.

GitHub repository showing the new commit
You have now created a development project in SAP Business Application Studio. You’ve made code changes, and released them to GitHub.
In the next step, you check that this release triggered your pipeline and created a new transport request in SAP Cloud Transport Management service.
More information: SAP Business Application Studio: Developer Guide
In this step, you verify that the pipeline job ran successfully in SAP Continuous Integration and Delivery and that a transport request was created in SAP Cloud Transport Management.
In SAP Continuous Integration and Delivery, on the Jobs tab, check that there’s a success status in the Latest Build column. Choose the row to open the job details.
If there’s no success status, it’s possible that the job is still running. You can still choose the row to open the log.

verify job and transport 01 Choose the finished build result to check the execution log.
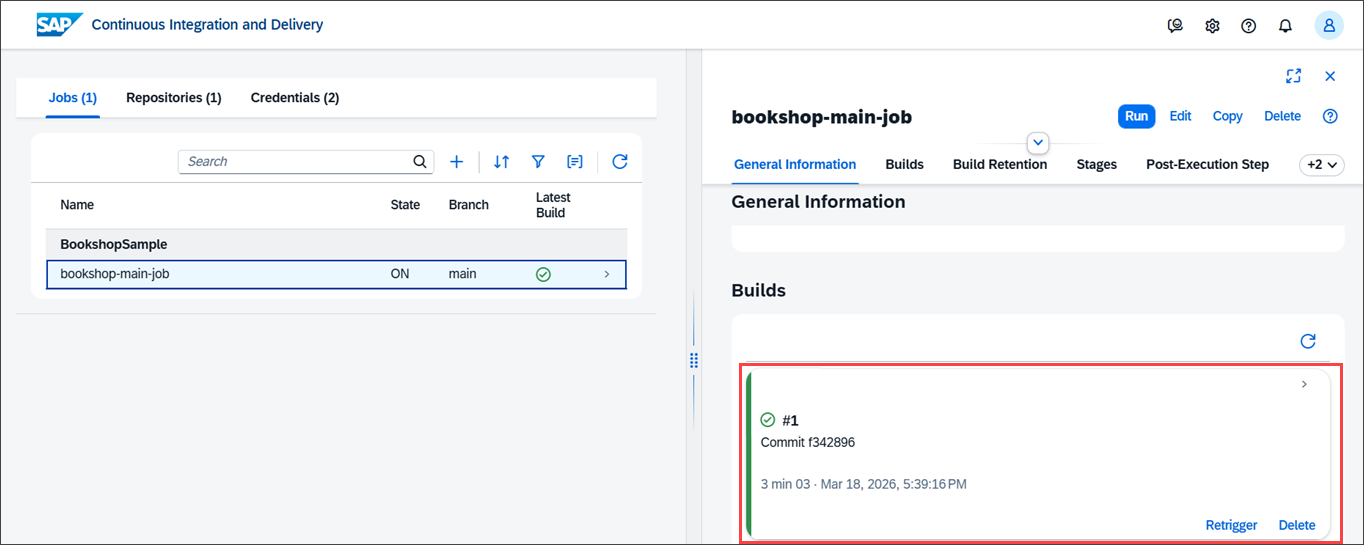
verify job and transport 02 Browse through the different stages and choose the Release stage.

verify job and transport 03 In the log file, search for
createdTransportRequestId.
verify job and transport 04 This transport will be available in SAP Cloud Transport Management.
Open SAP Cloud Transport Management, and go to Transport Nodes (1). To open the import queue of
trial, click on the arrow (2).
verify job and transport 05 Make sure that the transport request number corresponds to the one that you saw in the log of the pipeline job, here
481. The request is in status Initial.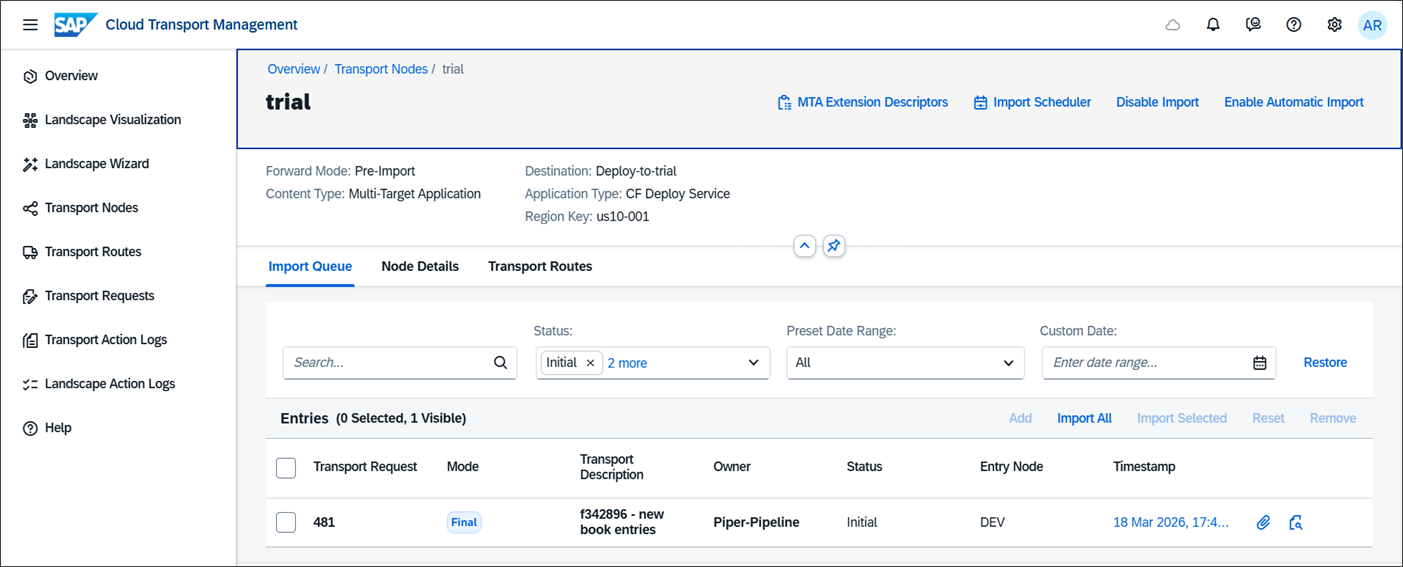
verify job and transport 06
You’ve now verified the pipeline and release steps. The transport is available in SAP Cloud Transport Management for your delivery to trial.
More information: Running and Monitoring CI/CD Jobs
In this step, you import the transport request from the import queue of the trial node into the target subaccount.
In SAP Cloud Transport Management, open the import queue of the trial node. The transport request created by the pipeline is in the import queue with the status Initial. Choose Import All.

transport 01 Confirm the import.

SAP Cloud Transport Management approval dialog asking to confirm import of all queue entries with OK button highlighted The import is running. The status of the transport request shows that the import is in progress.

transport 02 When the import finishes, the transport request status changes to Succeeded. To review the import log, choose the log icon.

transport 03 The log of the transport request shows the Export to Node and Import to Node actions, including the destination details and the entity that was deployed.

transport 04 When you scroll down, you see that the bookshop application was deployed successfully. The final entry confirms that the import ended with status Success.

transport 05 To verify the deployment, go to the trial subaccount in SAP BTP cockpit (1). In the navigation area, choose Cloud Foundry > Spaces (2). The dev space shows 1 started application. Choose the tile to open the dev space. (3).

app in space 01 The bookshop-srv application is available under Applications in the dev space, ready to be tested.

app in space 02
More information: Import Transport Requests
⚡🌋 Congratulations ⚡🌴! You’ve successfully completed the tutorial Transport an SAP Fiori Application with SAP Continuous Integration and Delivery Service and SAP Cloud Transport Management.
Resources
Discussion
Share feedback on this tutorial or join the conversation in SAP Community.