
Overview
You will learn
- Set up Intelligent Scenario Lifecycle Management (ISLM) in SAP S/4HANA 2023 (or higher)
- Enable custom generative AI scenarios in your SAP S/4HANA system
- Configure bgRFC-based background processing for ISLM


Prerequisites
- You have access to an SAP S/4HANA 2023 system (or higher) with SAP Fiori launchpad enabled
- You have the required authorizations to perform configuration tasks and access transactions such as SNOTE, STC01, SU01, and SBGRFCCONF
- You have access to SAP GUI and the SAP Fiori launchpad
Steps
In this tutorial, you prepare your SAP S/4HANA system to enable Intelligent Scenario Lifecycle Management (ISLM) for custom generative AI scenarios. You implement the required SAP Notes, configure the necessary business roles, and enable background processing. This establishes the foundation for integrating SAP AI Core in the next tutorials.
The diagram illustrates how Intelligent Scenario Lifecycle Management is embedded in the overall architecture and how it connects to SAP AI Core. This tutorial focuses on the SAP S/4HANA components highlighted in the diagram.
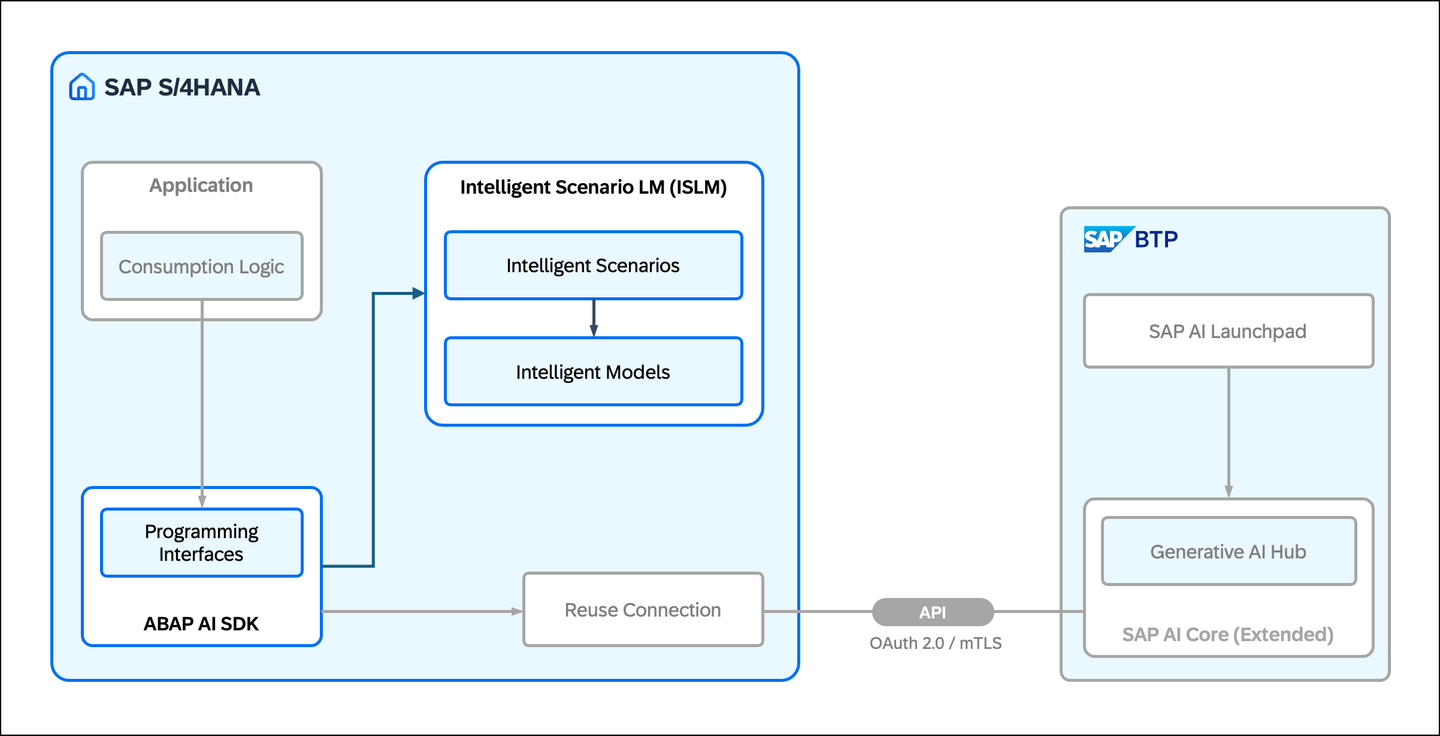
Further Information:
- Learn more about Intelligent Scenario Lifecycle Management (ISLM) on SAP Help Portal: Intelligent Scenario Lifecycle Management
- Explore additional resources in the SAP Community: Intelligent Scenario Lifecycle Management for SAP S/4HANA
In this step, you implement the required SAP Notes and Transport-Based Correction Instructions (TCIs) in your SAP S/4HANA system. SAP Notes contain correction instructions that adjust or enhance existing functionality in your system. During implementation, the system checks your release and identifies any prerequisite notes that must be processed first. This provides the technical foundation for custom generative AI scenarios with ISLM and enables integration with SAP AI Core.
1. Log on to your SAP S/4HANA system and open transaction SNOTE (Note Assistant).
2. Choose Download SAP Note.

3. In the SAP Note Download dialog, choose Multiple Selection.

4. Enter the following SAP Notes [1] and choose Copy [2]:
💡 TIP: You can also copy all note numbers at once and paste them into the Multiple Selection dialog.

5. Choose Execute to download the SAP Notes.

6. The SAP Notes appear in the list. Depending on your SAP S/4HANA release, some SAP Notes might not be applicable.
ℹ️ NOTE: In this example, some are already included in the standard and are therefore marked as Cannot be implemented.

7. If a note is delivered as a TCI, choose Upload TCI and upload the corresponding file ( Note > Correction Instructions > Software Component Versions > Download ).

8. For each SAP Note, choose one of the following:
- Implement SAP Note, if applicable
- Set as Not Relevant, if not required for your system
9. Ensure that all relevant SAP Notes are successfully implemented and no errors occur.

10. Congratulations! You have successfully implemented the required SAP Notes and TCIs.
In this step, you activate and assign the required business role for Intelligent Scenario Lifecycle Management (ISLM) in your SAP S/4HANA system. You use the content activation task list to generate and activate the required business roles and SAP Fiori content. This enables access to the ISLM applications in the SAP Fiori launchpad.
1. Log on to your SAP S/4HANA system and open transaction STC01 (Task Manager for Technical Configuration).
2. In the Task List field, enter SAP_FIORI_CONTENT_ACTIVATION and choose Execute (F8).

3. Enable the task Enter list of SAP Business Roles to be activated (optional) [1], then choose Fill Parameters [2].

4. In the Define Business Roles dialog, enter SAP_BR_ANALYTICS_SPECIALIST and choose Continue.

5. Choose Execute (F8) to start the task list.

6. Wait until the task list has completed successfully.
💡 TIP: Instead of the SAP standard role, you can also create your own business role tailored to your requirements.

7. Open transaction SU01 (User Maintenance), enter your user [1], and choose Change [2].
ℹ️ NOTE: The user DEMO is shown as an example. Replace it with your own user.

8. Open the Roles tab and assign Z_BR_ANALYTICS_SPECIALIST to the user.

9. Choose Save.
10. Open the SAP Fiori launchpad (transaction: /n/UI2/FLP) and log on with your user.
11. In the Analytics space, navigate to the Intelligent Scenarios section. The ISLM applications are now available.

12. Congratulations! You have successfully activated and assigned the required business role.
In this step, you configure the bgRFC queue in your SAP S/4HANA system to enable asynchronous background processing. ISLM uses the bgRFC queue for operations such as activation and deployment of intelligent scenarios. It consists of a supervisor destination, an inbound destination, and a scheduler. Together, these components ensure reliable processing of asynchronous background tasks and the communication with SAP AI Core.
1. Log on to your SAP S/4HANA system and open transaction SBGRFCCONF (bgRFC Configuration).
2. Open the Define Supervisor Dest. [1] tab and choose Create [2].

3. In the Create RFC Destination for Supervisor dialog, enter BGRFC_SUPERVISOR as Destination Name, BGRFC_SUPER as User Name, and provide a password. Enable Create User if required.

4. Choose Save.
5. Open the Define Inbound Dest. [1] tab and choose Create [2].

6. In the Configure Inbound Destination screen, enter ISLM_QBGRFC_INBOUND_DEST as Inb. Dest. Name [1] and add ISLM_ as a Queue Prefix [2].

7. Choose Save.
8. Open the Scheduler: Destination [1] tab and choose Create [2].
The scheduler ensures that queued background tasks are processed automatically.

9. In the dialog, select Inbound to create a scheduler for inbound processing.

10. In the Create Scheduler Settings for Inbound Destination screen, select ISLM_QBGRFC_INBOUND_DEST and choose Save.

11. Choose Save again to finalize the scheduler configuration.
12. Congratulations! You have successfully configured the bgRFC queue for ISLM.
Test your understanding of the concepts covered in this tutorial. Select the correct answer and choose Check Answer.
Resources
Discussion
Share feedback on this tutorial or join the conversation in SAP Community.