
Overview
You will learn
- Create SAP AI Core and SAP AI Launchpad services and subscriptions in SAP BTP
- Connect SAP S/4HANA to SAP AI Core and configure a reusable connection


Prerequisites
- You have access to an SAP BTP global account with administrative permissions
- You have SAP AI Core (plan: extended) and SAP AI Launchpad (plan: standard) entitlements available
- You have a basic understanding of SAP BTP services and related concepts such as service instances and bindings
- You have completed the tutorial Configure Your SAP S/4HANA System for ISLM
Steps
In this tutorial, you connect your SAP S/4HANA system to SAP BTP and enable Intelligent Scenario Lifecycle Management (ISLM) to communicate with SAP AI Core. You provision the required SAP BTP services, configure OAuth 2.0 authentication, and establish the communication from SAP S/4HANA to SAP AI Core. This enables ISLM to execute custom generative AI scenarios using SAP AI Core.
For learning purposes, the required services are set up manually in this tutorial. You can also use the available boosters and only complete the additional steps described in this tutorial.
The diagram illustrates how ISLM is embedded in the overall architecture and how it connects to SAP AI Core. This tutorial focuses on the SAP S/4HANA and SAP BTP components highlighted in the diagram.

Further Information:
- Learn more about Intelligent Scenario Lifecycle Management (ISLM) on SAP Help Portal: Intelligent Scenario Lifecycle Management
- Explore additional resources in the SAP Community: Intelligent Scenario Lifecycle Management for SAP S/4HANA
In this step, you assign the required entitlements in your SAP BTP subaccount for SAP AI Core and SAP AI Launchpad.
1. Log on to your SAP BTP subaccount (or create a new one) and open Entitlements.

2. Choose Edit.

3. Choose Add Service Plans.

4. In the Add Service Plans dialog, select SAP AI Core [1] and enable the extended [2] service plan.

5. In addition, select SAP AI Launchpad [1] and enable the standard (Application) [2] service plan. Then choose Add 2 Service Plans.

6. Choose Save.

7. Congratulations! You have now successfully assigned the required entitlements.
In this step, you create an SAP AI Core service instance and binding. The binding provides the credentials required to connect your SAP S/4HANA system.
1. Log on to your SAP BTP subaccount and open Services > Instances and Subscriptions.

2. Choose Create.

3. In the New Instance or Subscription dialog, maintain the following values:
- Service:
SAP AI Core - Plan:
extended - Runtime Environment:
Other - Instance Name: Enter a name, for example
ai-core-islm

4. Choose Create.
5. After a few seconds, the service instance is created successfully.
6. For the created service instance, choose … > Create Service Binding.

7. In the New Binding dialog, enter a Instance Name, for example api-binding, and choose Create.

8. Open the created binding.

9. Choose Download to save the service binding credentials (JSON file).

10. Congratulations! You have successfully created the SAP AI Core service instance and binding.
In this step, you subscribe to SAP AI Launchpad and assign the required role collections to your user to access the application.
1. Log on to your SAP BTP subaccount and open Services > Instances and Subscriptions.

2. Choose Create.

3. In the New Instance or Subscription dialog, maintain the following values:
- Service:
SAP AI Launchpad - Plan:
standard

4. Choose Create.
5. After a few seconds, the application is subscribed successfully.

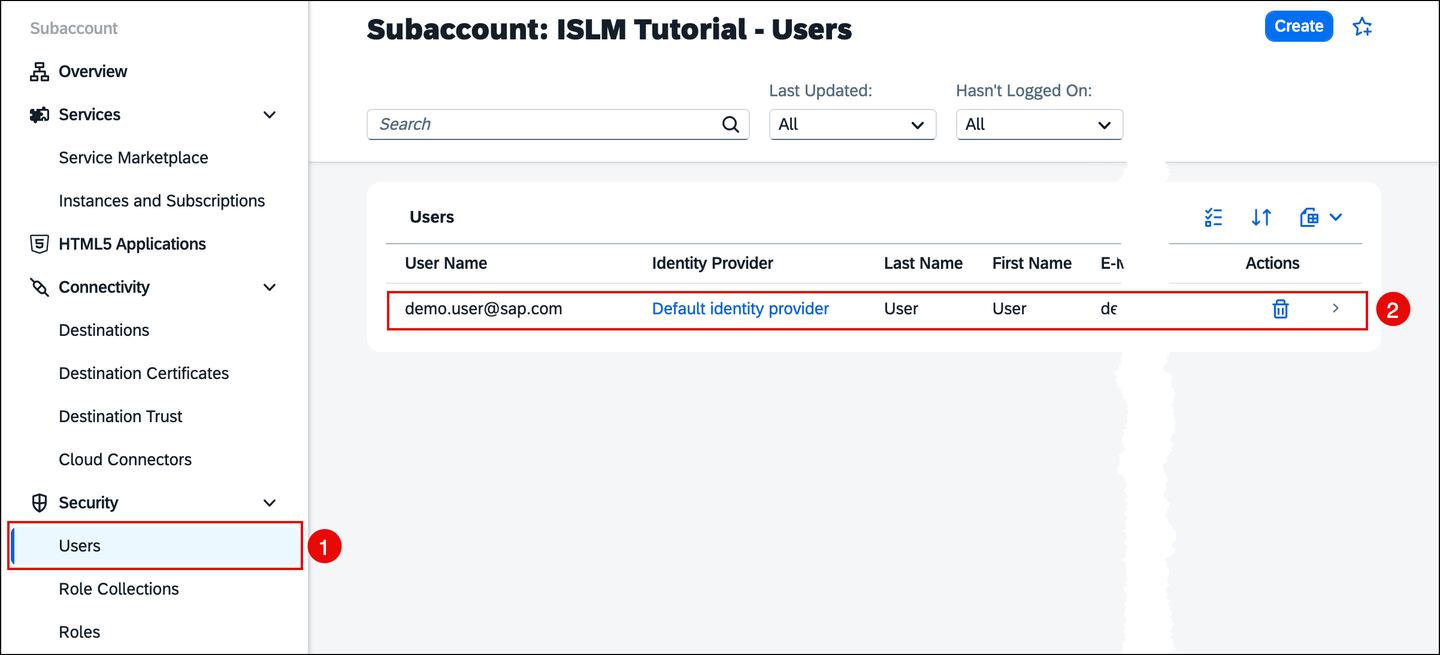
6. In the SAP BTP Cockpit, navigate to Security > Users [1] and open your user [2].
7. Choose Assign Role Collection.

8. In the Assign Role Collection dialog, select the following role collections and confirm:
ailaunchpad_aicore_admin_editorailaunchpad_allow_all_resourcegroupsailaunchpad_connections_editorailaunchpad_genai_managerailaunchpad_mloperations_editor

9. Congratulations! You have now successfully subscribed to SAP AI Launchpad and assigned the required role collections.
In this step, you verify that SAP AI Launchpad is correctly configured and connected to SAP AI Core. You create an AI API connection using the previously generated service binding and confirm that the setup is ready for use in ISLM scenarios.
1. Log on to your SAP BTP subaccount and open Services > Instances and Subscriptions.

2. Open SAP AI Launchpad from the list of subscriptions.

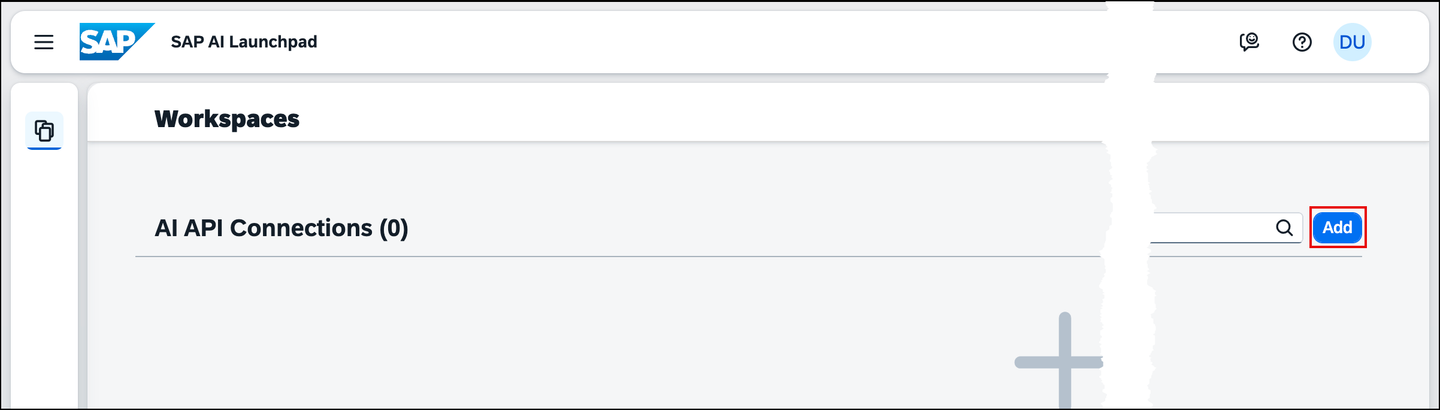
3. In SAP AI Launchpad, navigate to AI API Connections and choose Add.
4. In the Create AI API Connection dialog, maintain the following values and choose Create:
- Connection Name: Enter a name, for example
islm-tutorial - Service Key: Upload the service binding created previously, for example
api-binding.json

5. After a few seconds, the connection is created and displayed.
💡 TIP: If Document Grounding is not enabled, continue with the next optional chapter to enable it via API.

6. The AI API connection is automatically selected and ready to use.

7. Congratulations! You have now successfully verified SAP AI Launchpad access and confirmed that the integration is ready for your ISLM scenarios.
In this optional exercise, you enable Document Grounding for your SAP AI Core resource group using the API. This is only required if Document Grounding is not already enabled by default for your resource group.
1. Open Bruno (or Postman) and choose Create Collection.

2. Enter a Name, for example ISLM Tutorial, and choose Create.

3. In the new collection, choose … next to the collection name and select New Request.

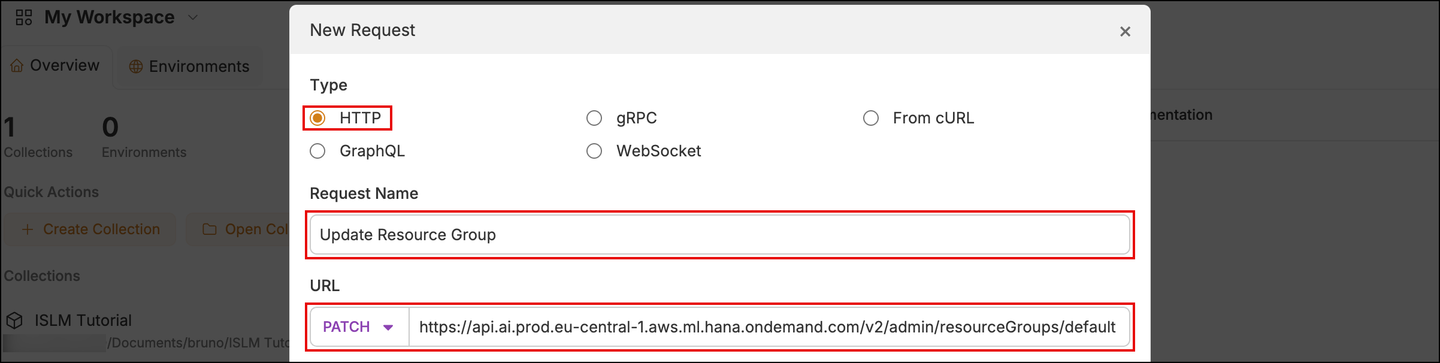
4. In the New Request dialog, maintain the following values [1] and choose Create [2]:
- Type:
HTTP - Name: Enter a name, for example
Update Resource Group - HTTP Method:
PATCH - URL: Use the
AI_API_URLfrom the service binding and append/v2/admin/resourceGroups/default
5. In the Request, open the Auth tab and select OAuth 2.0.

6. Maintain the following OAuth 2.0 values:
- Grant Type:
Client Credentials - Access Token URL: Use the
urlvalue from the service binding and append/oauth/token - Client ID: Enter the
clientidvalue from the service binding - Client Secret: Enter the
clientsecretvalue from the service binding

7. Choose Get Access Token [1]. After a few seconds, the token is retrieved [2] and displayed. Choose Save.
ℹ️ NOTE: The access token is used to authenticate when calling the SAP AI Core API.

8. Open the Body [1] tab and select JSON [2]. Enter the following JSON payload [3]:
	{
		"labels": [
    	{
      	"key": "ext.ai.sap.com/document-grounding",
        "value": "true"
      }
    ]
  }
9. Choose Execute.
10. Log on to your SAP BTP subaccount and open Services > Instances and Subscriptions.

11. Open SAP AI Launchpad from the list of subscriptions.

12. Document Grounding is now enabled for the default resource group.

13. Congratulations! You have successfully enabled Document Grounding for the default resource group.
In this step, you import the Root CA certificate of SAP AI Core into the trust store of your SAP S/4HANA system. This ensures that secure HTTPS communication with SAP AI Core can be established.
1. From the SAP AI Core service binding, copy the AI_API_URL.
2. Open the URL in a browser and display the certificate details.
3. In the Certificate Viewer, switch to the Details tab, select the root certificate [1], and choose Export [2].

4. Save the certificate locally.
5. Log on to your SAP S/4HANA system and open transaction STRUST (Trust Manager).
6. Choose Edit [1] and open the SSL client SSL Client (Standard) PSE [2].

7. In the Certificate section, choose Import certificate.

8. Select the certificate file and confirm the upload.
9. Choose Add to Certificate List.

10. Verify that the Root CA certificate appears in the certificate list.

11. Congratulations! You have successfully imported the Root CA Certificate into the trust store.
In this step, you create an OAuth 2.0 client in your SAP S/4HANA system. This client is used to authenticate requests from ISLM to SAP AI Core using the OAuth 2.0 client credentials flow.
1. Log on to your SAP S/4HANA system and open transaction OA2C_CONFIG (OAuth 2.0 Clients).
2. The OAuth 2.0 Clients application opens in a browser. Choose Create.
💡 TIP: If you receive a Forbidden error, activate the
oa2c_configservice in transaction SICF.

3. In the Create a new OAuth 2.0 client dialog, maintain the following values and choose OK:
- OAuth 2.0 Client Profile:
ISLM_SAPGENAI_OAUTH_PRF_HCP - Configuration Name: Enter a name, for example
ISLM_OAUTH - OAuth 2.0 Client ID: Enter the
clientidvalue from the service binding

4. After confirming, the OAuth 2.0 client is created and you are redirected to the details screen. Maintain the following values:
- Client Secret: Enter the
clientsecretvalue from the service binding - Token Endpoint: Use the
urlvalue from the service binding, remove the protocol, and append/oauth/token - Client Authentication:
Basic - Selected Grant Type:
Client Credentials - SSL Client PSE:
DEFAULT SSL Client (Standard)

5. Choose Save.
6. Congratulations! You have successfully created the OAuth 2.0 client for ISLM.
In this step, you create an HTTP destination in your SAP S/4HANA system to enable communication with SAP AI Core. This destination is used by ISLM to call the SAP AI Core API.
1. Log on to your SAP S/4HANA system and open transaction SM59 (Configuration of RFC Destinations).
2. Choose Create.

3. In the Create Destination dialog, maintain the following values [1] and choose Continue [2]:
- Destination: Enter a name, for example
ISLM_REUSE_CONNECTION - Connection Type:
GHTTP connection to external server

4. After confirming, you are redirected to the Technical Settings tab. Maintain the following values:
- Description 1: Enter a description, for example
Reuse Connection to SAP AI Core - Host: Enter the
AI_API_URLvalue from the service binding and remove the protocol - Post:
443 - Path Prefix:
/

5. Navigate to Logon & Security [1] and choose OAuth Settings [2].

6. In the OAUTH Settings dialog, select the OAuth client created in the previous step and choose Save.

7. In the Logon & Security tab, scroll down to the Security Options and maintain the following values:
- SSL:
Active - SSL Client PSE ID:
DFAULT SSL Client (Standard)

8. Choose Save.
9. Congratulations! You have successfully created the HTTP destination.
In this step, you assign the HTTP destination to the generative AI usage type in ISLM. This enables ISLM to use the configured connection when executing generative AI scenarios.
1. Log on to your SAP S/4HANA system and open transaction ISLM_REUSE_CFGV (Maintain Intelligent Scenario Usage).
2. Choose New Entries.

3. In the New Entries dialog, maintain the following values:
- Usage Type:
Stateless - Customer - Connection Information: Select the HTTP Destination created in the previous step, for example
ISLM_REUSE_CONNECTION - Resource Group:
default

4. Choose Save and return to the overview.
5. Select the new entry [1] and choose Check Connection [2] to verify the setup.

6. The connection is successfully established and shows status READY.

ℹ️ NOTE: You can now use ISLM to develop custom generative AI scenarios. It is recommended to continue with the next tutorial to enable mTLS-based authentication for communication with SAP AI Core.
7. Congratulations! You have successfully configured the usage type for the generative AI scenario.
Test your understanding of the concepts covered in this tutorial. Select the correct answer and choose Check Answer.
Resources
Discussion
Share feedback on this tutorial or join the conversation in SAP Community.