
Overview
You will learn
- Generate and manage client certificates in SAP BTP
- Enable certificate-based authentication and extend the SAP AI Core integration with mTLS
- Update the ISLM reuse connection in SAP S/4HANA to use mTLS


Prerequisites
- You have access to an SAP BTP subaccount with administrative permissions
- You have completed the tutorial Set Up SAP BTP and Integrate SAP AI Core with ISLM
Steps
In this tutorial, you enhance the authentication of Intelligent Scenario Lifecycle Management (ISLM) with mutual TLS (mTLS) for communication with SAP AI Core. You configure certificate-based authentication, create the required service bindings, and update the communication setup in SAP S/4HANA.
This tutorial demonstrates a generic approach. You can also use your own public key infrastructure (PKI) if your certificates are issued by a trusted certificate authority supported by SAP BTP.
The diagram illustrates how ISLM is embedded in the overall architecture and how it connects to SAP AI Core. This tutorial focuses on the SAP S/4HANA and SAP BTP components highlighted in the diagram.

Further Information:
- Learn more about Intelligent Scenario Lifecycle Management (ISLM) on SAP Help Portal: Intelligent Scenario Lifecycle Management
- Explore additional resources in the SAP Community: Intelligent Scenario Lifecycle Management for SAP S/4HANA
- Review supported certificate authorities for mTLS: Trusted Authorities for X.509 Certificates
In this step, you create a client certificate in SAP BTP to enable secure communication using mutual TLS (mTLS). This demonstrates a generic approach, but you can also use your own PKI if the certificate is issued by a supported certificate authority.
1. Log on to your SAP BTP subaccount and open Connectivity > Destination Certificates.

2. Choose Create.

3. In the Create Certificate dialog, maintain the following values:
- Generation Method:
External service - Name: Enter a name, for example
DEV - File Extension:
PEM - Common Name (CN): Use the same value as for the Name field, for example
DEV - Validity: Select a validity period, for example
1 year - Password: Enter a password for the certificate
- Automatic Renewal:
Enabled

4. Choose Create.
5. After a few seconds, the certificate is created and available for download.

6. Congratulations! You have successfully created the client certificate.
In this step, you create a Destination service instance in SAP BTP and generate a service binding to retrieve the credentials required for API access. Since the private key of the client certificate is not available for download in the SAP BTP cockpit, you use the Destination Service REST API to download the full certificate.
1. Log on to your SAP BTP subaccount and open Services > Instances and Subscriptions.

2. Choose Create.

3. In the New Instance or Subscription dialog, maintain the following values:
- Service:
Destination Service - Plan:
lite - Runtime Environment:
Other - Instance Name: Enter a name, for example
destination-instance

4. Choose Create.
5. After a few seconds, the service instance is created successfully.
6. Choose … > Create Service Binding.

7. In the New Binding dialog, enter an Binding Name, for example api-binding, and choose Create.

8. Open the created binding.

9. The credentials are displayed. Extract the values for clientid, clientsecret, url and uri.

10. Congratulations! You have successfully created the destination service instance and binding.
In this step, you use the Destination Service REST API to download the client certificate along with its private key, and prepare it for use in SAP S/4HANA.
1. Open Bruno (or Postman) and choose Create Collection.
💡 TIP: If you already created the collection in the previous tutorial, continue with step 3.

2. Enter a Name for the collection, for example ISLM Tutorial and choose Create.

3. In the new collection, choose … next to the collection name and select New Request.

4. In the New Request dialog, maintain the following values [1] and choose Create [2]:
- Type:
HTTP - Name: Enter a name, for example
Read Destination Certificate - HTTP Method:
GET - URL: Use the
urivalue from the service binding and append/destination-configuration/v1/subaccountCertificates/<cert>

5. In the Request, open the Auth tab and select OAuth 2.0.

6. Maintain the following OAuth 2.0 values:
- Grant Type:
Client Credentials - Access Token URL: Use the
urlvalue from the service binding and append/oauth/token - Client ID: Enter the
clientidvalue from the service binding - Client Secret: Enter the
clientsecretvalue from the service binding

7. Choose Get Access Token [1]. After a few seconds, the token is fetched [2] and displayed. Choose Save.
ℹ️ NOTE: The access token is used to authenticate when calling the SAP AI Core API.

8. Choose Execute to send the request.

9. After a few milliseconds, the response is returned and displayed in the Response section. Copy the value of the Content field and paste it into a local text file, for example client_certificate_base64.txt.

10. Decode the Base64 content and save it as a PEM file, for example client_certificate.pem. You can use the following command:
macOS (Terminal)
base64 -d -i client_certificate_base64.txt -o client_certificate.pemWindows (PowerShell)
$base64 = Get-Content client_certificate_base64.txt
$bytes  = [System.Convert]::FromBase64String($base64)
Set-Content client_certificate.pem -Value $bytes -Encoding Byte
11. Congratulations! You have successfully downloaded and prepared the client certificate for SAP S/4HANA.
In this step, you create a new SSL client identity, import the client certificate into your SAP S/4HANA system, and assign it to the corresponding SSL client configuration for secure communication.
1. Log on to your SAP S/4HANA system and open transaction STRUST (Trust Manager).
2. Choose Edit [1] and navigate to Environment > SSL Client Identities of System [2].

3. Choose Edit, then choose New Entries.

4. Enter an Identity, for example ISLM, and a Description, for example ISLM Tutorial. Choose Save.

5. When prompted, assign a transport request and choose Continue.
6. Return to the Trust Manager screen and choose PSE > Import.

7. Select the decoded certificate file (for example client_certificate.pem) and confirm the upload.
8. Enter the password defined during certificate creation and choose Continue.

9. After a few seconds, the certificate details are displayed. Choose Import.

10. Choose PSE > Save As.

11. In the Save PSE As dialog, select SSL Client and choose the newly created identity (for example ISLM). Confirm your selection.

12. Verify that the certificate is assigned to the selected SSL Client PSE. Then choose Save.

13. Congratulations! You have successfully imported and assigned the client certificate to SAP S/4HANA.
In this step, you export the public certificate from your SAP S/4HANA keystore to use it in the service binding configuration to enable mTLS.
1. Log on to your SAP S/4HANA system and open transaction STRUST (Trust Manager).
2. Double-click the SSL Client PSE [1], for example SSL client ISLM Tutorial. Then double-click the Subject [2] field to open the certificate details.

3. Choose Export certificate.

4. In the Export Certificate dialog, enter a file path, for example DEV.pem, select Base64 as the file format, and choose Save.

5. Congratulations! You have successfully exported the public certificate for mTLS.
In this step, you create an additional SAP AI Core service binding for mTLS. You use the public certificate to establish trust and enable certificate-based authentication in the binding parameters.
1. The public certificate extracted in the previous step must be converted into a single-line format before it can be used in the service binding configuration. Convert the certificate as follows:
macOS (Terminal)
tr -d '\r' < DEV.cer | sed 's/$/\\n/' | tr -d '\n'; echoWindows (PowerShell)
(Get-Content DEV.cer -Raw) -replace "`r?`n", "\n"2. Copy the resulting string. You will use it later in the binding payload.
3. Log on to your SAP BTP subaccount and open Services > Instances and Subscriptions.
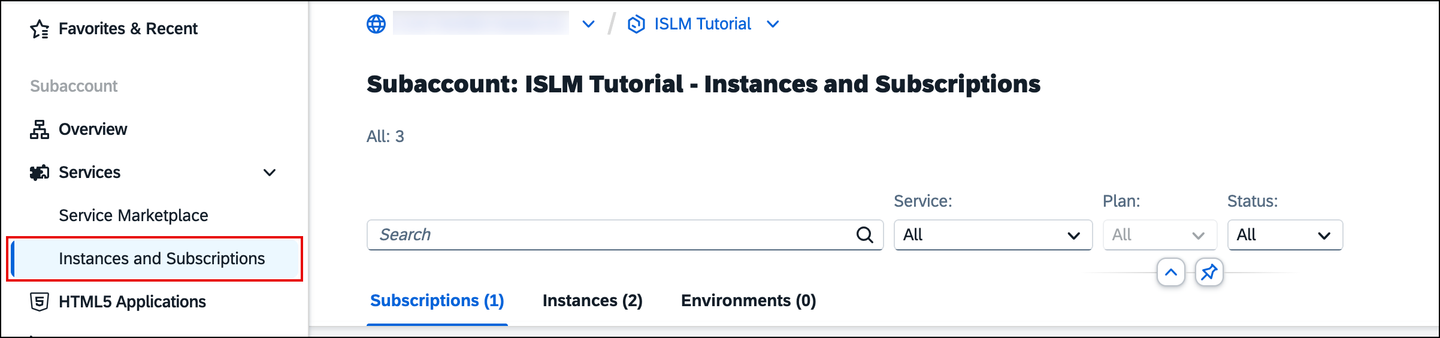
4. For your existing SAP AI Core service instance, choose … > Create Service Binding.

5. In the New Binding dialog, enter an Instance Name, for example api-binding-mtls.
6. Specify the following JSON in the Configure Binding Parameters section. Replace <paste your converted public certificate here> with the converted certificate string from step 1:
{
  "xsuaa": {
  	"credential-type": "x509",
    "x509": {
      "certificate": "<paste your converted public certificate here>",
      "ensure-uniqueness": false,
      "certificate-pinning": false,
      "hide-certificate": true
    }
  }
}
7. Choose Create.
8. Open the created binding.

9. Choose Download to store the service binding credentials.

10. Congratulations! You have successfully created the SAP AI Core service binding for mTLS.
In this step, you import the Root CA certificate into your SAP S/4HANA trust store to establish trust with the SAP BTP endpoint used for mTLS authentication and token requests.
1. Open the DigiCert URL in a browser and download the Root CA certificate.
2. Log on to your SAP S/4HANA system and open transaction STRUST (Trust Manager).
3. Choose Edit [1] and open the SSL Client PSE [2], for example SSL client ISLM Tutorial.

4. Scroll down to the Certificate section and choose Import certificate.

5. Select the certificate file and confirm the upload.
6. Choose Add to Certificate List.

7. Verify that the Root CA certificate appears in the certificate list.

8. Congratulations! You have successfully imported the Root CA Certificate into the trust store.
In this step, you create an OAuth 2.0 client configured for mTLS authentication to securely obtain tokens from SAP AI Core.
1. Log on to your SAP S/4HANA system and open transaction OA2C_CONFIG (OAuth 2.0 Clients).
2. The OAuth 2.0 Clients application opens in a browser. Choose Create.
💡 TIP: If you receive a Forbidden error, activate the oa2c_config service in transaction SICF.

3. In the Create a new OAuth 2.0 client dialog, maintain the following values and choose OK:
- OAuth 2.0 Client Profile:
ISLM_SAPGENAI_OAUTH_PRF_HCP - Configuration Name: Enter a name, for example
ISLM_OAUTH_MTLS - OAuth 2.0 Client ID: Enter the
clientidvalue from the service binding

4. After confirming, the OAuth 2.0 client is created and you are redirected to the details screen. Maintain the following values:
- Token Endpoint: Use the
urlvalue from the service binding, remove the protocol, and append/oauth/token - Client Authentication:
Client Certificate - Selected Grant Type:
Client Credentials - SSL Client PSE: Select the SSL Client PSE, for example
ISLM ISLM Tutorial - mTLS Token Endpoint Alias: Use the
certurlvalue from the service binding, remove the protocol, and append/oauth/token

5. Choose Save.
ℹ️ NOTE: The selected SSL Client PSE is used for mTLS authentication. It provides the client certificate for authentication and contains the trusted CA certificate required to establish trust with the certificate endpoint (
certurl).
6. Congratulations! You have successfully created the OAuth 2.0 client for ISLM.
In this step, you update the existing HTTP destination in your SAP S/4HANA system to use the OAuth client configured for mTLS authentication. This ensures that communication with SAP AI Core is secured using certificate-based authentication.
1. Log on to your SAP S/4HANA system and open transaction SM59 (Configuration of RFC Destinations).
2. Open your existing destination from the list, for example ISLM_REUSE_CONNECTION.

3. Choose Edit [1].
4. Navigate to Logon & Security [2] and choose OAuth Settings [3].
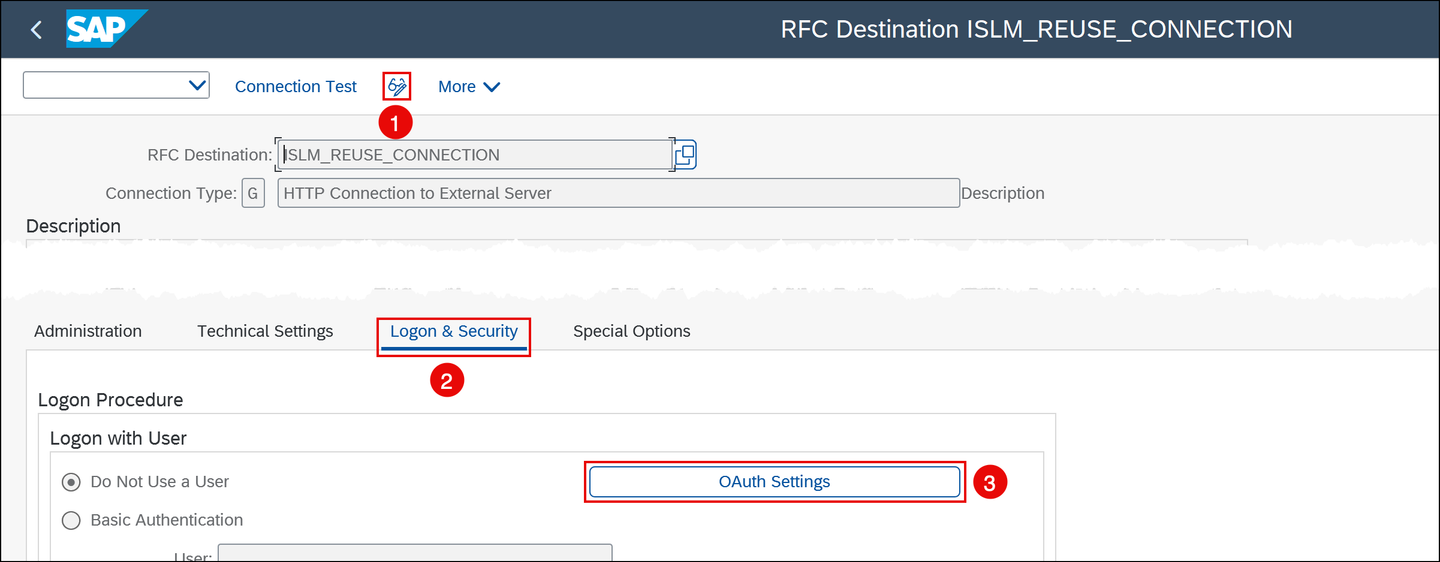
5. In the OAUTH Settings dialog, select the OAuth client created in the previous step, for example ISLM_OAUTH_MTLS and choose Save.

6. Choose Save again.
ℹ️ NOTE: The SSL Client PSE remains unchanged, as it already stores the certificate required to establish trust with the SAP AI Core endpoint.
7. Congratulations! You have successfully updated the HTTP destination to use the mTLS-enabled OAuth client.
In this step, you test the assigned HTTP destination for the generative AI usage type in ISLM. This verifies that the configured mTLS-based connection is working correctly when used in ISLM.
1. Log on to your SAP S/4HANA system and open transaction ISLM_REUSE_CFGV (Maintain Intelligent Scenario Usage).
2. Select your existing entry [1] from the list and choose Check Connection [2] to verify the setup.

3. The connection is successfully established and shows status READY. Verify that the updated OAuth Config, for example ISLM_OAUTH_MTLS is used.

4. Congratulations! You have successfully updated and verified the usage type for the generative AI scenario with mTLS.
Test your understanding of the concepts covered in this tutorial. Select the correct answer and choose Check Answer.
Resources
Discussion
Share feedback on this tutorial or join the conversation in SAP Community.